buzzard
In a nutshell, the buzzard library provides powerful abstractions to manipulate together images and geometries that come from different kind of sources (GeoTIFF, PNG, GeoJSON, Shapefile, numpy array, buzzard pipelines, ...).
buzzard is
- A python library.
- Primarily designed to hide all cumbersome operations when doing data-science with GIS files.
- A multipurpose computer vision library, it can be used in all kind of situations where images or geometries are involved.
- A pythonic wrapper for osgeo's gdal/ogr/osr.
- A solution to work with arbitrary large images by simplifying and automating the manipulation of image slices.
buzzard contains
- A
Datasetclass that oversees a set of opened raster and vector files. - An immutable toolbox class, the
Footprint, designed to locate a rectangle in both an image space and a geometry space.
How to open and read files
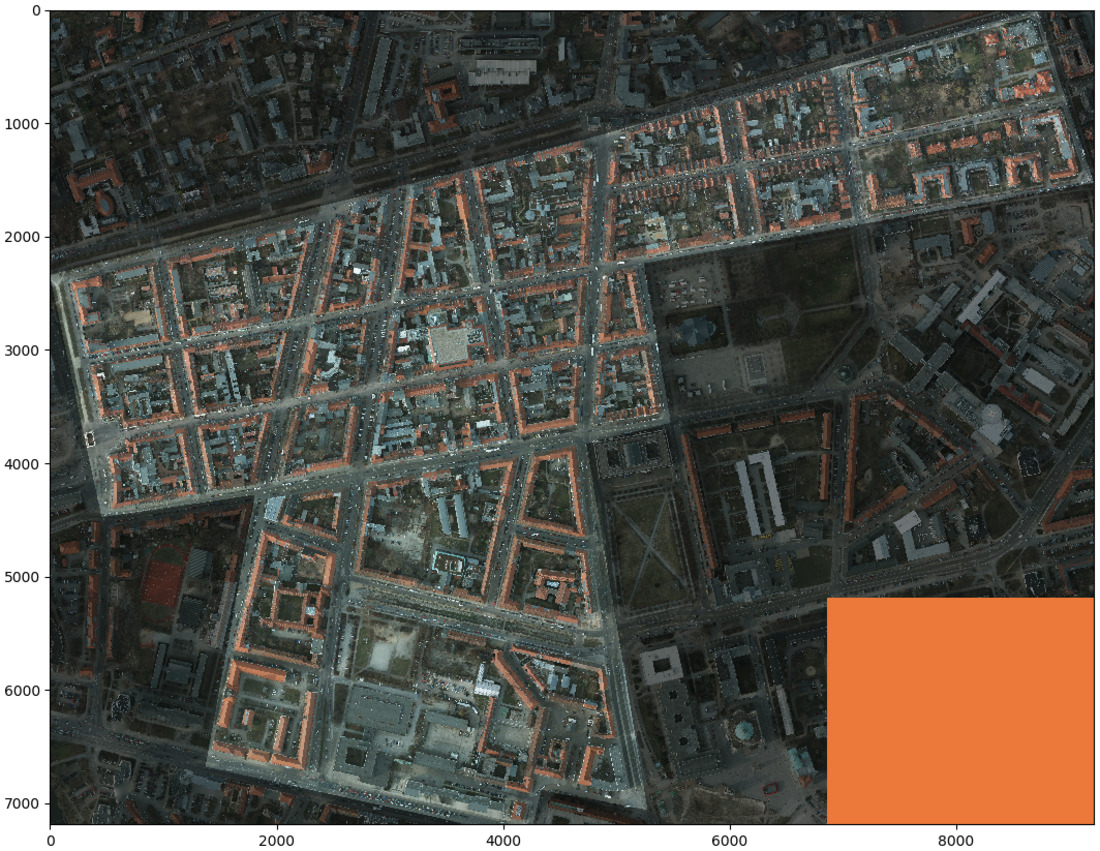
This example demonstrates how to visualize a large raster polygon per polygon.
import buzzard as buzz
import numpy as np
import matplotlib.pyplot as plt

# Open the files. Only metadata are kept in memory
r = buzz.open_raster('path/to/rgba-image.tif')
v = buzz.open_vector('path/to/polygons.geojson', driver='GeoJSON')


# Load the polygons from disk one by one as shapely objects
for poly in v.iter_data():

    # Compute the Footprint bounding `poly`
    fp = r.fp.intersection(poly)
    print(fp)

    # Load the image from disk at `fp` to a numpy array
    rgb = r.get_data(fp=fp, channels=(0, 1, 2))
    alpha = r.get_data(fp=fp, channels=3)

    # Create a boolean mask as a numpy array from the shapely polygon
    mask = np.invert(fp.burn_polygons(poly))

    # Darken pixels outside of polygon and set transparent pixels to orange
    rgb[mask] = (rgb[mask] * 0.5).astype(np.uint8)
    rgb[alpha == 0] = [236, 120, 57]

    # Show the result with matplotlib
    plt.imshow(rgb)
    plt.show()
Images from the ISPRS's Potsdam dataset.
Footprint(tl=(3183.600000, -914.550000), br=(3689.700000, -1170.450000), size=(506.100000, 255.900000), rsize=(3374, 1706))
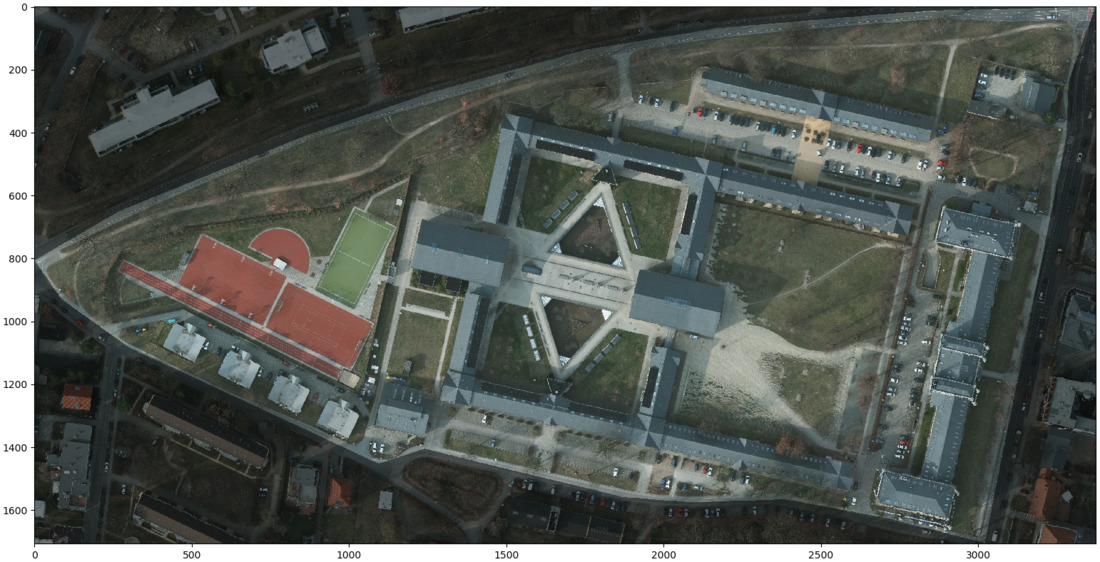
Footprint(tl=(3171.600000, -1321.500000), br=(4553.400000, -2400.000000), size=(1381.800000, 1078.500000), rsize=(9212, 7190))
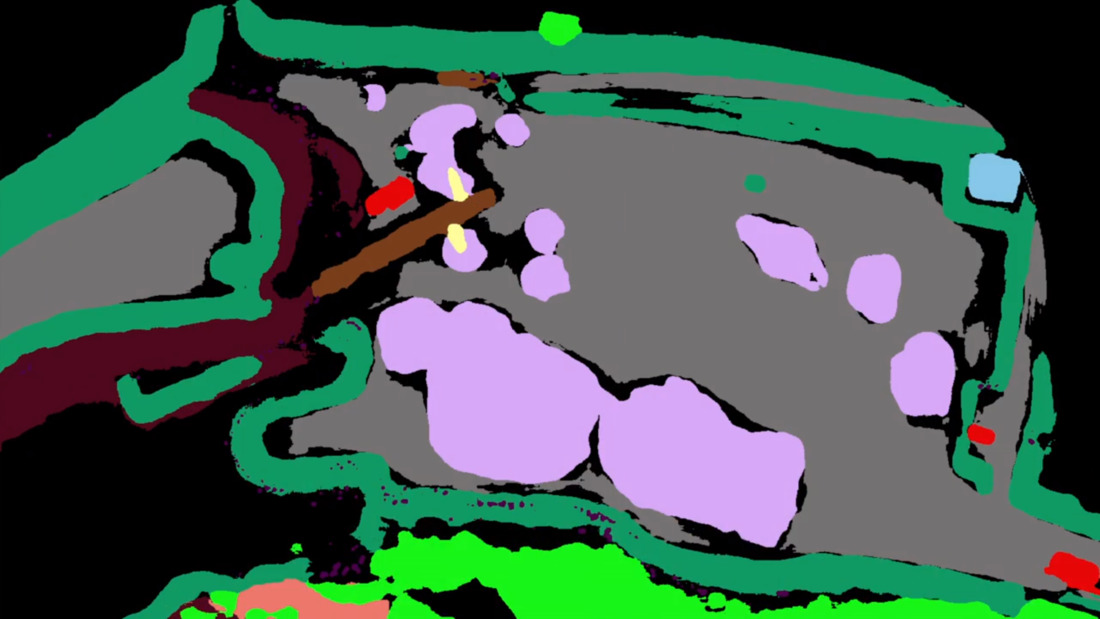
How to create files and manipulate Footprints
import buzzard as buzz
import numpy as np
import matplotlib.pyplot as plt
import keras

r = buzz.open_raster('path/to/rgba-image.tif')
km = keras.models.load_model('path/to/deep-learning-model.hdf5')

# Chunk the raster's Footprint to Footprints of size
# 1920 x 1080 pixels stored in a 2d numpy array
tiles = r.fp.tile((1920, 1080))

all_roads = []

# Perform an inference for each tile
for i, fp in enumerate(tiles.flat):
    rgb = r.get_data(fp=fp, channels=(0, 1, 2))

    # Perform pixelwise semantic segmentation with a keras model
    predictions_heatmap = km.predict(rgb[np.newaxis, ...])[0]
    predictions_top1 = np.argmax(predictions_heatmap, axis=-1)

    # Save the prediction to a `geotiff`
    path = f'predictions_{i}.tif'
    with buzz.create_raster(path=path, fp=fp, dtype='uint8', channel_count=1).close as out:
        out.set_data(predictions_top1)

    # Extract the road polygons by transforming a numpy boolean mask to shapely polygons
    road_polygons = fp.find_polygons(predictions_top1 == 3)
    all_roads += road_polygons

    # Show the result with matplotlib for one tile
    if i == 2:
        plt.imshow(rgb)
        plt.imshow(predictions_top1)
        plt.show()

# Save all roads found to a single `shapefile`
with buzz.create_vector(path='roads.shp', type='polygon').close as out:
    for poly in all_roads:
        out.insert_data(poly)
Advanced examples
Additional examples can be found here:
buzzard allows
- Opening and creating raster and vector files. Supports all GDAL drivers (GTiff, PNG, ...) and all OGR drivers (GeoJSON, DXF, Shapefile, ...).
- Reading raster files pixels from disk to numpy.ndarray.
- Options:
sub-rectangle reading,rotated and scaled sub-rectangle reading (thanks to on-the-fly remapping with OpenCV),automatic parallelization of read and remapping (soon),async (soon),be the source of an image processing pipeline (soon). - Properties:
thread-safe parallel reads.
- Options:
- Writing raster files pixels to disk from numpy.ndarray.
- Options:
sub-rectangle writing,rotated and scaled sub-rectangle writing (thanks to on-the-fly remapping with OpenCV),masked writing (slow).
- Options:
- Reading vector files geometries from disk to shapely objects, geojson dict and raw coordinates.
- Options:
masking. - Properties:
thread-safe parallel reads.
- Options:
- Writing vector files geometries to disk from shapely objects, geojson dict and raw coordinates.
- Powerful manipulations of raster windows
- Instantiation of image processing pipelines where each node is a raster, and each edge is a user defined python function transforming numpy.ndarray objects (beta, partially implemented).
- Options:
automatic parallelization using user defined thread or process pools,disk caching. - Properties:
lazy evaluation,deterministic,automatic tasks chunking into tiles,fine grain task prioritization,backpressure prevention.
- Options:
- Spatial reference homogenization between opened files like a GIS software does (beta)
Documentation
https://buzzard.readthedocs.io/
Dependencies
The following table lists dependencies along with the minimum version, their status for the project and the related license.
| Library | Version | Mandatory | License | Comment |
|---|---|---|---|---|
| gdal | >=2.3.3 | Yes | MIT/X | Hard to install. Will be included in buzzard wheels |
| opencv-python | >=3.1.0 | Yes | 3-clause BSD | Easy to install with opencv-python wheels. Will be optional |
| shapely | >=1.6.1 | Yes | 3-clause BSD | |
| affine | >=2.0.0 | Yes | 3-clause BSD | |
| numpy | >=1.15.0 | Yes | numpy | |
| scipy | >=0.19.1 | Yes | scipy | |
| pint | >=0.8.1 | Yes | 3-clause BSD | |
| six | >=1.11.0 | Yes | MIT | |
| sortedcontainers | >=1.5.9 | Yes | apache | |
| Rtree | >=0.8.3 | Yes | MIT | |
| scikit-image | >=0.14.0 | Yes | scikit-image | |
| chainmap | >=1.0.2 | Yes | Python 2.7 license | Only for python <3.2 |
| pytest | >=3.2.2 | No | MIT | Only for tests |
| attrdict | >=2.0.0 | No | MIT | Only for tests |
How to install from terminal
Anaconda and pip
# Step 1 - Install Anaconda
# https://www.anaconda.com/download/

# Step 2 - Create env
conda create -n buzz python gdal>=2.3.3 shapely rtree -c 'conda-forge'

# Step 3 - Activate env
conda activate buzz

# Step 4 - Install buzzard
pip install buzzard
Docker
docker build -t buzz --build-arg PYTHON_VERSION=3.7 https://raw.githubusercontent.com/earthcube-lab/buzzard/master/.circleci/images/base-python/Dockerfile
docker run -it --rm buzz bash
pip install buzzard
Package manager and pip
# Step 1 - Install GDAL and rtree ******************************************* **
# Windows
# https://www.lfd.uci.edu/~gohlke/pythonlibs/#gdal
# https://www.lfd.uci.edu/~gohlke/pythonlibs/#rtree

# MacOS
brew install gdal
brew tap osgeo/osgeo4mac
brew tap --repair
brew install gdal2
brew install spatialindex
export PATH="/usr/local/opt/gdal2/bin:$PATH"
python3 -m pip install 'gdal==2.3.3'

# Ubuntu
# Run the commands from the following Dockerfile:
# https://github.com/earthcube-lab/buzzard/blob/master/doc/ubuntu_install/Dockerfile

# Step 2 - Install buzzard ************************************************** **
python3 -m pip install buzzard
Supported Python versions
To enjoy the latest buzzard features, update your python!
Full python support
- Latest tested version:
3.8(June 2018) - Oldest tested version:
3.6(Sept 2015)
Partial python support
- For python
2.7: use buzzard version0.4.4 - For python
3.4: use buzzard version0.6.3 - For python
3.5: use buzzard version0.6.4


