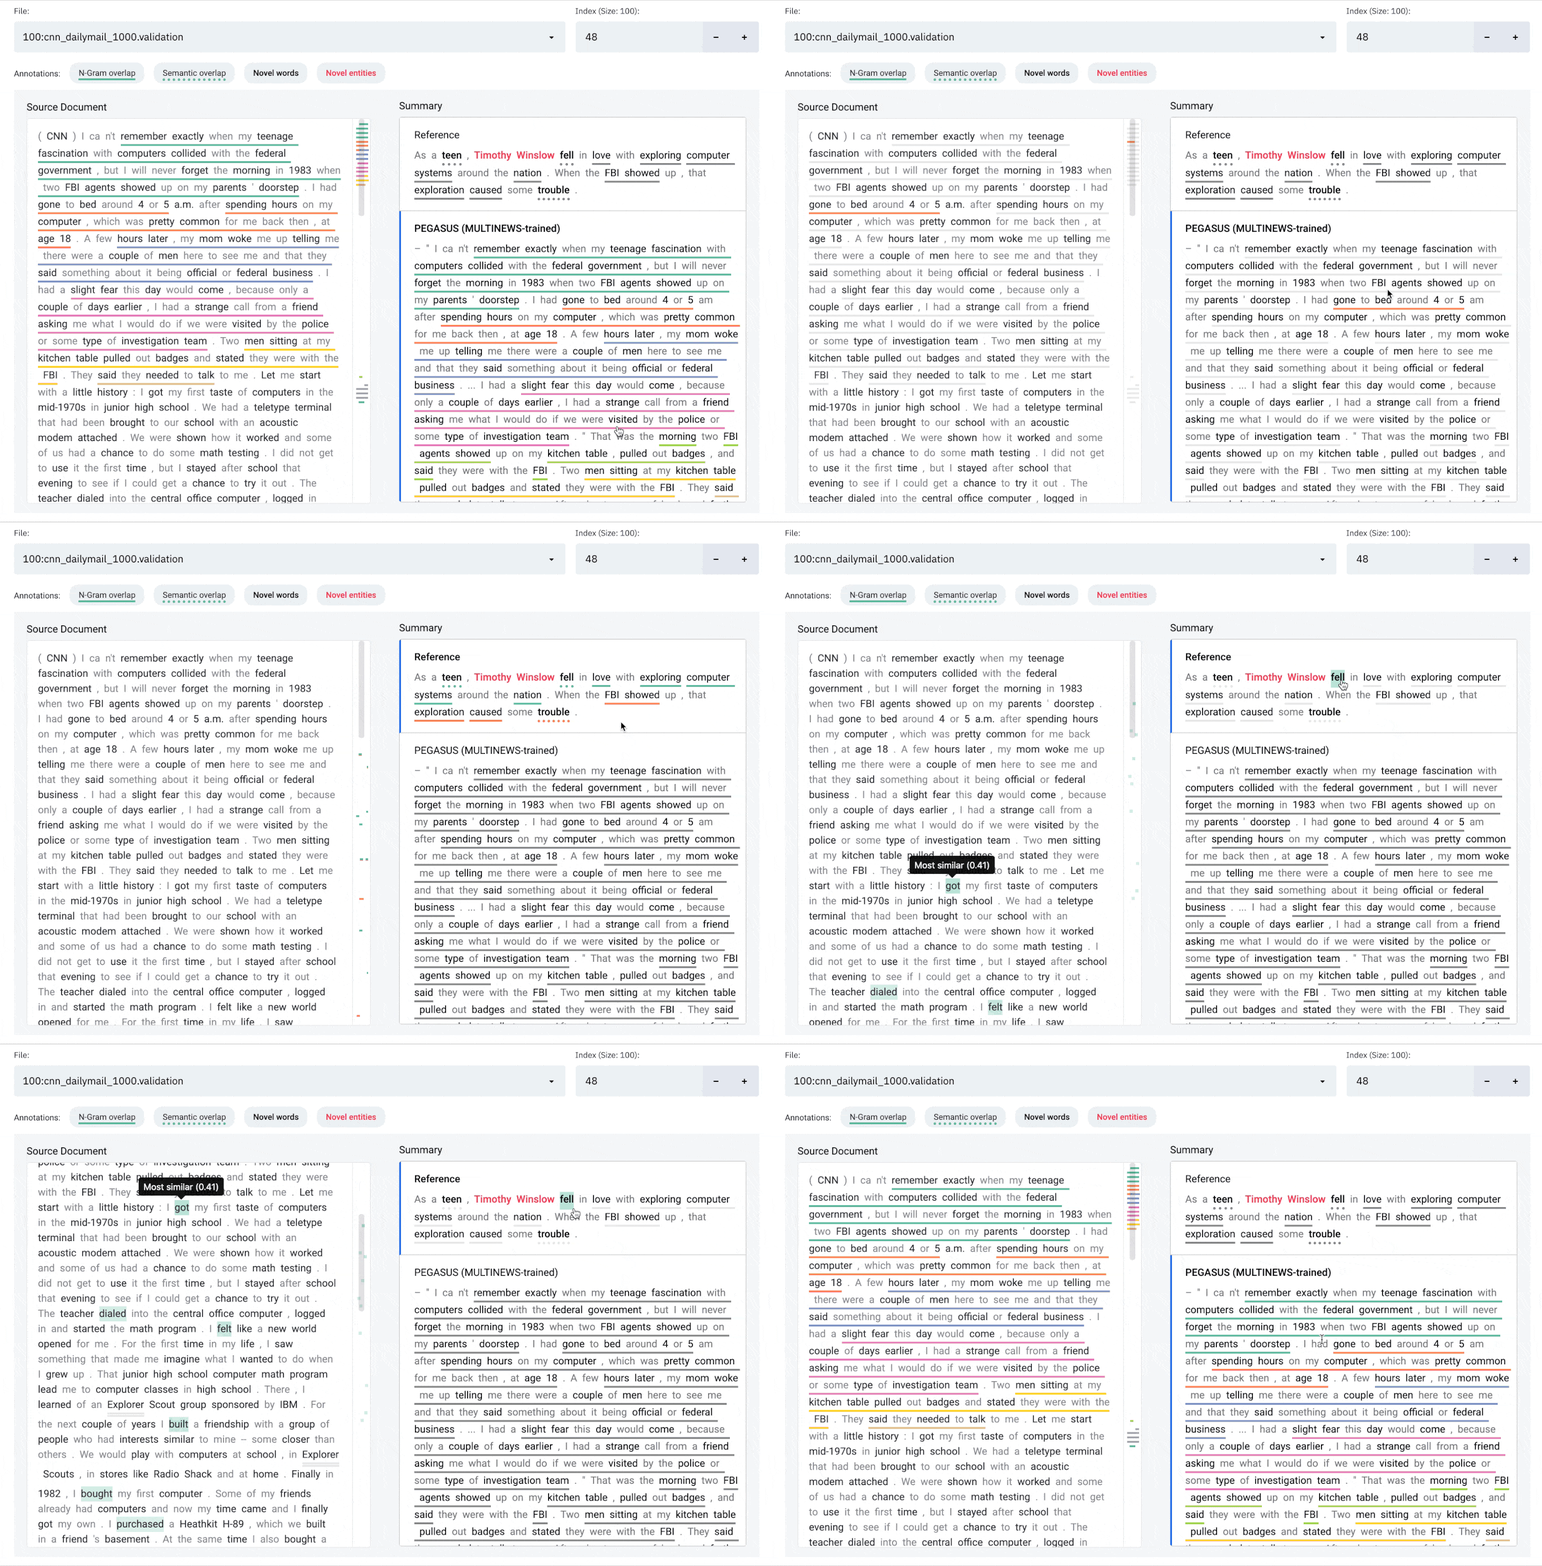
SummVis
SummVis is an open-source visualization tool that supports fine-grained analysis of summarization models, data, and evaluation metrics. Through its lexical and semantic visualizations, SummVis enables in-depth exploration across important dimensions such as factual consistency and abstractiveness.
Authors: Jesse Vig1, Wojciech Kryściński1, Karan Goel2, Nazneen Fatema Rajani1

Note: SummVis is under active development, so expect continued updates in the coming weeks and months.
Feel free to raise issues for questions, suggestions, requests or bug reports.
User guide
Overview
SummVis is a tool for analyzing abstractive summarization systems. It provides fine-grained insights on summarization
models, data, and evaluation metrics by visualizing the relationships between source documents, reference summaries,
and generated summaries, as illustrated in the figure below.

Interface
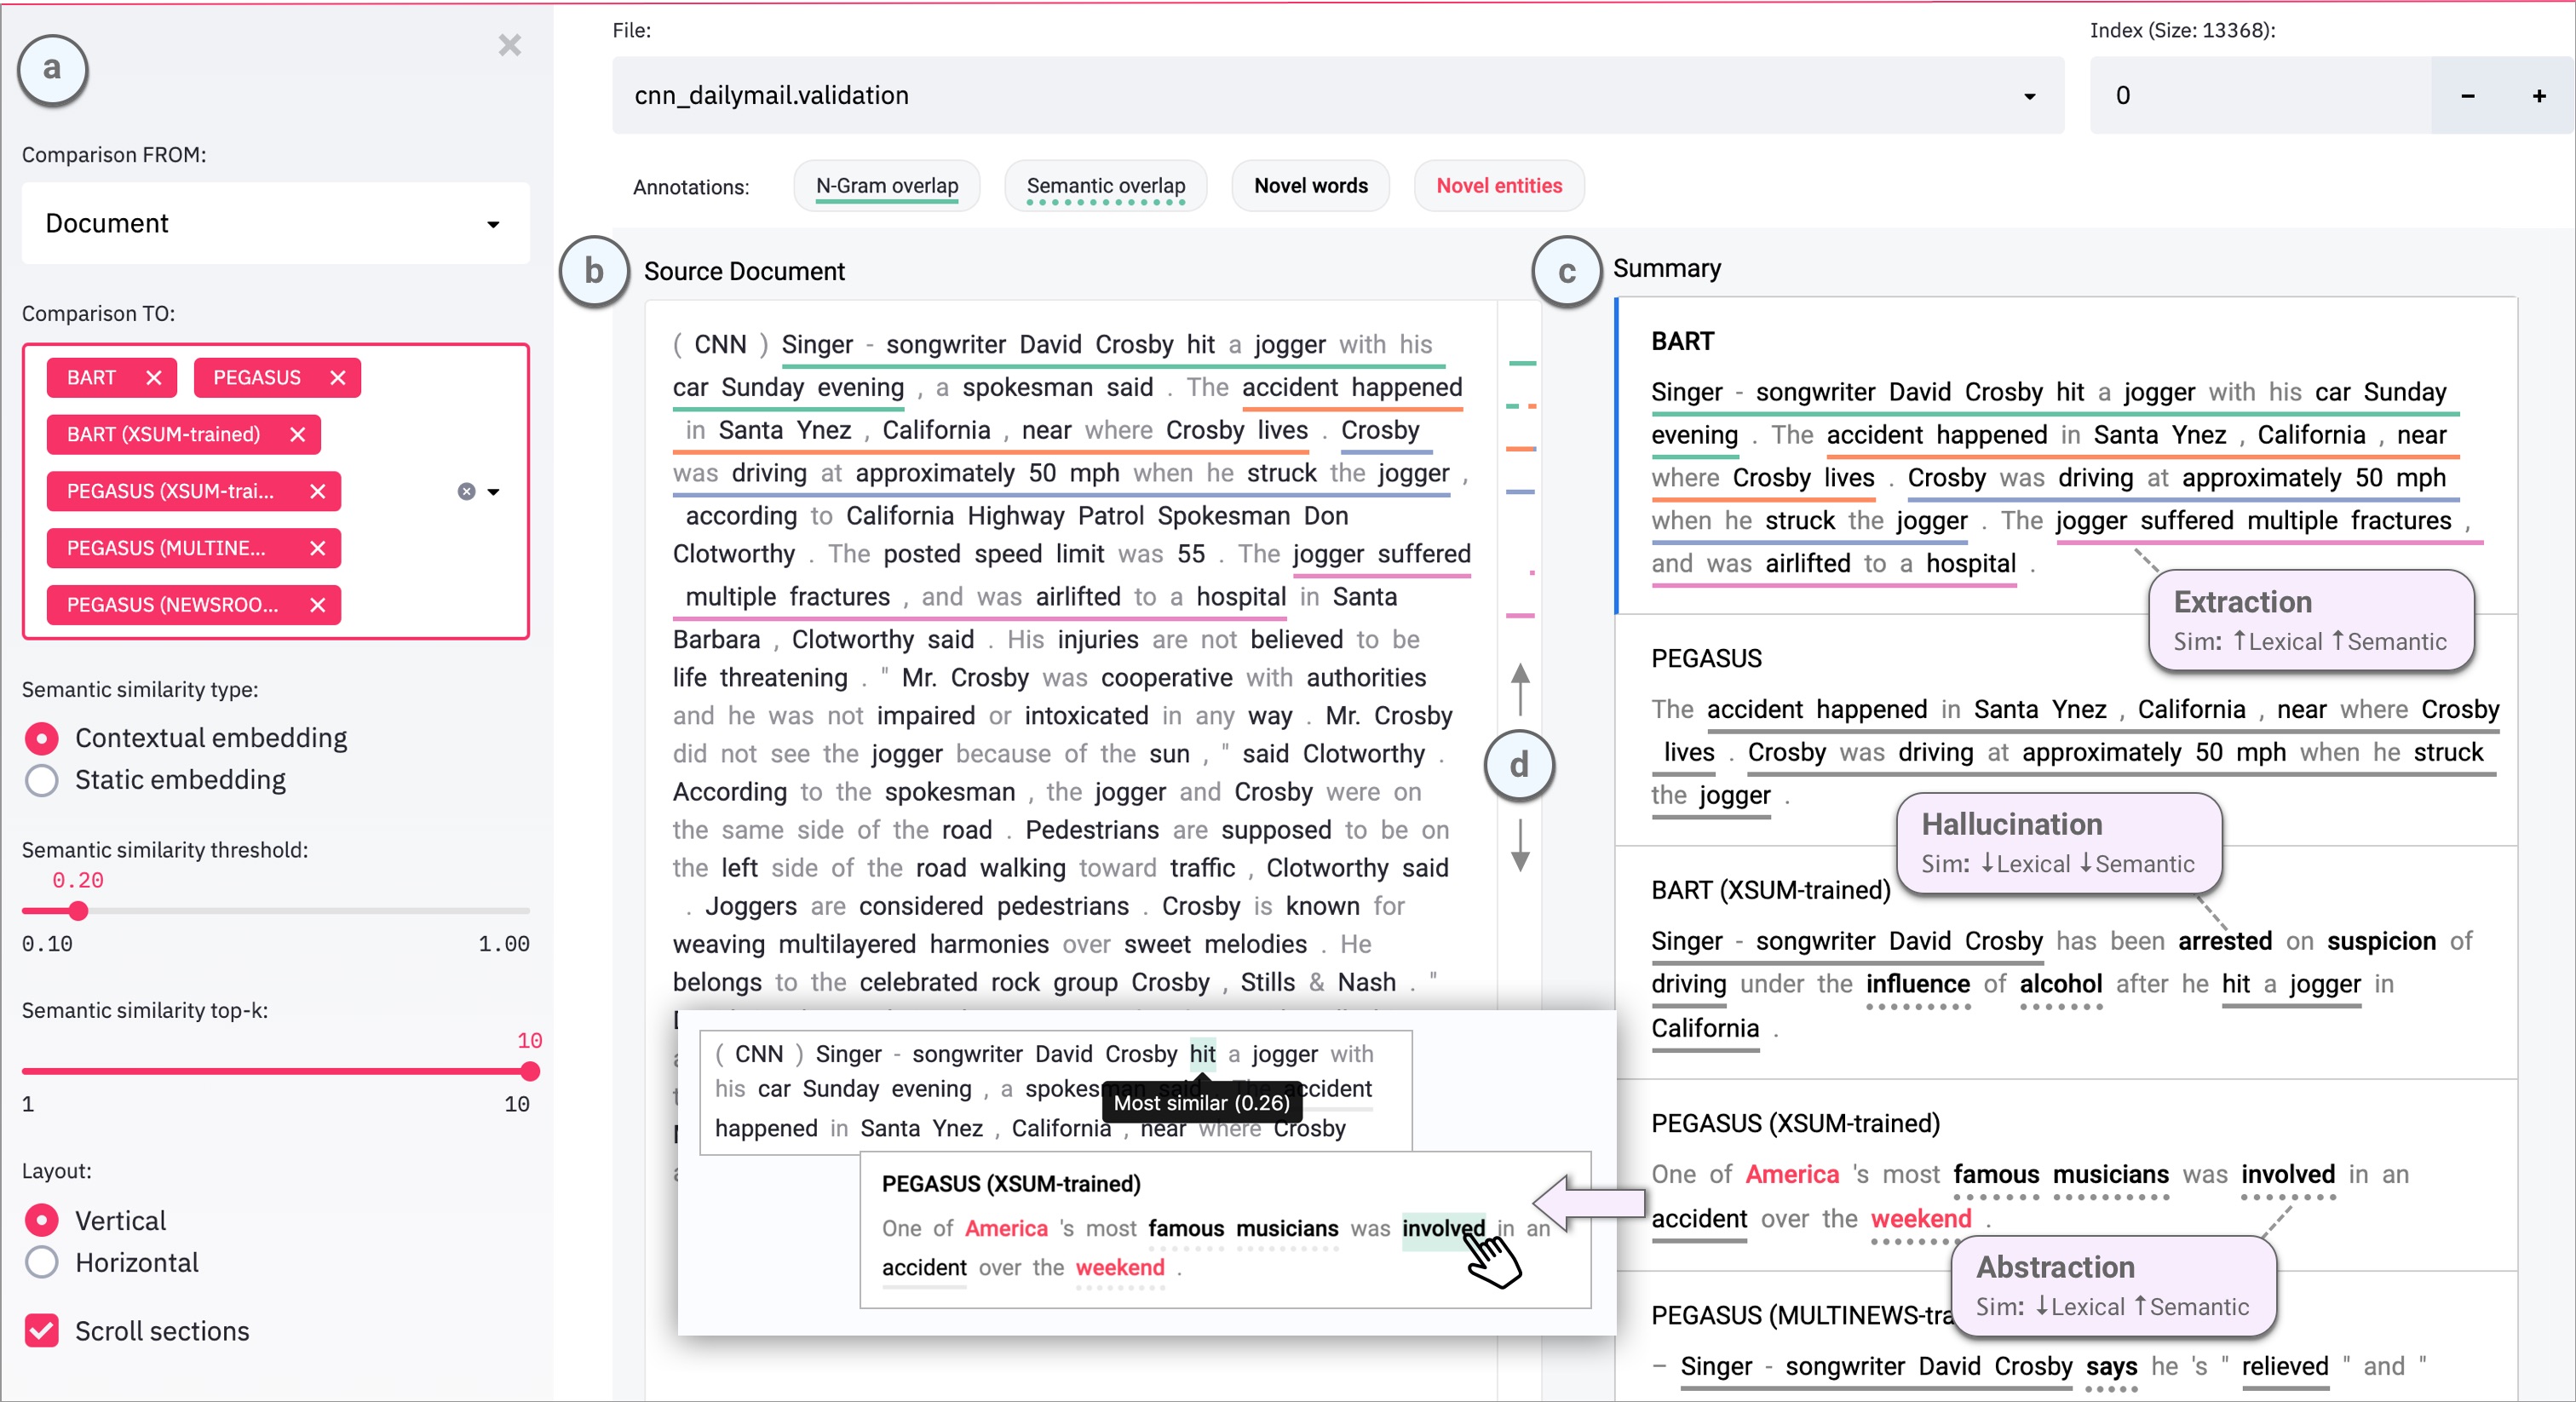
The SummVis interface is shown below. The example displayed is the first record from the
CNN / Daily Mail validation set.

Components
(a) Configuration panel
(b) Source document (or reference summary, depending on configuration)
(c) Generated summaries (and/or reference summary, depending on configuration)
(d) Scroll bar with global view of annotations
Annotations

N-gram overlap: Word sequences that overlap between the document on the left and
the selected summary on the right. Underlines are color-coded by index of summary sentence.
Semantic overlap: Words in the summary that are semantically close to one or more words in document on the left.
Novel words: Words in the summary that do not appear in the document on the left.
Novel entities: Entity words in the summary that do not appear in the document on the left.
Limitations
Currently only English text is supported.
Installation
Option 1: Conda (recommended)
The following will create a conda environment named summvis
git clone https://github.com/robustness-gym/summvis.git
cd summvis
conda env create -f environment.yml
conda activate summvis # OR "source activate summvis" on older conda versions
python -m spacy download en_core_web_sm
Installation takes around 2 minutes on a Macbook Pro.
Option 2: Pip
IMPORTANT: Please use python>=3.8 since some dependencies require that for installation.
# Requires python>=3.8
git clone https://github.com/robustness-gym/summvis.git
cd summvis
pip install -r requirements.txt
python -m spacy download en_core_web_sm
Quickstart
Start using SummVis immediately on a small sample from the CNN / Daily Mail validation set.
1. Activate conda environment (if installed using conda)
conda activate summvis # OR "source activate summvis" on older conda versions
2. Cache the data
This may take a few minutes if you haven't previously loaded CNN / DailyMail from
the Datasets library.
sh quickstart.sh
This will create the file data/cnn_dailymail_10.validation, which contains the first 10 pre-cached examples from the CNN / Daily Mail validation set. For more details on the loading process, see Running with pre-loaded datasets.
3. Start the tool
streamlit run summvis.py
The tool will automatically load the dataset created in the previous step. If you have other files in the data directory, you
will need to select the appropriate file from the dropdown in the upper-right corner of the interface.
Running with pre-loaded datasets
1. Download one of the pre-loaded datasets:
Download our pre-cached dataset that contains predictions for state-of-the-art models such as PEGASUS and BART on
CNN / Daily Mail and XSum validation sets.
CNN / Daily Mail (1000 examples from validation set): https://storage.googleapis.com/sfr-summvis-data-research/cnn_dailymail_1000.validation.anonymized.zip
CNN / Daily Mail (full validation set): https://storage.googleapis.com/sfr-summvis-data-research/cnn_dailymail.validation.anonymized.zip
XSum (1000 examples from validation set): https://storage.googleapis.com/sfr-summvis-data-research/xsum_1000.validation.anonymized.zip
XSum (full validation set): https://storage.googleapis.com/sfr-summvis-data-research/xsum.validation.anonymized.zip
We recommend that you choose the smallest dataset that fits your need in order to minimize download / preprocessing time.
Example: Download and unzip CNN / Daily Mail
mkdir data
mkdir preprocessing
curl https://storage.googleapis.com/sfr-summvis-data-research/cnn_dailymail_1000.validation.anonymized.zip --output preprocessing/cnn_dailymail_1000.validation.anonymized.zip
unzip preprocessing/cnn_dailymail_1000.validation.anonymized.zip -d preprocessing/
Example: Download and unzip XSum
mkdir data
mkdir preprocessing
curl https://storage.googleapis.com/sfr-summvis-data-research/xsum_1000.validation.anonymized.zip --output preprocessing/xsum_1000.validation.anonymized.zip
unzip preprocessing/xsum_1000.validation.anonymized.zip -d preprocessing/
2. Deanonymize n examples:
Next, we'll need to add the original examples from the CNN / Daily Mail or XSum datasets to deanonymize the data (this information
is omitted for copyright reasons). The preprocessing.py script can be used for this with the --deanonymize flag.
Set the --n_samples argument and name the --processed_dataset_path output file accordingly.
Example: Deanonymize 100 examples from CNN / Daily Mail:
python preprocessing.py \
--deanonymize \
--dataset_rg preprocessing/cnn_dailymail_1000.validation.anonymized \
--dataset cnn_dailymail \
--version 3.0.0 \
--split validation \
--processed_dataset_path data/100:cnn_dailymail_1000.validation \
--n_samples 100
Example: Deanonymize all pre-loaded examples from CNN / Daily Mail (1000 examples dataset):
python preprocessing.py \
--deanonymize \
--dataset_rg preprocessing/cnn_dailymail_1000.validation.anonymized \
--dataset cnn_dailymail \
--version 3.0.0 \
--split validation \
--processed_dataset_path data/full:cnn_dailymail_1000.validation \
--n_samples 1000
Example: Deanonymize all pre-loaded examples from CNN / Daily Mail (full dataset):
python preprocessing.py \
--deanonymize \
--dataset_rg preprocessing/cnn_dailymail.validation.anonymized \
--dataset cnn_dailymail \
--version 3.0.0 \
--split validation \
--processed_dataset_path data/full:cnn_dailymail.validation
Example: Deanonymize all pre-loaded examples from XSum (1000 examples dataset):
python preprocessing.py \
--deanonymize \
--dataset_rg preprocessing/xsum_1000.validation.anonymized \
--dataset xsum \
--split validation \
--processed_dataset_path data/full:xsum_1000.validation \
--n_samples 1000
3. Run SummVis
Once the app loads, make sure it's pointing to the right File at the top
of the interface.
streamlit run summvis.py
Alternatively, you may point SummVis to a folder where your data is stored:
streamlit run summvis.py -- --path your/path/to/data
You may further specify the filename within the folder:
streamlit run summvis.py -- --path your/path/to/data --file filename
Note that the additional -- is not a mistake, and is required to pass command-line arguments in streamlit.
Get your data into SummVis
The simplest way to use SummVis with your own data is to create a jsonl file of the following format:
{"document":  "This is the first source document", "summary:reference": "This is the reference summary", "summary:testmodel1": "This is the summary for testmodel1", "summary:testmodel2": "This is the summary for testmodel2"}
{"document":  "This is the second source document", "summary:reference": "This is the reference summary", "summary:testmodel1": "This is the summary for testmodel1", "summary:testmodel2": "This is the summary for testmodel2"}
The key for the reference summary must equal summary:reference and the key for any other summary must be of the form
summary:<summary_name>, e.g. summary:BART. The document and at least one summary (reference, other, or both) are required.
NOTE: SummVis is optimized for documents that are approximately the length of a news article. Documents that are
significantly longer than this may render slower in the tool, especially if many summaries are displayed.
The following additional install step is required.:
python -m spacy download en_core_web_lg
You have two options to load this jsonl file into the tool:
Option 1: Load the jsonl file directly
This is the simplest approach for loading your data into SummVis. The disadvantage of this approach is that all computations are performed in real-time, which is particularly expensive for
the semantic similarity computation. As a result, each example will be slow to load (~5-15 seconds on a Macbook Pro).
- Place the jsonl file in the
datadirectory. Note that the file must be named with a.jsonlextension. - Start SummVis:
streamlit run summvis.py - Select your jsonl file from the
Filedropdown at the top of the interface.
Option 2: Preprocess jsonl file (recommended)
You may run preprocessing.py to precompute all data required in the interface (running spaCy, lexical and semantic
aligners) and save a cache file, which can be read directly into the tool. Note that this script may run for a while
(~5-15 seconds per example on a MacBook Pro for
documents of typical length found in CNN/DailyMail or XSum), and will be greatly expedited by running on a GPU.
-
Run preprocessing script to generate cache file
python preprocessing.py \
--workflow \
--dataset_jsonl path/to/my_dataset.jsonl \
--processed_dataset_path path/to/my_cache_file
You may wish to first try it with a subset of your data by adding the following argument:
--n_samples <number_of_samples>. -
Copy output cache file to the
datadirectory -
Start SummVis:
streamlit run summvis.py -
Select your file from the
Filedropdown at the top of the interface.
As an alternative to steps 2-3, you may point SummVis to a folder in which the cache file is stored:
streamlit run summvis.py -- --path <parent_directory_of_cache_file>
Generating predictions
The instructions in the previous section assume access to model predictions. We also provide tools to load predictions,
either by downloading datasets with precomputed predictions or running
a script to generate predictions for HuggingFace-compatible models. In this section we describe an end-to-end pipeline
for using these tools.
Prior to running the following, an additional install step is required:
python -m spacy download en_core_web_lg
1. Standardize and save dataset to disk.
Loads in a dataset from HF, or any dataset that you have and stores it in a
standardized format with columns for document and summary:reference.
Example: Save CNN / Daily Mail validation split to disk as a jsonl file.
python preprocessing.py \
--standardize \
--dataset cnn_dailymail \
--version 3.0.0 \
--split validation \
--save_jsonl_path preprocessing/cnn_dailymail.validation.jsonl
Example: Load custom my_dataset.jsonl, standardize, and save.
python preprocessing.py \
--standardize \
--dataset_jsonl path/to/my_dataset.jsonl \
--save_jsonl_path preprocessing/my_dataset.jsonl
Expected format of my_dataset.jsonl:
{"document":  "This is the first source document", "summary:reference": "This is the reference summary"}
{"document":  "This is the second source document", "summary:reference": "This is the reference summary"}
If you wish to use column names other than document and summary:reference, you may specify custom column names
using the doc_column and reference_column command-line arguments.
2. Add predictions to the saved dataset.
Takes a saved dataset that has already been standardized and adds predictions to it
from prediction jsonl files. Cached predictions for several models available here:
https://storage.googleapis.com/sfr-summvis-data-research/predictions.zip
You may also generate your own predictions using this this script.
Example: Add 6 prediction files for PEGASUS and BART to the dataset.
python preprocessing.py \
--join_predictions \
--dataset_jsonl preprocessing/cnn_dailymail.validation.jsonl \
--prediction_jsonls \
predictions/bart-cnndm.cnndm.validation.results.anonymized \
predictions/bart-xsum.cnndm.validation.results.anonymized \
predictions/pegasus-cnndm.cnndm.validation.results.anonymized \
predictions/pegasus-multinews.cnndm.validation.results.anonymized \
predictions/pegasus-newsroom.cnndm.validation.results.anonymized \
predictions/pegasus-xsum.cnndm.validation.results.anonymized \
--save_jsonl_path preprocessing/cnn_dailymail.validation.jsonl
3. Run the preprocessing workflow and save the dataset.
Takes a saved dataset that has been standardized, and predictions already added.
Applies all the preprocessing steps to it (running spaCy, lexical and semantic aligners),
and stores the processed dataset back to disk.
Example: Autorun with default settings on a few examples to try it.
python preprocessing.py \
--workflow \
--dataset_jsonl preprocessing/cnn_dailymail.validation.jsonl \
--processed_dataset_path data/cnn_dailymail.validation \
--try_it
Example: Autorun with default settings on all examples.
python preprocessing.py \
--workflow \
--dataset_jsonl preprocessing/cnn_dailymail.validation.jsonl \
--processed_dataset_path data/cnn_dailymail
Citation
When referencing this repository, please cite this paper:
@misc{vig2021summvis,
      title={SummVis: Interactive Visual Analysis of Models, Data, and Evaluation for Text Summarization},
      author={Jesse Vig and Wojciech Kry{\'s}ci{\'n}ski and Karan Goel and Nazneen Fatema Rajani},
      year={2021},
      eprint={2104.07605},
      archivePrefix={arXiv},
      primaryClass={cs.CL},
      url={https://arxiv.org/abs/2104.07605}
}


