Scripted visualizations in blender
The goal of this project is to script 3D scientific visualizations using blender.
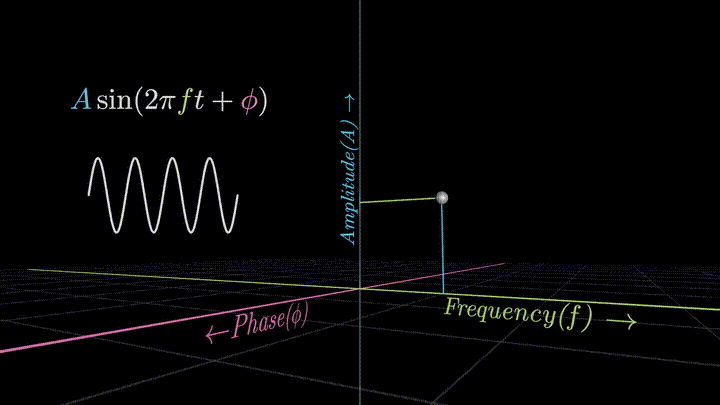
To achieve this, we aim to bring together blender's powerful visualization toolkit with Anaconda's scientific computing and package management capabilities. For example, the code in ./apps/concepts/fourier_signal_composition.py was used to generate the following visualization.
Acknowledgments
- All the wonderful people that make open source software
- Inspiration - 3blue1brown's videos and pedagogical clarity
Setup instructions
These are detailed instructions that worked for me on a windows 10 laptop.
blender+Anaconda+VSCode
- Download blender (get the zip file, NOT a binary installer), or just follow this link: https://builder.blender.org/download/
- Unzip to C:\blender\2.83.0 (which has a folder called 2.83)
- Open the python console within blender, and check the python version
- e.g. 3.7.4
- Delete the python folder and all its contents (C:\blender\2.83.0\2.83\python)
- Add the blender executable folder (C:\blender\2.83.0) to the system path
- This is used by the _requirementsCheck.py file
- Install Anaconda (NOT miniconda), and open anaconda prompt with admin privileges
- Make sure you have "C:\Users\Praneeth\anaconda3\Library\bin" in the system path
- On windows, check the Path variable in the 'System Variables' box when editing environment variables
- Clone this repository in your workspace (make sure git is installed and added to your system path)
- Navigate to your workspace in the command prompt (e.g. C:\dev)
- git clone https://github.com/praneethnamburi/blender-ScriptViz.git
- cd blender-ScriptViz
- Create an anaconda environment using the _requirements.yml file
- conda env update -f requirements.yml
- Make sure to wait until it finishes running. It might appear stuck when installing pip packages. You might see a temporary text file created by conda in your current directory, for example "condaenv.p5qt3m3s.requirements.txt". Conda has finished doing its job when this file is deleted.
- conda activate blender2830
- Install VSCode and activate the environment from within VSCode's command line
- Call blender from the command line. The idea is to pass an extra argument while launching blender to set the path the python we want to use.
- blender.exe --env-system-python "C:\Users\Praneeth\.conda\envs\blender2830"
- blender.exe --env-system-python "C:\Users\Praneeth\anaconda3\envs\blender2830"
- Remember to use double quotes if there is a space in the path!
- If this works, you're good to go! Rest of the steps make are meant to make your life easier in the long run.
- You should be able to install additional packages using conda and import them in the blender console.
- Use the _requirementsCheck.py file through the command python _requirementsCheck.py. It will:
- Check if blender, and the correct python executables are visible to the terminal.
- Make a startup file in blender's startup directory, which just adds your workspace folder to python's sys.path. Alternatively you can type these command within blender's python console once you invoke blender from the command line, or using the extension (see below). import sys; sys.path.append("C:\dev\blender-ScriptViz"). Typing those two commands into the prompt every time you start blender can be annoying, and the startup script removes that specific annoyance.
- Blender startup directory is at C:\blender\2.83.0\2.83\scripts\startup
- Update _requirements.yml file with your current conda environment.
- Set up debugging. Install Blender Development add-on for VSCode.
- Modify the add-on's source code. The add-on launches blender with a custom-written script to enable debugging. We need the add-on to pass an additional --env-system-python argument.
- Locate the blender_executable.js file in the add-on install folder.
- C:\Users\Praneeth\.vscode\extensions\jacqueslucke.blender-development-0.0.12\out\blender_executable.js
- Modify the getBlenderLaunchArgs function
- return ['--env-system-python', 'C:\Users\Praneeth\.conda\envs\blender2830', '--python', paths_1.launchPath];
- Within the function testIfPathIsBlender, in the if-else clause contained within the Promise, change the if condition to if (false)
- This is so it does not throw 'A simple check to test...'
- (There is probably a much more elegant way to do this)
- Restart VSCode (for some reason it took 2 re-starts for me)
- From VSCode's command palette, use the command Blender: start
- If this fails, make sure that the python from your blender environment is in the system path! C:\Users\Praneeth\.conda\envs\blender2830\python.exe
- Troubleshooting:
- A useful tip is to check if you're able to find the correct python, pip, conda and blender commands from your command prompt. Most of the issues I encountered had something to do with the correct paths.
- Use 'where blender' in the windows command prompt inside VSCode
- Result: C:\blender\2.83.0\blender.exe
- where python
- C:\Users\Praneeth\.conda\envs\blender2830\python.exe
- where conda
- C:\ProgramData\Anaconda3\condabin\conda.bat
- Check VSCode settings -
Add these settings in VSCode (to your workspace) - Modify this example- "settings": {
"terminal.integrated.env.windows": {
"PATH": "C:\blender\2.83.0;C:\Users\Praneeth\.conda\envs\blender2830;C:\Users\Praneeth\.conda\envs\blender2830\Library\mingw-w64\bin;C:\Users\Praneeth\.conda\envs\blender2830\Library\usr\bin;C:\Users\Praneeth\.conda\envs\blender2830\Library\bin;C:\Users\Praneeth\.conda\envs\blender2830\Scripts;C:\Users\Praneeth\.conda\envs\blender2830\bin;C:\ProgramData\Anaconda3\condabin;OTHER THINGS IN YOUR PATH,
},
"python.pythonPath": "C:\Users\Praneeth\.conda\envs\blender2830\python.exe",
},
- "settings": {
- If conda env create -f _requirements.yml fails, activate the environment, and use conda env export > temp.yml, and check which packages failed to install. If it is pybullet, then it is probably because it needs Visual C++ 14. You can install Visual Studio Community edition (if you have the space, or perhaps the redistributable VC++ also works, I haven't tested it.)
Development workflow
- Start VSCode
- sync VSCode settings (automated this using the extension)
- git pull
- Check requirements using shift+f6 (blender --python
_requirementsCheck.py) - Start blender using VSCode extension
- automated 3, 4, and 5 using the multi-command extension
- Import this software into the python console within blender using 'from bpn_init import *'. This will work if _requirementsCheck.py completed successfully.
- Run scripts (blender extension, add shortcut f6) and develop!
- During development, update documentation, notes and readme.md
- git Commit and push
- Sync VSCode settings (automated this using the extension setting)
Current workflow
- Start VSCode
- Press shift+f6 to start a sesstion (multicommand automation)
- Start coding! Use f6 to run scripts
Folder structure
_auth: Authentication
This folder contains authentication keys for interfacing with
applications. Don't commit this when working with multiple people.
_dev: Developer notes
Notes for development and learning during the course of the project.
_requirements_topLevel.txt is meant to help with python's package
management. It is a good idea to add this to source control when
developing with multiple people, but this will eventually disappear from
distribution.
_temp: Temporary folder
Local cache for storing intermediate data generated by the software.
apps
Applications that use the main package bpn, and supporting package pntools. See License.
bpn
This folder contains the core scripts for using
core module has wrappers around blender objects, divided into three types:
- Thing - class that initializes all wrappers
- Object, Mesh, Collection, GreasePencil - wrappers around bpy.data.(*)
- MeshObject, GreasePencilObject - Initialize object + data
- Each of these classes have analogs in the new module (mesh, pencil)
- The user should only need to interact with core classes through functions in the new module
utils.get is the dispatcher that automatically creates objects from the appropriate classes in the core module.
names are very important in bpn. We use names to insulate bpn from bpy. That means, bpn tries very hard not to keep a copy of things from bpy. Instead, it tries to get the appropriate information from bpy when needed. names determine the interaction between bpy and bpn.
*args are for the 'new' function to create a new blender data instance
*kwargs are for initializing that instance inside bpy.data.(type).(instance)
Objects and lights need to pass one argument through *args. I did not set it to have the flexibility of initializing empty objects with Nonetype.
Classes inherited from Object also send *args up to Thing class (e.g. MeshObject, and GreasePencilObject)
Rest of them ONLY send kwargs for initialization.
Modules vef, trf and env currently do not depend on any other files within bpn.
env requires blender and therefore, will stay within bpn, but the other two can become their own packages that bpn uses. Perhaps move them to pntools?
pntools
General python tools that were developed with this proejct, but can generalize beyond this project.
bpn_init.py
The purpose is to bring bpn's functionality into blender's python console with one command. At the blender console, type from bpn_init import *
Authors
- Praneeth Namburi