Image Captioning Transformer
This projects extends pytorch/fairseq with Transformer-based image captioning models. It is still in an early stage, only baseline models are available at the moment. These are based on ideas from the following papers:
-
Jun Yu, Jing Li, Zhou Yu, and Qingming Huang. Multimodal transformer with multi-view visual
representation for image captioning. arXiv preprint arXiv:1905.07841, 2019. -
X. Zhu, L. Li, L. Jing, H. Peng, X. Niu. Captioning Transformer with Stacked Attention Modules.
Appl. Sci. 2018, 8, 739 -
P. Anderson, X. He, C. Buehler, D. Teney, M. Johnson, S. Gould, and L. Zhang. Bottom-up and top-down
attention for image captioning and visual question answering.
In Proceedings of the IEEE Conference on Computer Vision and Pattern Recognition, pages 6077–6086, 2018.
See also section Training for pre-trained models and their performance. Over time, more and more
details from these and other papers will be implemented to further push model performance. Instead of reproducing
the results of a single paper, main goal of this project is to combine selected approaches from several papers.
Baseline architecture
The following figure gives an overview of the baseline model architectures.
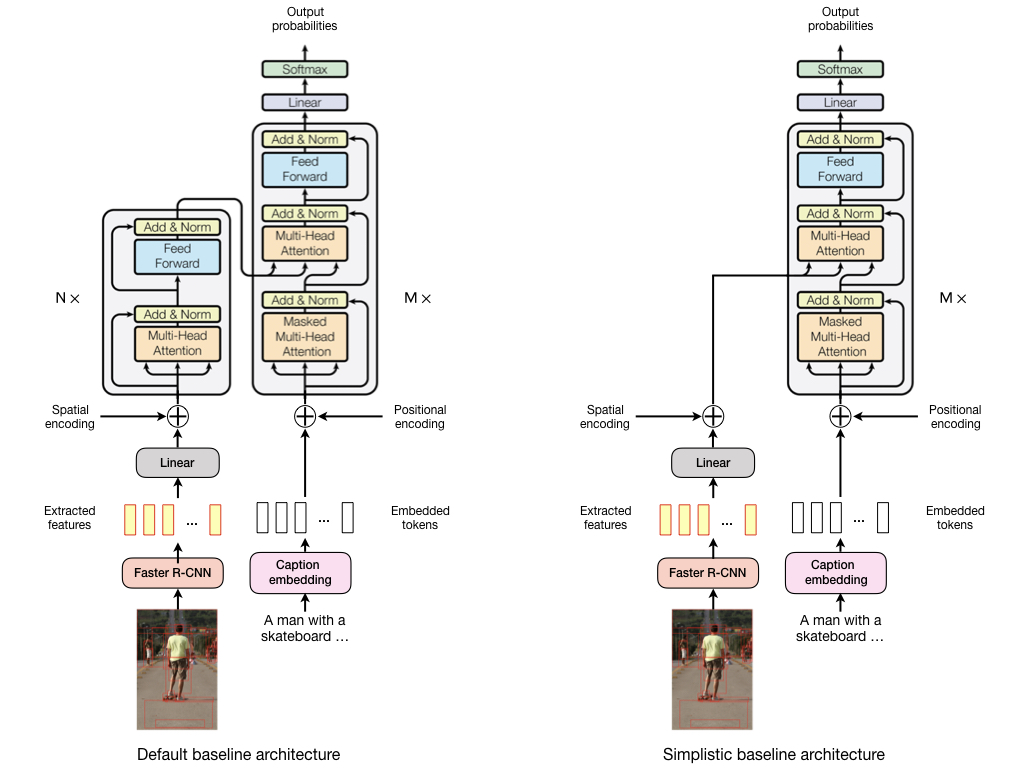
The default baseline architecture uses a Transformer encoder for self-attention on visual features and a Transformer
decoder for masked self-attention on caption tokens and for visio-linguistic (= encoder-decoder) attention. A linear
layer projects visual features into the usually lower-dimensional representation space of the encoder.
The simplistic baseline architecture doesn't use a Transformer encoder and projected visual features are directly
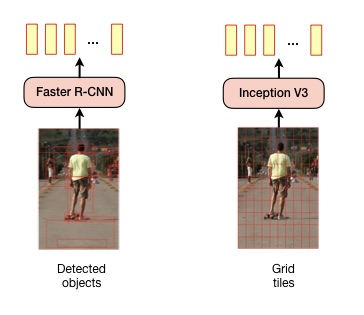
processed by the Transformer decoder. In both architectures, visual features from images can be either extracted with
a Faster R-CNN model as described in [3] or from fixed grid tiles (8x8) using an Inception V3 model.
Fairseq extensions
The following extensions to the fairseq command line tools are implemented:
--task captioning. Enables the image captioning functionality.--arch default-captioning-arch. Uses a transformer encoder to process image features (3 layers by default) and a
transformer decoder to process image captions and encoder output (6 layers by default). The number of encoder and
decoder layers can be adjusted with--encoder-layersand--decoder-layers, respectively.--arch simplistic-captioning-arch. Uses the same decoder as indefault-captioning-archbut no transformer encoder.
Image features are processed directly by the decoder after projecting them into a lower-dimensional space which can
be controlled with--encoder-embed-dim. Projection into lower-dimensional space can be skipped with--no-projection.--features obj. Use image features extracted from detected objects as described in [3].
Additionally use--max-source-positions 100when using this option.--features grid. Use image features extracted from an 8 x 8 grid. Inception v3 is used for extracting image features.
Additionally use--max-source-positions 64when using this option.--feature-spatial-encoding. Learn spatial (2D-positional) encoding of bounding boxes or grid tiles. Disabled by default.
Positional encodings are learned from bounding box or grid tile coordinates and their size.
Setup
Environment
- Install NCCL for multi-GPU training.
- Install apex with the
--cuda_extoption for faster training. - Create a conda environment with
conda env create -f environment.yml. - Activate the conda environment with
conda activate fairseq-image-captioning.
Dataset
Models are currently trained with the MS-COCO dataset. To setup the dataset for training, create an ms-coco directory
in the project's root directory, download MS-COCO 2014
- training images (13 GB)
- validation images (6 GB)
- annotations (241 MB)
to the created ms-coco directory and extract the archives there. The resulting directory structure should look like
ms-coco
  annotations
  images
    train2014
    val2014
MS-COCO images are needed when training with the --features grid command line option. Image features are then extracted
from a fixed 8 x 8 grid on the image. When using the --features obj command line option image features are extracted
from detected objects as described in [3].
Pre-computed features of detected objects (10-100 per image) are available in this repository.
You can also use this link for downloading them
directly (22 GB). After downloading, extract the trainval.zip file, rename the trainval directory to features and
move it to the ms-coco directory. The ms-coco/features directory should contain 4 .tsv files.
ms-coco
  annotations
  features
    karpathy_test_resnet101_faster_rcnn_genome.tsv
    karpathy_train_resnet101_faster_rcnn_genome.tsv.0
    karpathy_train_resnet101_faster_rcnn_genome.tsv.1
    karpathy_val_resnet101_faster_rcnn_genome.tsv
  images
    train2014
    val2014
Pre-processing
For splitting the downloaded MS-COCO data into a training, validation and test set, Karpathy splits are used.
Split files have been copied from this repository.
Pre-processing commands shown in the following sub-sections write their results to the output directory by default.
Pre-process captions
./preprocess_captions.sh ms-coco
Converts MS-COCO captions into a format required for model training.
Pre-process images
./preprocess_images.sh ms-coco
Converts MS-COCO images into a format required for model training. Only needed when training with the --features grid
command line option.
Pre-process object features
./preprocess_features.sh ms-coco/features
Converts pre-computed object features into a format required for model training. Only needed when training with the
--features obj command line option.
Training
A default baseline model can be trained with the following command. Please note that this is just an example, hyper-
parameters are not tuned yet.
python -m fairseq_cli.train \
  --save-dir .checkpoints
  --user-dir task \
  --task captioning \
  --arch default-captioning-arch \
  --encoder-layers 3 \
  --decoder-layers 6 \
  --features obj \
  --feature-spatial-encoding \
  --optimizer adam \
  --adam-betas "(0.9,0.999)" \
  --lr 0.0003 \
  --lr-scheduler inverse_sqrt \
  --min-lr 1e-09 \
  --warmup-init-lr 1e-8 \
  --warmup-updates 8000 \
  --criterion label_smoothed_cross_entropy \
  --label-smoothing 0.1 \
  --weight-decay 0.0001 \
  --dropout 0.3 \
  --max-epoch 25 \
  --max-tokens 4096 \
  --max-source-positions 100 \
  --encoder-embed-dim 512 \
  --num-workers 2
Checkpoints are written to the .checkpoints directory.
Pre-trained models
Checkpoints 18-21 from a training run with these settings on two NVIDIA GTX 1080 cards (8GB memory each) are available
for download.
The best single model is checkpoint 20. Evaluation results for this model and an ensemble of all four checkpoints are
shown in the following table. These are compared to models in [2] and [3], trained with cross-entropy loss and
evaluated on the Karpathy test split.
| Model | BLEU-1* | BLEU-4* | METEOR | ROUGE-L | CIDEr | SPICE |
|---|---|---|---|---|---|---|
| [2] (single model) | 73.0 | 33.3 | 54.8 | 108.1 | ||
| [3] (single model) | 77.2 | 36.2 | 27.0 | 56.4 | 113.5 | 20.3 |
| Baseline (checkpoint 20) | 74.8 | 34.8 | 28.0 | 56.2 | 112.9 | 21.1 |
| Baseline (checkpoints 18-21) | 74.7 | 35.2 | 28.3 | 56.5 | 114.8 | 21.1 |
* It must be investigated if there's an inconsistency in reported BLEU scores.
Evaluation
Setup
Evaluation is performed using a Python 3 Fork of the
COCO Caption Evaluation library. This library is included
as a Git Submodule in the path external/coco-caption. Download
the submodule with the following commands:
git submodule init
git submodule update
Furthermore, the COCO Caption Evaluation library uses the Stanford CoreNLP 3.6.0
toolset which must be downloaded prior to the first execution of the scoring script. It is important to change into the
submodules root folder before executing the script to download the required files:
cd external/coco-caption
./get_stanford_models.sh
Generate captions
Captions can be generated for images in the Karpathy test split with the following command.
python generate.py \
--user-dir task \
--features obj \
--tokenizer moses \
--bpe subword_nmt \
--bpe-codes output/codes.txt \
--beam 3 \
--split test \
--path .checkpoints/checkpoint_best.pt \
--input output/test-ids.txt \
--output output/test-predictions.json
This example uses the best checkpoint from a training run (--path .checkpoints/checkpoint_best.pt). To generate
captions with a pre-trained baseline model download checkpoint 20 to the project's root directory and use
--path checkpoint20.pt instead. To generate captions with the full ensemble additionally download checkpoints
18, 19 and 21 and use --path checkpoint18.pt:checkpoint19.pt:checkpoint20.pt:checkpoint21.pt.
Calculate metrics
Metrics can be calculated with the score.sh script. This script uses the specified reference-captions as the
ground truth and evaluates the model based on the generated captions provided as a JSON file (created with the
generate.py script). The following example calculates metrics for captions contained in
output/test-predictions.json.
./score.sh \
  --reference-captions external/coco-caption/annotations/captions_val2014.json \
  --system-captions output/test-predictions.json
Note output/test-predictions.json contains captions generated for the Karpathy test split which is a subset of the
images contained in the official MS-COCO validation set external/coco-caption/annotations/captions_val2014.json. For
captions generated with the full baseline ensemble this should produce an output like
...

Scores:
=======
Bleu_1: 0.747
Bleu_2: 0.587
Bleu_3: 0.454
Bleu_4: 0.352
METEOR: 0.283
ROUGE_L: 0.565
CIDEr: 1.148
SPICE: 0.211
Demo
To generate captions with the baseline ensemble for some test set images contained in demo/test-images.txt,
run the following command:
python generate.py \
--user-dir task \
--features obj \
--tokenizer moses \
--bpe subword_nmt \
--bpe-codes output/codes.txt \
--beam 3 \
--split test \
--path checkpoint18.pt:checkpoint19.pt:checkpoint20.pt:checkpoint21.pt \
--input demo/demo-ids.txt \
--output demo/demo-predictions.json
Alternatively use --path checkpoint20.pt to use a single baseline checkpoint instead of the ensemble. When using the
ensemble you should see an output like
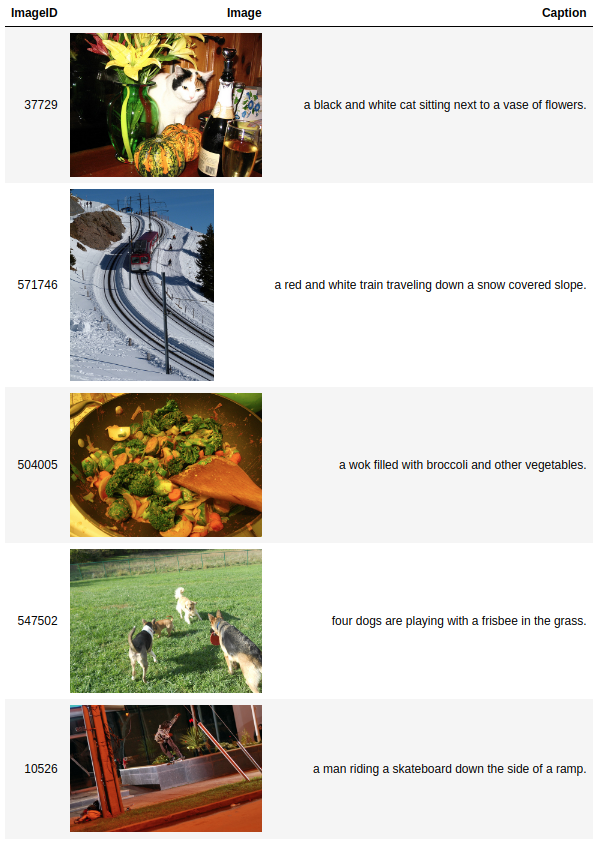
Predictions:
============
37729: a black and white cat sitting next to a vase of flowers.
571746: a red and white train traveling down a snow covered slope.
504005: a wok filled with broccoli and other vegetables.
547502: four dogs are playing with a frisbee in the grass.
10526: a man riding a skateboard down the side of a ramp.
Notebook viewer.ipynb displays generated captions together with their images.
You can of course use this viewer to show all results in output/test-predictions.json too.


