Healthchecks
healthchecks is a watchdog for your cron jobs. It's a web server that listens for pings from your cron jobs, plus a web interface.
The building blocks are:
- Python 3
- Django 2
- PostgreSQL or MySQL
Setting Up for Development
These are instructions for setting up healthchecks Django app
in development environment.
-
install dependencies (Debian/Ubuntu)
$ sudo apt-get update $ sudo apt-get install -y gcc python3-dev python3-venv -
prepare directory for project code and virtualenv:
$ mkdir -p ~/webapps $ cd ~/webapps -
prepare virtual environment
(with virtualenv you get pip, we'll use it soon to install requirements):$ python3 -m venv hc-venv $ source hc-venv/bin/activate -
check out project code:
$ git clone https://github.com/healthchecks/healthchecks.git -
install requirements (Django, ...) into virtualenv:
$ pip install -r healthchecks/requirements.txt -
healthchecks is configured to use a SQLite database by default. To use
PostgreSQL or MySQL database, create and edithc/local_settings.pyfile.
There is a template you can copy and edit as needed:$ cd ~/webapps/healthchecks $ cp hc/local_settings.py.example hc/local_settings.py -
create database tables and the superuser account:
$ cd ~/webapps/healthchecks $ ./manage.py migrate $ ./manage.py createsuperuser -
run development server:
$ ./manage.py runserver
The site should now be running at http://localhost:8080
To log into Django administration site as a super user,
visit http://localhost:8080/admin
Configuration
Site configuration is loaded from environment variables. This is
done in hc/settings.py. Additional configuration is loaded
from hc/local_settings.py file, if it exists. You can create this file
(should be right next to settings.py in the filesystem) and override
settings, or add extra settings as needed.
Configurations settings loaded from environment variables:
| Environment variable | Default value | Notes |
|---|---|---|
| SECRET_KEY | "---" |
|
| DEBUG | True |
Set to False for production |
| ALLOWED_HOSTS | * |
Separate multiple hosts with commas |
| DEFAULT_FROM_EMAIL | "[email protected]" |
|
| USE_PAYMENTS | False |
|
| REGISTRATION_OPEN | True |
|
| DB | "sqlite" |
Set to "postgres" or "mysql" |
| DB_HOST | "" (empty string) |
|
| DB_PORT | "" (empty string) |
|
| DB_NAME | "hc" (PostgreSQL, MySQL) or "/path/to/project/hc.sqlite" (SQLite) |
For SQLite, specify the full path to the database file. |
| DB_USER | "postgres" or "root" |
|
| DB_PASSWORD | "" (empty string) |
|
| DB_CONN_MAX_AGE | 0 |
|
| DB_SSLMODE | "prefer" |
PostgreSQL-specific, details |
| DB_TARGET_SESSION_ATTRS | "read-write" |
PostgreSQL-specific, details |
| EMAIL_HOST | "" (empty string) |
|
| EMAIL_PORT | "587" |
|
| EMAIL_HOST_USER | "" (empty string) |
|
| EMAIL_HOST_PASSWORD | "" (empty string) |
|
| EMAIL_USE_TLS | "True" |
|
| EMAIL_USE_VERIFICATION | "True" |
|
| SITE_ROOT | "http://localhost:8000" |
|
| SITE_NAME | "Mychecks" |
|
| MASTER_BADGE_LABEL | "Mychecks" |
|
| PING_ENDPOINT | "http://localhost:8000/ping/" |
|
| PING_EMAIL_DOMAIN | "localhost" |
|
| DISCORD_CLIENT_ID | None |
|
| DISCORD_CLIENT_SECRET | None |
|
| SLACK_CLIENT_ID | None |
|
| SLACK_CLIENT_SECRET | None |
|
| PUSHOVER_API_TOKEN | None |
|
| PUSHOVER_SUBSCRIPTION_URL | None |
|
| PUSHOVER_EMERGENCY_RETRY_DELAY | 300 |
|
| PUSHOVER_EMERGENCY_EXPIRATION | 86400 |
|
| PUSHBULLET_CLIENT_ID | None |
|
| PUSHBULLET_CLIENT_SECRET | None |
|
| TELEGRAM_BOT_NAME | "ExampleBot" |
|
| TELEGRAM_TOKEN | None |
|
| TWILIO_ACCOUNT | None |
|
| TWILIO_AUTH | None |
|
| TWILIO_FROM | None |
|
| TWILIO_USE_WHATSAPP | "False" |
|
| PD_VENDOR_KEY | None |
|
| TRELLO_APP_KEY | None |
|
| MATRIX_HOMESERVER | None |
|
| MATRIX_USER_ID | None |
|
| MATRIX_ACCESS_TOKEN | None |
|
| APPRISE_ENABLED | "False" |
Some useful settings keys to override are:
SITE_ROOT is used to build fully qualified URLs for pings, and for use in
emails and notifications. Example:
SITE_ROOT = "https://my-monitoring-project.com"
SITE_NAME has the default value of "Mychecks" and is used throughout
the templates. Replace it with your own name to personalize your installation.
Example:
SITE_NAME = "My Monitoring Project"
REGISTRATION_OPEN controls whether site visitors can create new accounts.
Set it to False if you are setting up a private healthchecks instance, but
it needs to be publicly accessible (so, for example, your cloud services
can send pings).
If you close new user registration, you can still selectively invite users
to your team account.
EMAIL_USE_VERIFICATION enables/disables the sending of a verification
link when an email address is added to the list of notification methods.
Set it to False if you are setting up a private healthchecks instance where
you trust your users and want to avoid the extra verification step.
Database Configuration
Database configuration is loaded from environment variables. If you
need to use a non-standard configuration, you can override the
database configuration in hc/local_settings.py like so:
DATABASES = {
    'default': {
        'ENGINE':   'django.db.backends.postgresql',
        'NAME':     'your-database-name-here',
        'USER':     'your-database-user-here',
        'PASSWORD': 'your-database-password-here',
        'TEST': {'CHARSET': 'UTF8'},
        'OPTIONS': {
            ... your custom options here ...
        }
    }
}
Sending Emails
healthchecks must be able to send email messages, so it can send out login
links and alerts to users. Environment variables can be used to configure
SMTP settings, or your may put your SMTP server configuration in
hc/local_settings.py like so:
EMAIL_HOST = "your-smtp-server-here.com"
EMAIL_PORT = 587
EMAIL_HOST_USER = "username"
EMAIL_HOST_PASSWORD = "password"
EMAIL_USE_TLS = True
For more information, have a look at Django documentation,
Sending Email section.
Receiving Emails
healthchecks comes with a smtpd management command, which starts up a
SMTP listener service. With the command running, you can ping your
checks by sending email messages
to [email protected] email addresses.
Start the SMTP listener on port 2525:
$ ./manage.py smtpd --port 2525
Send a test email:
$ curl --url 'smtp://127.0.0.1:2525' \
    --mail-from '[email protected]' \
    --mail-rcpt '[email protected]' \
    -F '='
Sending Status Notifications
healtchecks comes with a sendalerts management command, which continuously
polls database for any checks changing state, and sends out notifications as
needed. Within an activated virtualenv, you can manually run
the sendalerts command like so:
$ ./manage.py sendalerts
In a production setup, you will want to run this command from a process
manager like supervisor or systemd.
Database Cleanup
With time and use the healthchecks database will grow in size. You may
decide to prune old data: inactive user accounts, old checks not assigned
to users, records of outgoing email messages and records of received pings.
There are separate Django management commands for each task:
-
Remove old records from
api_pingtable. For each check, keep 100 most
recent pings:$ ./manage.py prunepings -
Remove old records of sent notifications. For each check, remove
notifications that are older than the oldest stored ping for same check.$ ./manage.py prunenotifications -
Remove user accounts that match either of these conditions:
-
Account was created more than 6 months ago, and user has never logged in.
These can happen when user enters invalid email address when signing up. -
Last login was more than 6 months ago, and the account has no checks.
Assume the user doesn't intend to use the account any more and would
probably want it removed.$ ./manage.py pruneusers
-
-
Remove old records from the
api_tokenbuckettable. The TokenBucket
model is used for rate-limiting login attempts and similar operations.
Any records older than one day can be safely removed.$ ./manage.py prunetokenbucket -
Remove old records from the
api_fliptable. The Flip
objects are used to track status changes of checks, and to calculate
downtime statistics month by month. Flip objects from more than 3 months
ago are not used and can be safely removed.$ ./manage.py pruneflips
When you first try these commands on your data, it is a good idea to
test them on a copy of your database, not on the live database right away.
In a production setup, you should also have regular, automated database
backups set up.
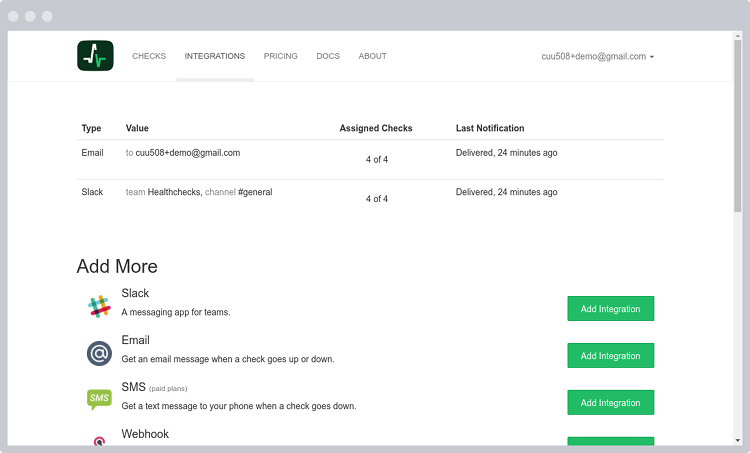
Integrations
Discord
To enable Discord integration, you will need to:
- register a new application on https://discordapp.com/developers/applications/me
- add a redirect URI to your Discord application. The URI format is
SITE_ROOT/integrations/add_discord/. For example, if you are running a
development server onlocalhost:8000then the redirect URI would be
http://localhost:8000/integrations/add_discord/ - Look up your Discord app's Client ID and Client Secret. Put them
inDISCORD_CLIENT_IDandDISCORD_CLIENT_SECRETenvironment
variables.
Pushover
Pushover integration works by creating an application on Pushover.net which
is then subscribed to by Healthchecks users. The registration workflow is as follows:
- On Healthchecks, the user adds a "Pushover" integration to a project
- Healthchecks redirects user's browser to a Pushover.net subscription page
- User approves adding the Healthchecks subscription to their Pushover account
- Pushover.net HTTP redirects back to Healthchecks with a subscription token
- Healthchecks saves the subscription token and uses it for sending Pushover
notifications
To enable the Pushover integration, you will need to:
- Register a new application on Pushover via https://pushover.net/apps/build.
- Within the Pushover 'application' configuration, enable subscriptions.
Make sure the subscription type is set to "URL". Also make sure the redirect
URL is configured to point back to the root of the Healthchecks instance
(e.g.,http://healthchecks.example.com/). - Put the Pushover application API Token and the Pushover subscription URL in
PUSHOVER_API_TOKENandPUSHOVER_SUBSCRIPTION_URLenvironment
variables. The Pushover subscription URL should look similar to
https://pushover.net/subscribe/yourAppName-randomAlphaNumericData.
Telegram
-
Create a Telegram bot by talking to the
BotFather. Set the bot's name,
description, user picture, and add a "/start" command. -
After creating the bot you will have the bot's name and token. Put them
inTELEGRAM_BOT_NAMEandTELEGRAM_TOKENenvironment variables. -
Run
settelegramwebhookmanagement command. This command tells Telegram
where to forward channel messages by invoking Telegram's
setWebhook API call:$ ./manage.py settelegramwebhook Done, Telegram's webhook set to: https://my-monitoring-project.com/integrations/telegram/bot/
For this to work, your SITE_ROOT needs to be correct and use "https://"
scheme.
Apprise
To enable Apprise integration, you will need to:
- ensure you have apprise installed in your local environment:
pip install apprise
- enable the apprise functionality by setting the
APPRISE_ENABLEDenvironment variable.
Running in Production
Here is a non-exhaustive list of pointers and things to check before launching a Healthchecks instance
in production.
- Environment variables, settings.py and local_settings.py.
- DEBUG. Make sure it is set to
False. - ALLOWED_HOSTS. Make sure it
contains the correct domain name you want to use. - Server Errors. When DEBUG=False, Django will not show detailed error pages, and will not print exception
tracebacks to standard output. To receive exception tracebacks in email,
review and edit the ADMINS and
SERVER_EMAIL settings.
Another good option for receiving exception tracebacks is to use Sentry.
- DEBUG. Make sure it is set to
- Management commands that need to be run during each deployment.
- This project uses Django Compressor
to combine the CSS and JS files. It is configured for offline compression – run the
manage.py compresscommand whenever files in the/static/directory change. - This project uses Django's staticfiles app.
Run themanage.py collectstaticcommand whenever files in the/static/
directory change. This command collects all the static files inside thestatic-collecteddirectory.
Configure your web server to serve files from this directory under the/static/prefix.
- This project uses Django Compressor
- Processes that need to be running constantly.
manage.py runserveris intended for development only. Do not use it in production,
instead consider using uWSGI or
gunicorn.- Make sure the
manage.py sendalertscommand is running and can survive server restarts.
On modern linux systems, a good option is to
define a systemd service for it.
- General
- Make sure the database is secured well and is getting backed up regularly
- Make sure the TLS certificates are secured well and are getting refreshed regularly
- Have monitoring in place to be sure the Healthchecks instance itself is operational
(is accepting pings, is sending out alerts, is not running out of resources).


