ml-workspace
The ML workspace is an all-in-one web-based IDE specialized for machine learning and data science. It is simple to deploy and gets you started within minutes to productively built ML solutions on your own machines. This workspace is the ultimate tool for developers preloaded with a variety of popular data science libraries (e.g., Tensorflow, PyTorch, Keras, Sklearn) and dev tools (e.g., Jupyter, VS Code, Tensorboard) perfectly configured, optimized, and integrated.
Highlights
- ? Jupyter, JupyterLab, and Visual Studio Code web-based IDEs.
- ? Pre-installed with many popular data science libraries & tools.
- ? Full Linux desktop GUI accessible via web browser.
- ? Seamless Git integration optimized for notebooks.
- ? Integrated hardware & training monitoring via Tensoboard & Netdata.
- ? Access from anywhere via Web, SSH, or VNC under a single port.
- ? Usable as remote kernel (Jupyter) or remote machine (VS Code) via SSH.
- ? Easy to deploy on Mac, Linux, and Windows via Docker.
Getting Started
Prerequisites
The workspace requires Docker to be installed on your machine (Installation Guide).
? If you are new to Docker, we recommend taking a look at this beginner guide.
Start single instance
Deploying a single workspace instance is as simple as:
docker run -d -p 8091:8091 -v "${PWD}:/workspace" --restart always mltooling/ml-workspace:latest
Voilà, that was easy! Now, Docker will pull the latest workspace image to your machine. This may take a few minutes, depending on your internet speed. Once the workspace is started, you can access it via: http://localhost:8091.
ℹ️ If started on a remote machine or with a different port, make sure to use the machine's IP/DNS and/or the exposed port.
Persist Data
To persist the data, you need to mount a volume into /workspace.
Configuration
The container can be configured with the following environment variables (--env):
| Variable | Description | Default |
|---|---|---|
| WORKSPACE_BASE_URL | The base URL under which the notebook server is reachable. E.g. setting it to /my-workspace, the workspace would be reachable under /my-workspace/tree. | / |
| WORKSPACE_CONFIG_BACKUP | Automatically backup and restore user configuration to the persisted /workspace folder, such as the .ssh, .jupyter, or .gitconfig from the users home directory. |
true |
| WORKSPACE_AUTH_USER | Basic auth user name. To enable basic auth, both the user and password need to be set. | |
| WORKSPACE_AUTH_PASSWORD | Basic auth user password. To enable basic auth, both the user and password need to be set. | |
| WORKSPACE_SSL_ENABLED | Enable or disable SSL. When set to true, either certificates (cert.crt) must be mounted to /resources/ssl or, if not, the container generates self-signed certificates. |
false |
| Jupyter Configuration: | ||
| SHUTDOWN_INACTIVE_KERNELS | Automatically shutdown inactive kernels after a given timeout (to cleanup memory or gpu resources). Value can be either a timeout in seconds or set to true with a default value of 48h. |
false |
| AUTHENTICATE_VIA_JUPYTER | If true, all HTTP requests will be authenticated against the Jupyter server, meaning that the authentication method configured with Jupyter will be used for all other tools as well. This can be deactivated with false. Any other value will activate this authentication and are applied as token via NotebookApp.token configuration of Jupyter. |
false |
| NOTEBOOK_ARGS | Add and overwrite Jupyter configuration options via command line args. Refer to this overview for all options. | |
| Hardware Configuration: | ||
| OMP_NUM_THREADS | The number of threads used for MKL computations. This configuration can be overwritten by the user from within the workspace. Generally, it is good to set it at or below the number of CPUs available to the workspace. | 8 |
| NVIDIA_VISIBLE_DEVICES | (GPU only) Controls which GPUs will be accessible inside the workspace. By default, all GPUs from the host are accessible within the workspace. You can either use all, none, or specify a comma-separated list of device IDs (e.g. 0,1). You can find out the list of available device IDs by running nvidia-smi on the host machine. |
|
| CUDA_VISIBLE_DEVICES | (GPU only) Controls which GPUs CUDA applications running inside the workspace will see. By default, all GPUs that the workspace has access to will be visible. To restrict applications, provide a comma-separated list of internal device IDs (e.g. 0,2) based on the available devices within the workspace (run nvidia-smi). In comparison to NVIDIA_VISIBLE_DEVICES, the workspace user will still able to access other GPUs by overwriting this configuration from within the workspace. |
|
| VNC Configuration: | ||
| VNC_PW | Password of VNC Connection. | vncpassword |
| VNC_RESOLUTION | Desktop Resolution of VNC Connection. | 1600x900 |
| VNC_COL_DEPTH | Color Depth of VNC Connection. | 24 |
WIP Add Examples
Run multiple instances
WIP
Run GPU instance
WIP
Support
The ML Workspace project is maintained by @LukasMasuch
and @raethlein. Please understand that we won't be able
to provide individual support via email. We also believe that help is much more
valuable if it's shared publicly so that more people can benefit from it.
| Type | Channel |
|---|---|
| ? Bug Reports |  |
| ? Feature Requests |  |
| ?? Usage Questions |  |
| ? General Discussion |  |
Features
Jupyter • Desktop GUI • VS Code • Git Integration • JupyterLab • Hardware Monitoring • Tensorboard • SSH Access
The workspace is equipped with a selection of best-in-class open-source development tools to help with the machine learning workflow. Many of these tools can be started from the Open Tool menu from Jupyter (the main application of the workspace):

ℹ️ Within your workspace you have full root & sudo access to install any library or tool you need via terminal (e.g.,
piporapt-get)
Jupyter
Jupyter Notebook is a web-based interactive environment for writing and running code. The main building blocks of Jupyter are the file-browser, the notebook editor, and kernels. The file-browser provides an interactive file manager for all notebooks, files, and folders in the /workspace directory.

A new notebook can be created by clicking on the New drop-down button at the top of the list and selecting the desired language kernel.
? You can spawn interactive terminal instances as well by selecting
New -> Terminalin the file-browser.
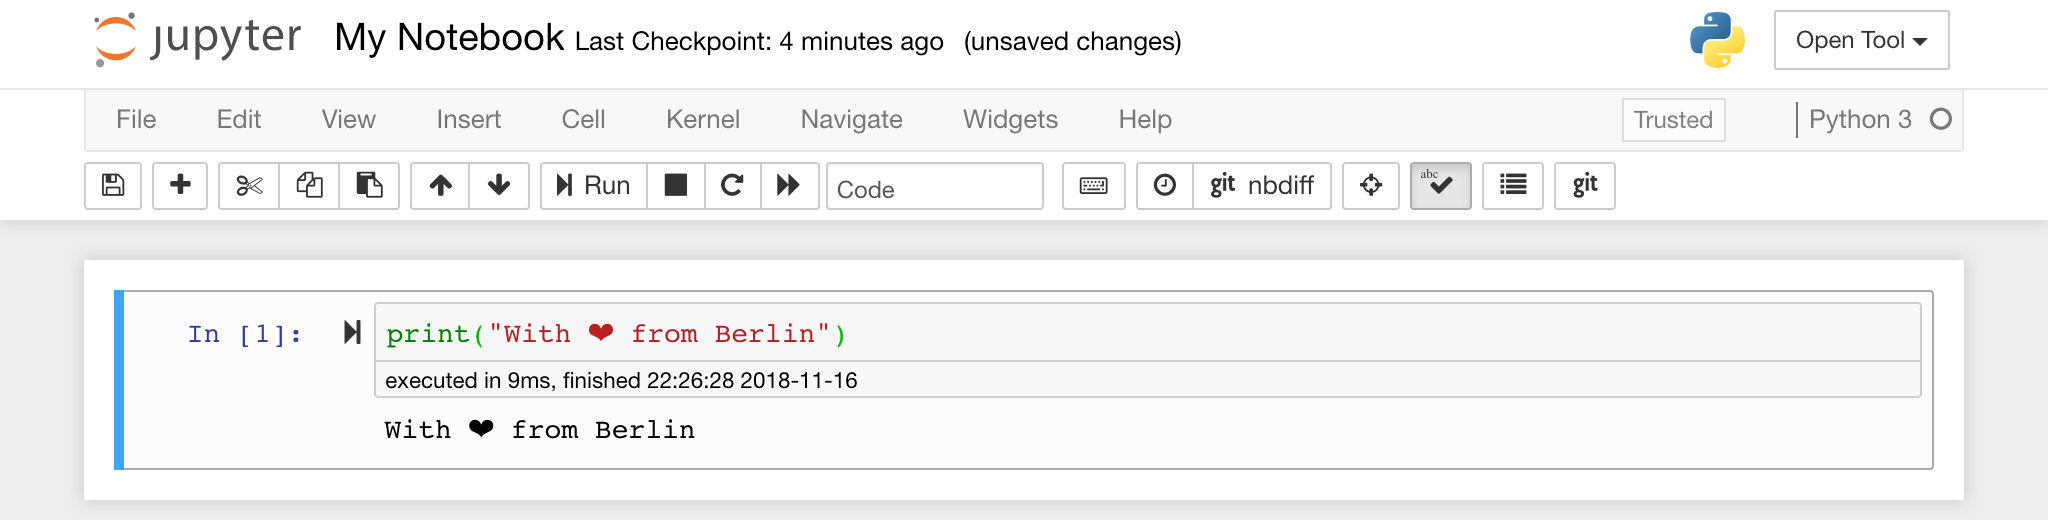
The notebook editor enables users to author documents that include live code, markdown text, shell commands, LaTeX equations, interactive widgets, plots, and images. These notebook documents provide a complete and self-contained record of a computation that can be converted to various formats and shared with others.
ℹ️ This workspace has a variety of third-party Jupyter extensions activated. You can configure these extensions in the nbextensions configurator:
nbextensionstab on the file browser
The Notebook allows code to be run in a range of different programming languages. For each notebook document that a user opens, the web application starts a kernel that runs the code for that notebook and returns output. This workspace has a Python 3 and Python 2 kernel pre-installed. Additional Kernels can be installed to get access to other languages (e.g., R, Scala, Go) or additional computing resources (e.g., GPUs, CPUs, Memory).
ℹ️ Python 2 support is deprecated and not fully supported. Please only use Python 2 if necessary!
Desktop GUI
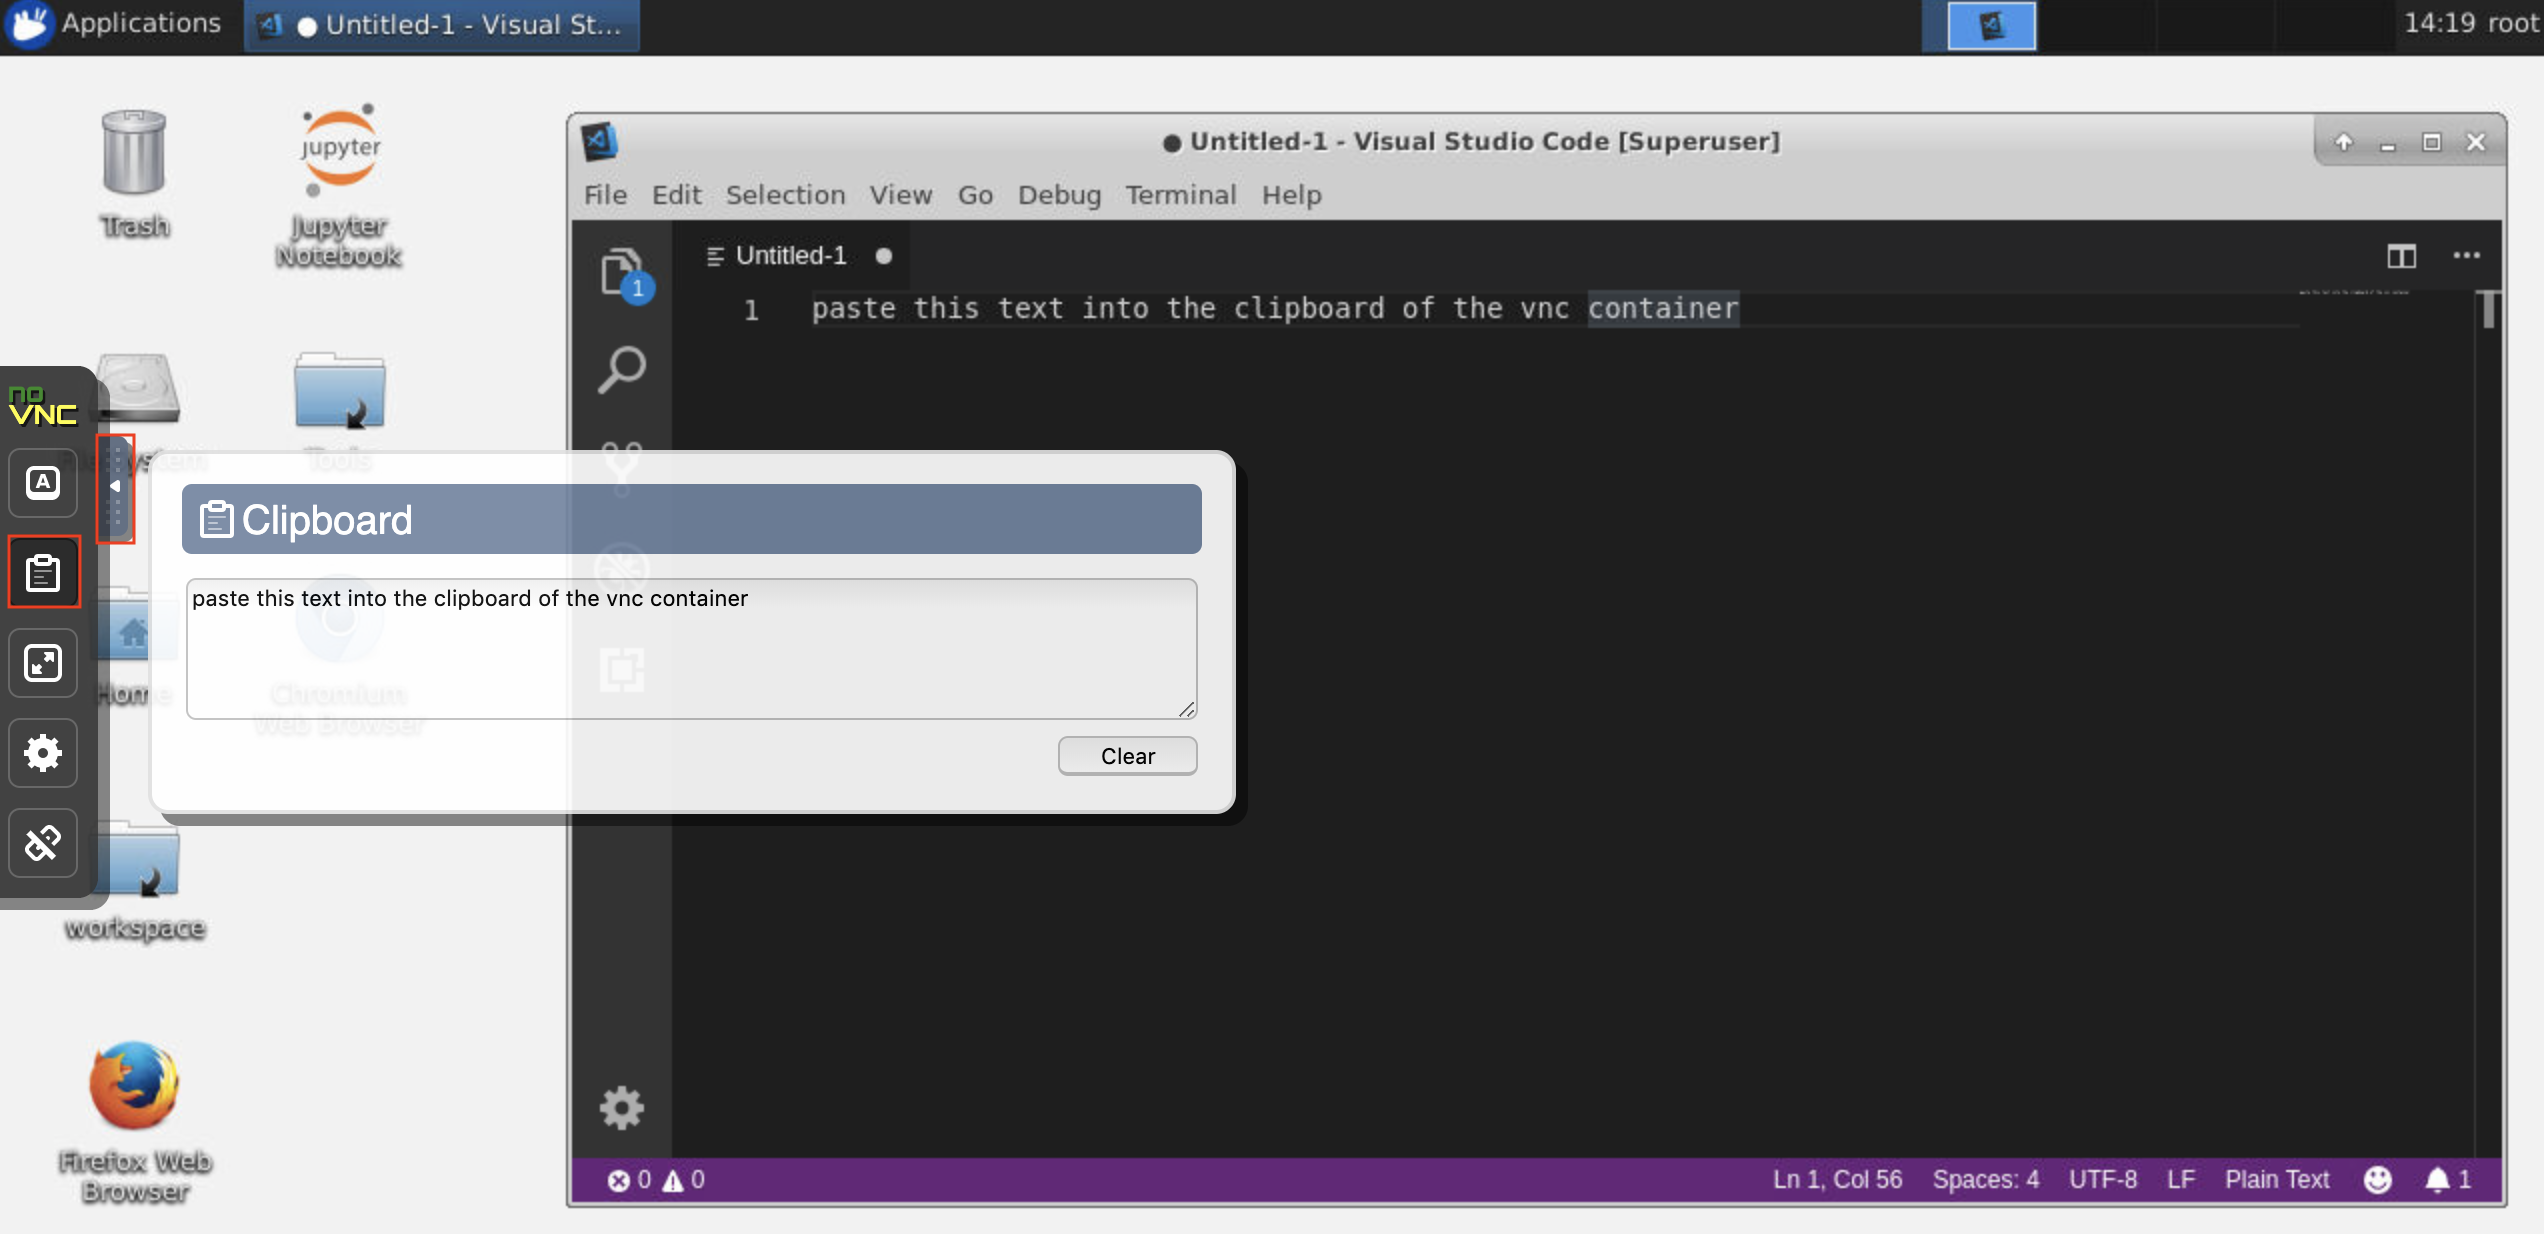
This workspace provides an HTTP-based VNC access to the workspace via noVNC. Thereby, you can access and work within the workspace with a fully featured desktop GUI. To access this desktop GUI, go to Open Tool, select VNC, and click the Connect button. In the case you are asked for a password, use vncpassword.

Once you are connected, you will see a desktop GUI that allows you to install and use full-fledged web-browsers or any other tool that is available for Ubuntu. Within the Tools folder on the desktop, you will find a collection of install scripts that makes it straightforward to install some of the most commonly used development tools, such as Atom, PyCharm, R-Runtime, R-Studio, or Postman (just double-click on the script).
Clipboard: If you want to share the clipboard between your machine and the workspace, you can use the copy-paste functionality as described below:
? Long-running tasks: Use the desktop GUI for long-running Jupyter executions. By running notebooks from the browser of your workspace desktop GUI, all output will be synchronized to the notebook even if you have disconnected your browser from the notebook.
Visual Studio Code
Visual Studio Code (Open Tool -> VS Code) is an open-source lightweight but powerful code editor with built-in support for a variety of languages and a rich ecosystem of extensions. It combines the simplicity of a source code editor with powerful developer tooling, like IntelliSense code completion and debugging. The workspace integrates VS Code as a web-based application accessible through the browser based on the awesome code-server project. It allows you to customize every feature to your liking and install any number of third-party extensions.
Git Integration
Version control is a crucial aspect for productive collaboration. To make this process as smooth as possible, we have integrated a custom-made Jupyter extension specialized on pushing single notebooks, a full-fledged web-based Git client (ungit), a tool to open and edit plain text documents (e.g., .py, .md) as notebooks (jupytext), as well as a notebook merging tool (nbdime). Additionally, JupyterLab and VS Code also provide GUI-based Git clients.
Clone Repository
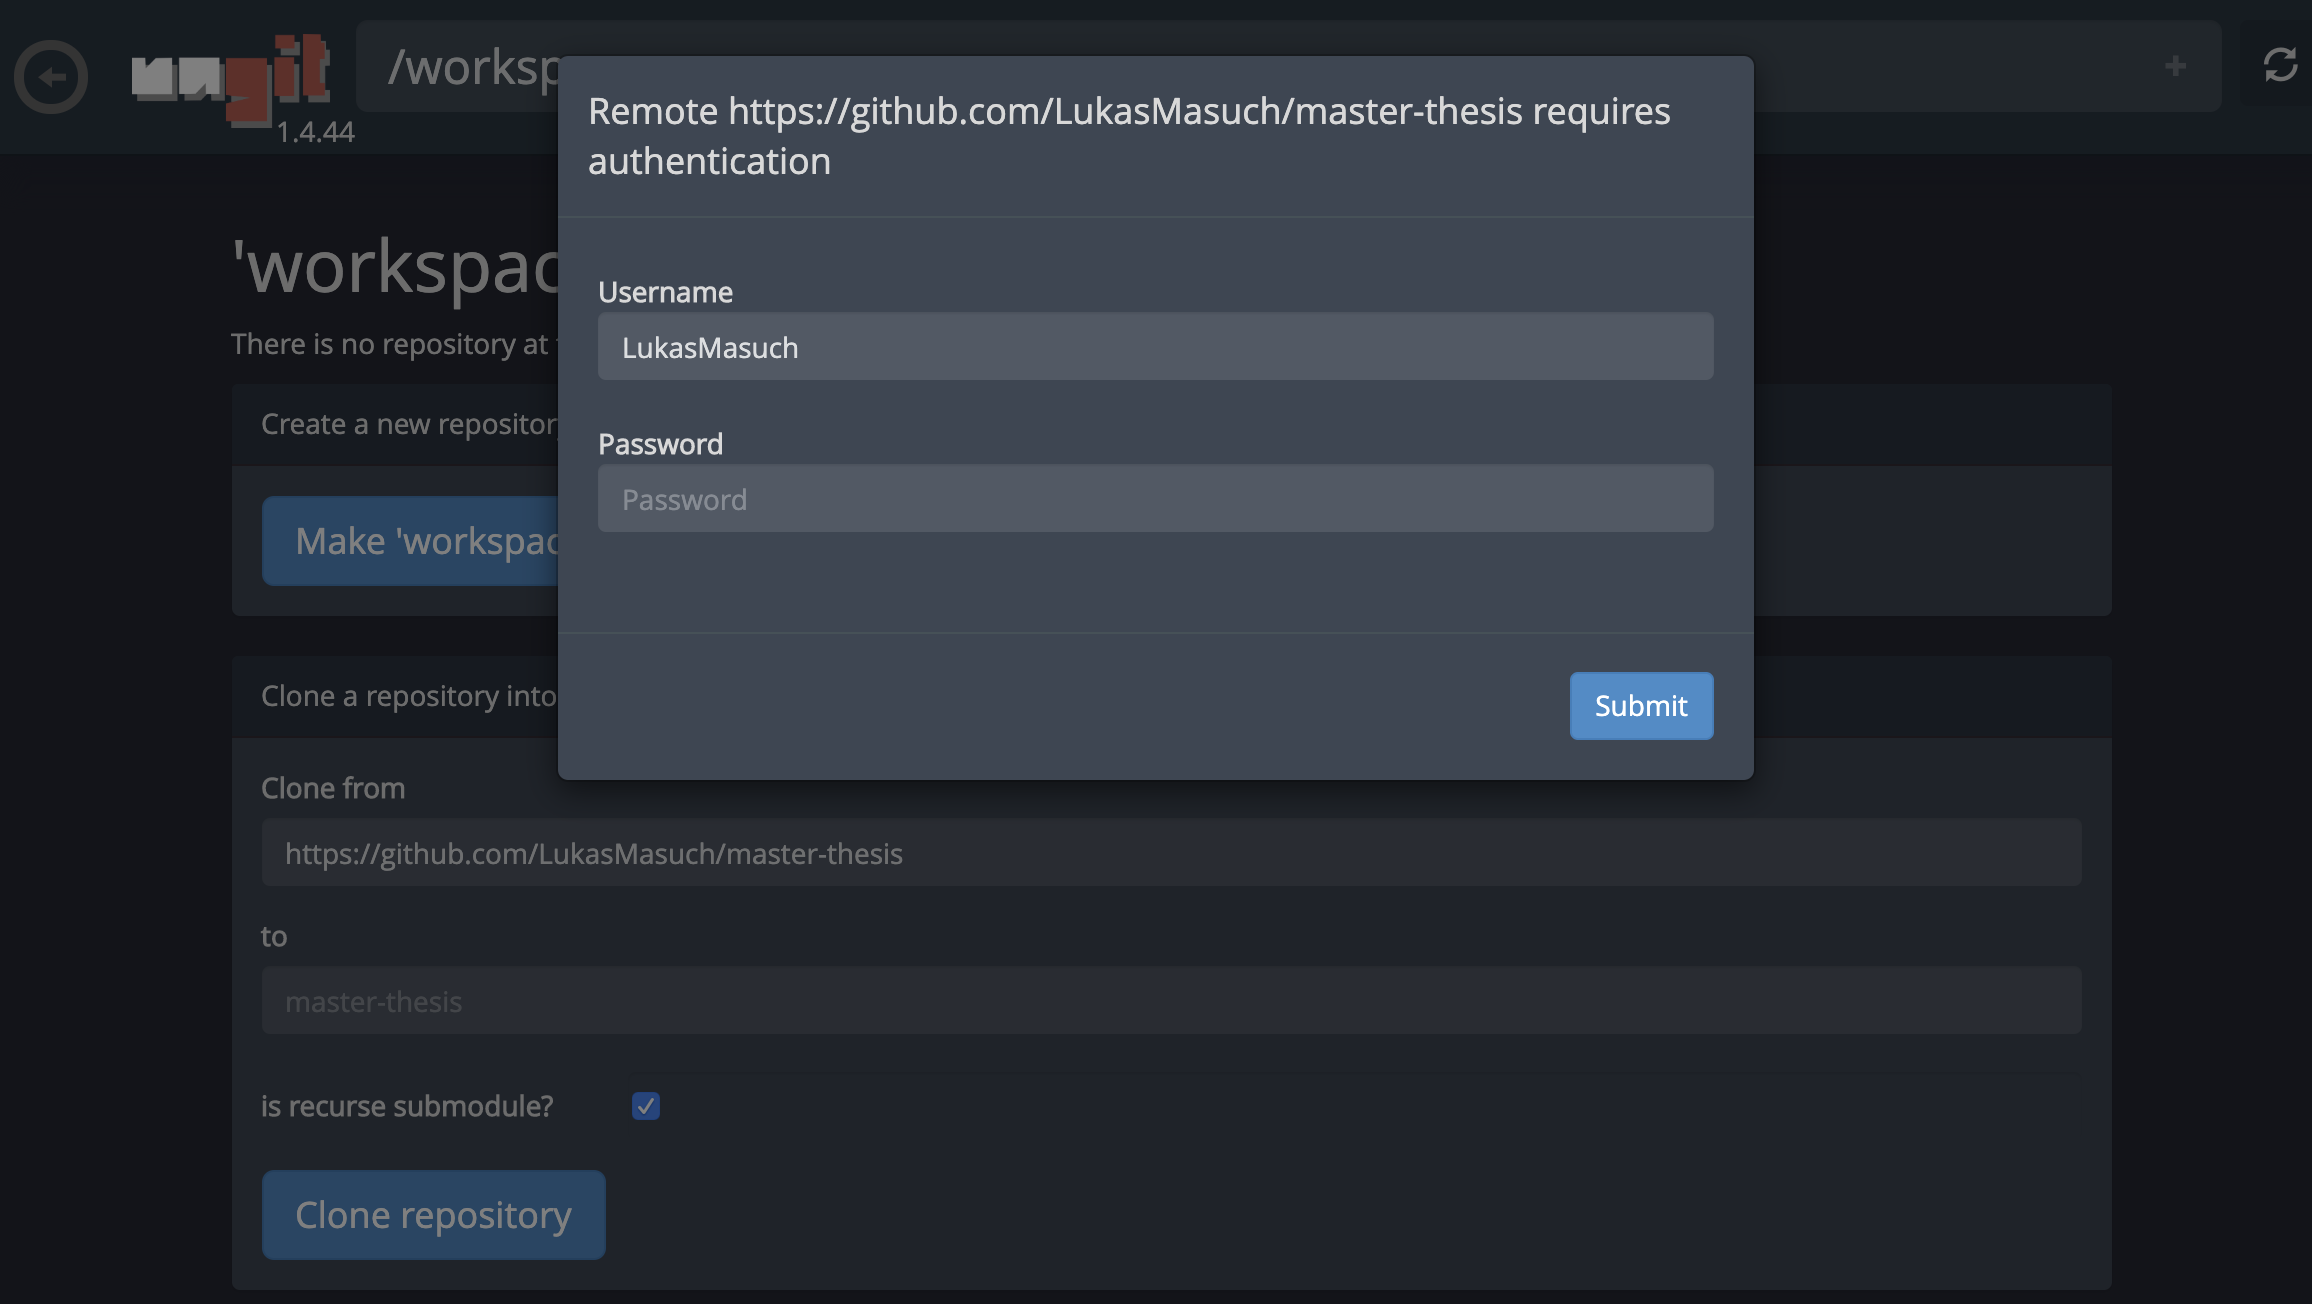
For cloning repositories via https, we recommend to navigate to the desired root folder and to click on the git button as shown below:

This might ask for some required settings and, subsequently, opens ungit, a web-based Git client with a clean and intuitive UI that makes it convenient to sync your code artifacts. Within ungit, you can clone any repository. If authentication is required, you will get asked for your credentials.
Push, Pull, Merge, and Other Git Actions
To commit and push a single notebook to a remote Git repository, we recommend to use the Git plugin integrated into Jupyter as shown below:
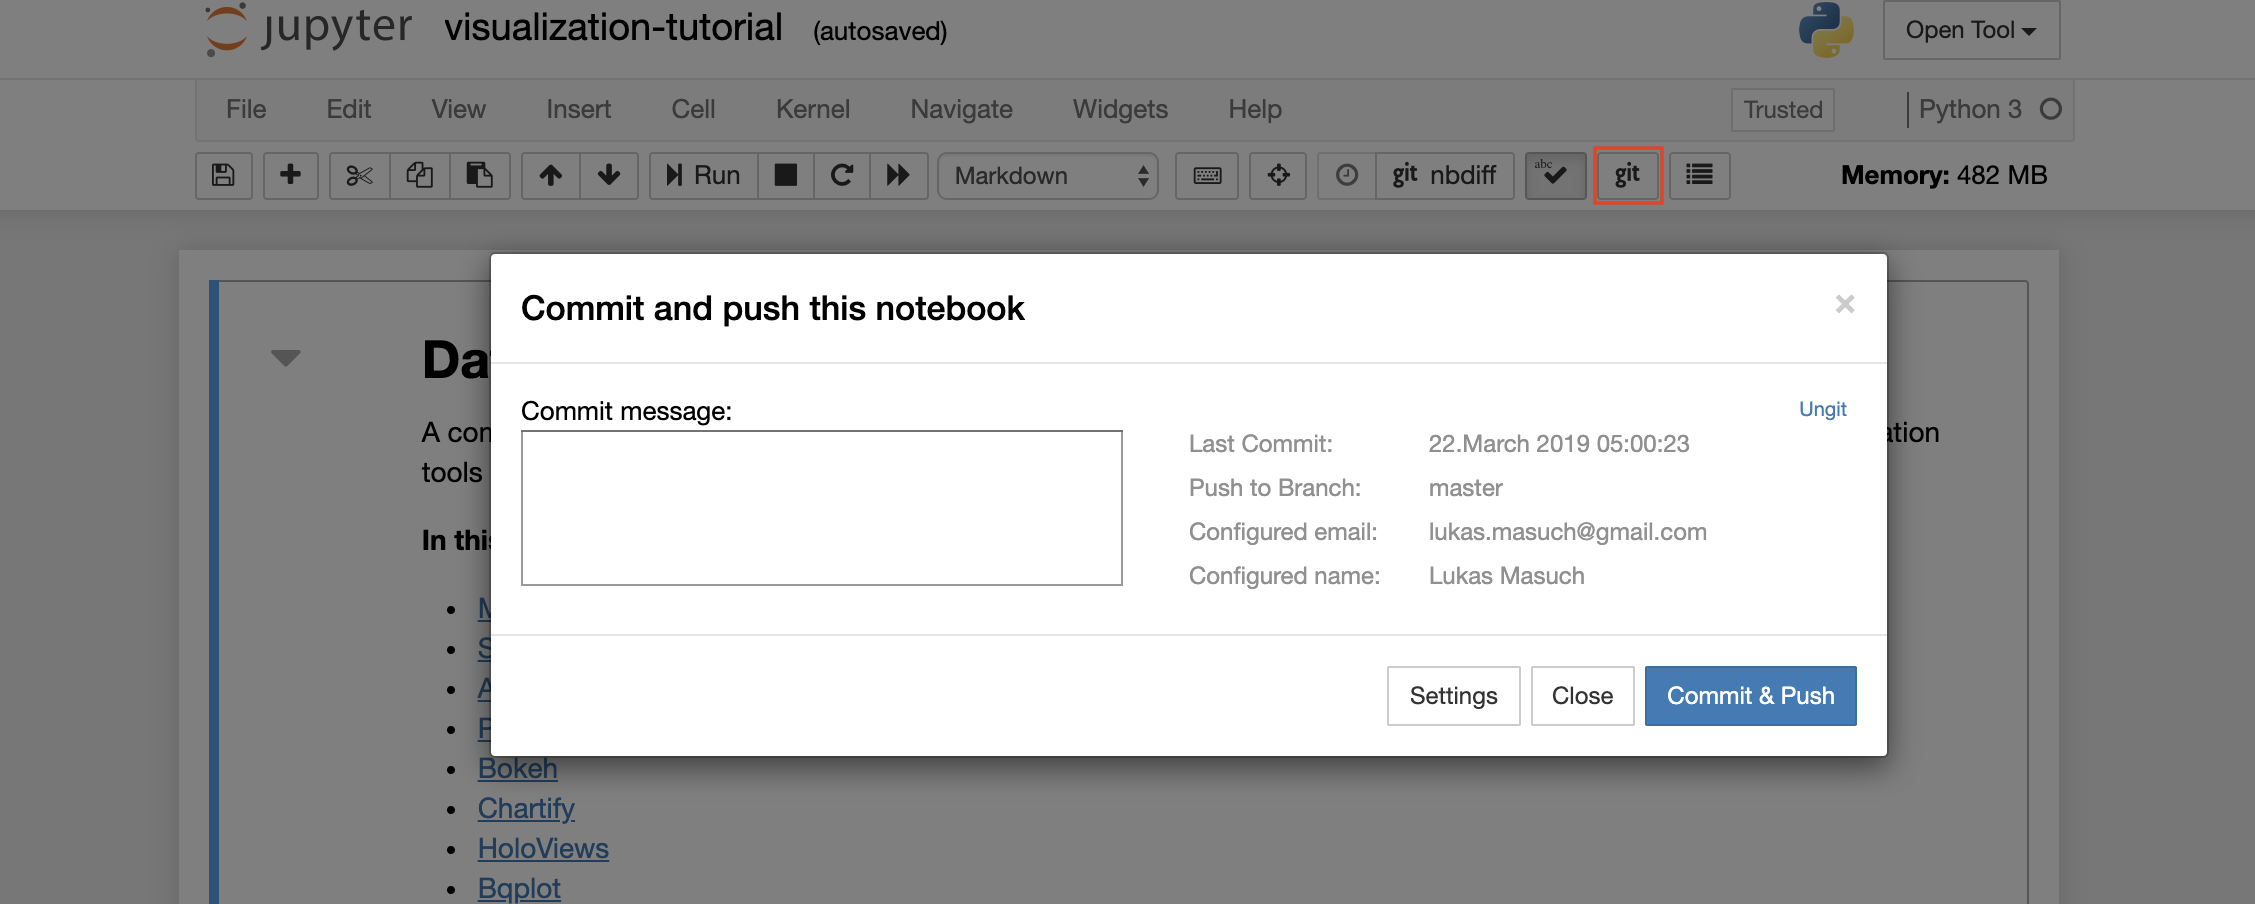
For more advanced Git operations we recommend to use ungit. With ungit, you can do most of the common git actions such as push, pull, merge, branch, tag, checkout, and many more.
Sharing, Diffing, and Merging Notebooks
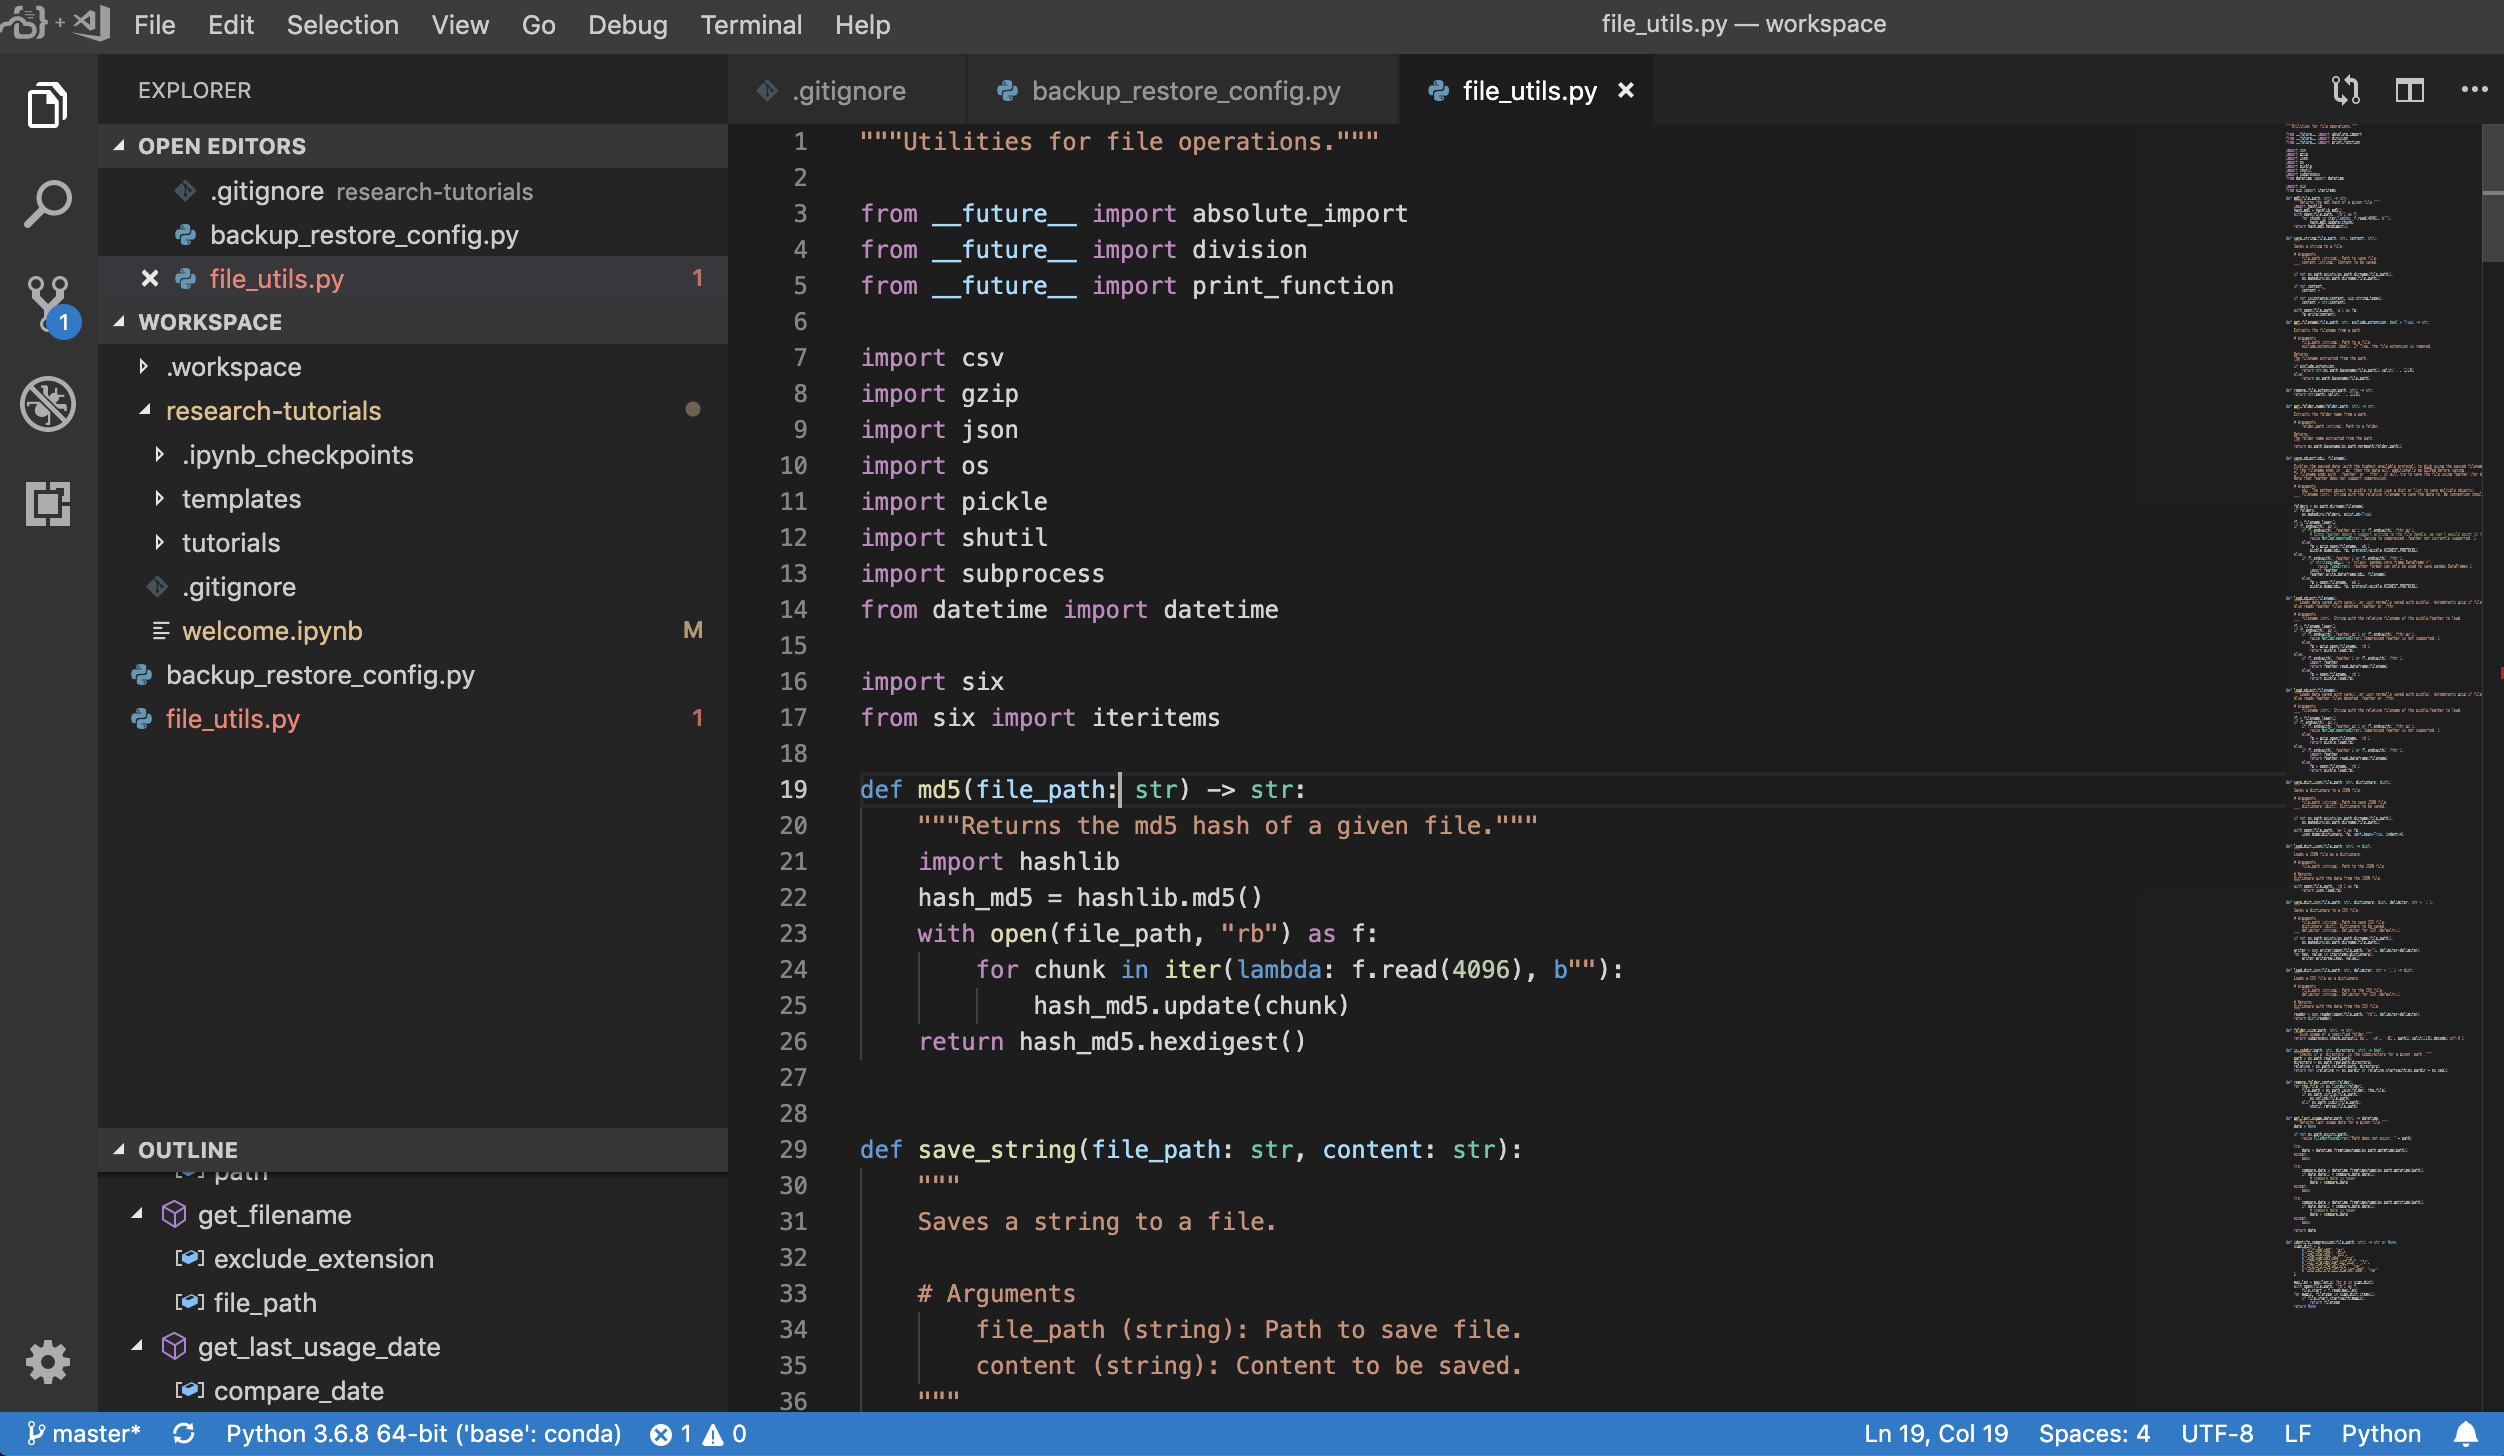
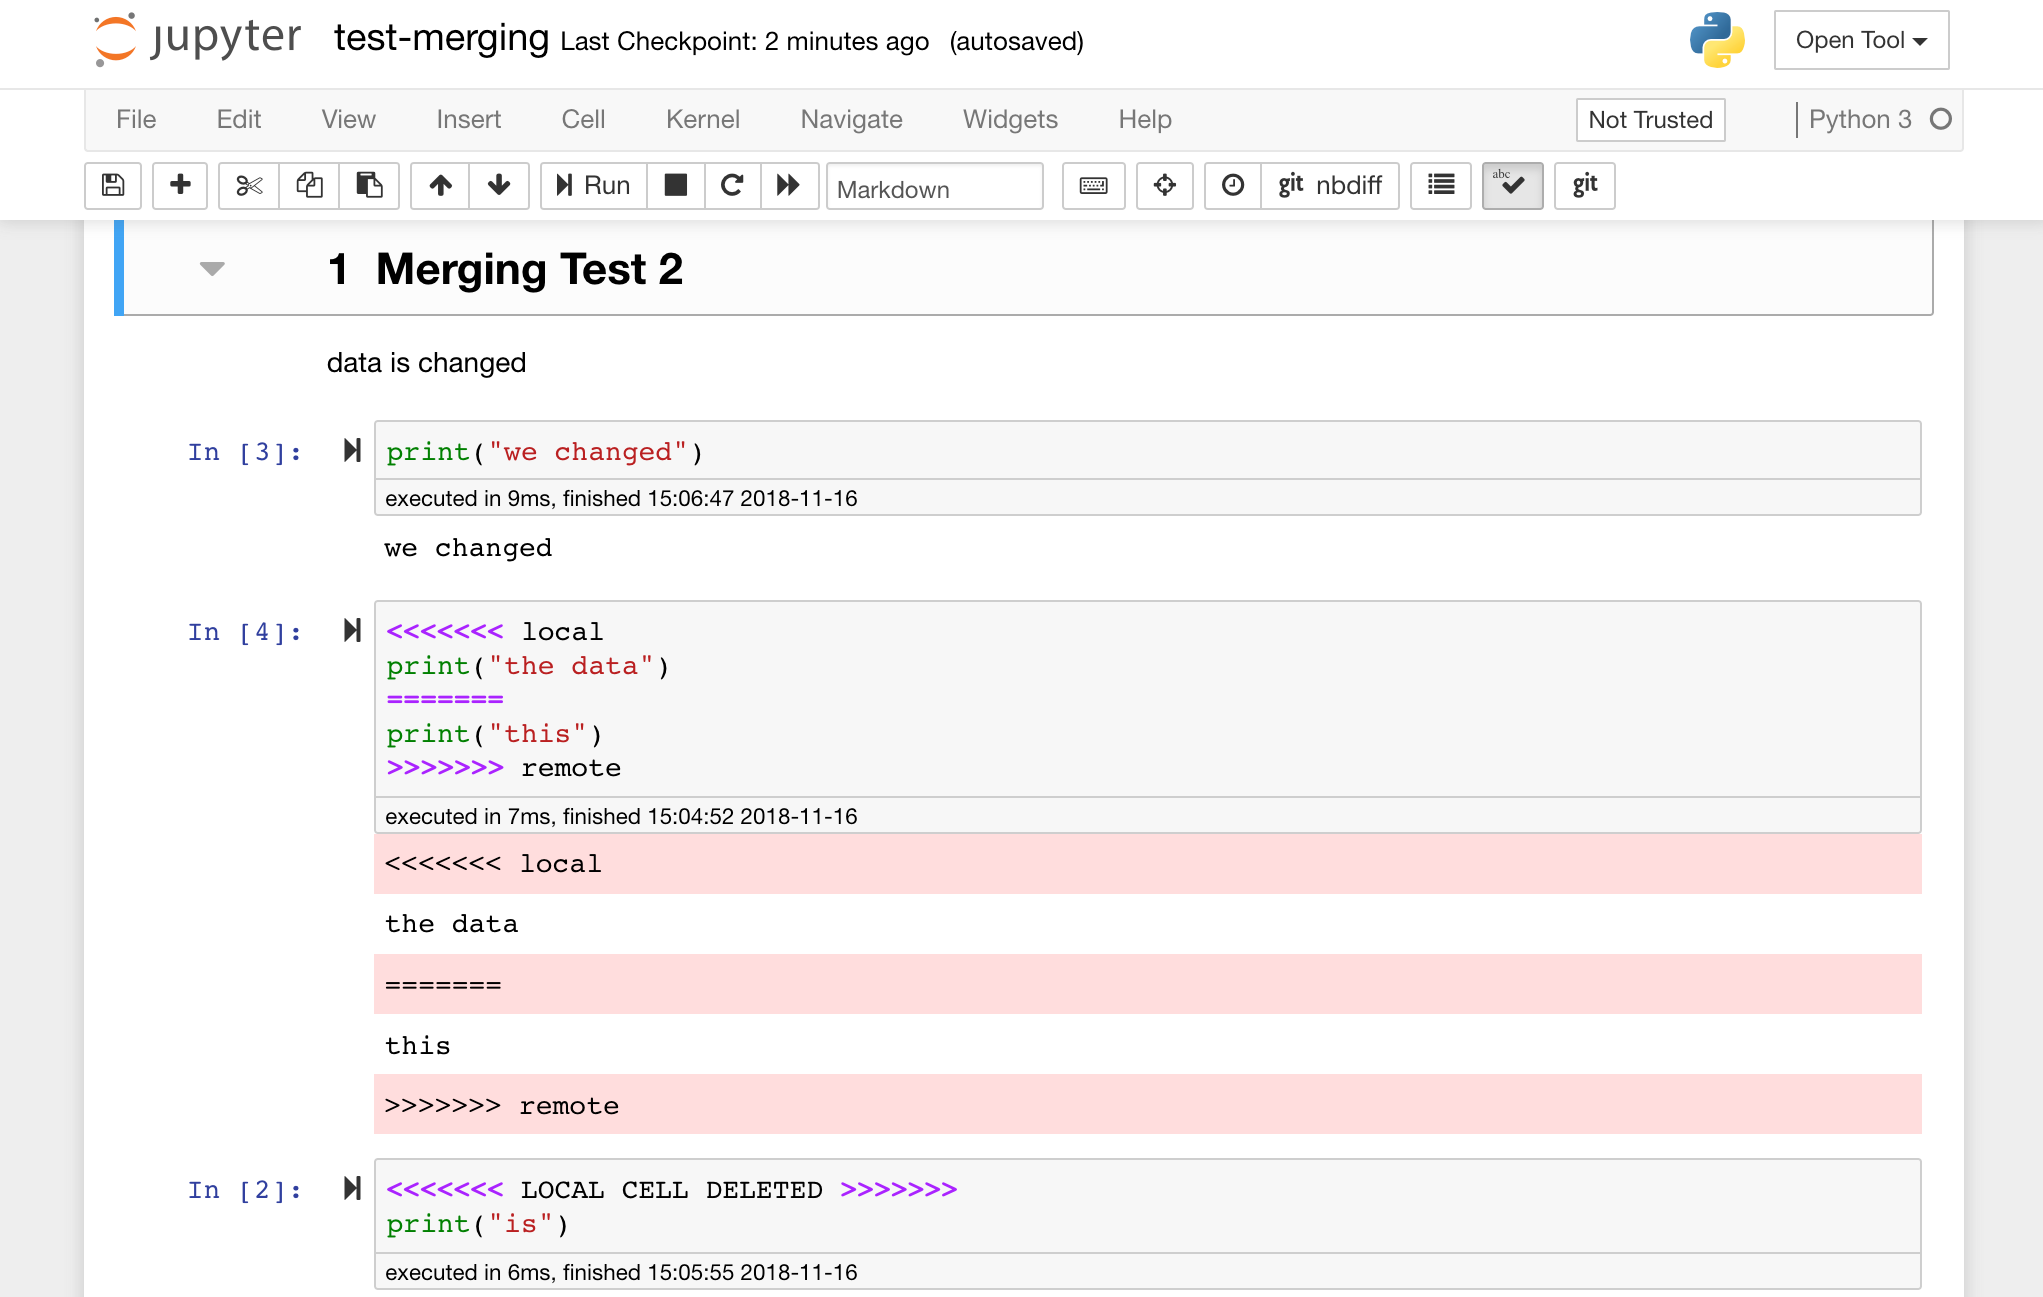
Jupyter notebooks are great, but they often are huge files, with a very specific JSON file format. To enable seamless sharing, diffing, and merging via Git this workspace is pre-installed with nbdime. Nbdime understands the structure of notebook documents and, therefore, automatically makes intelligent decisions when diffing and merging notebooks. In the case you have merge conflicts, nbdime will make sure that the notebook is still readable by Jupyter, as shown below:
Furthermore, the workspace comes pre-installed with jupytext, a Jupyter plugin that reads and writes notebooks as plain text files. This allows you to open, edit, and run scripts or markdown files (e.g., .py, .md) as notebooks within Jupyter. In the following screenshot, we have opened this README.md file via Jupyter:
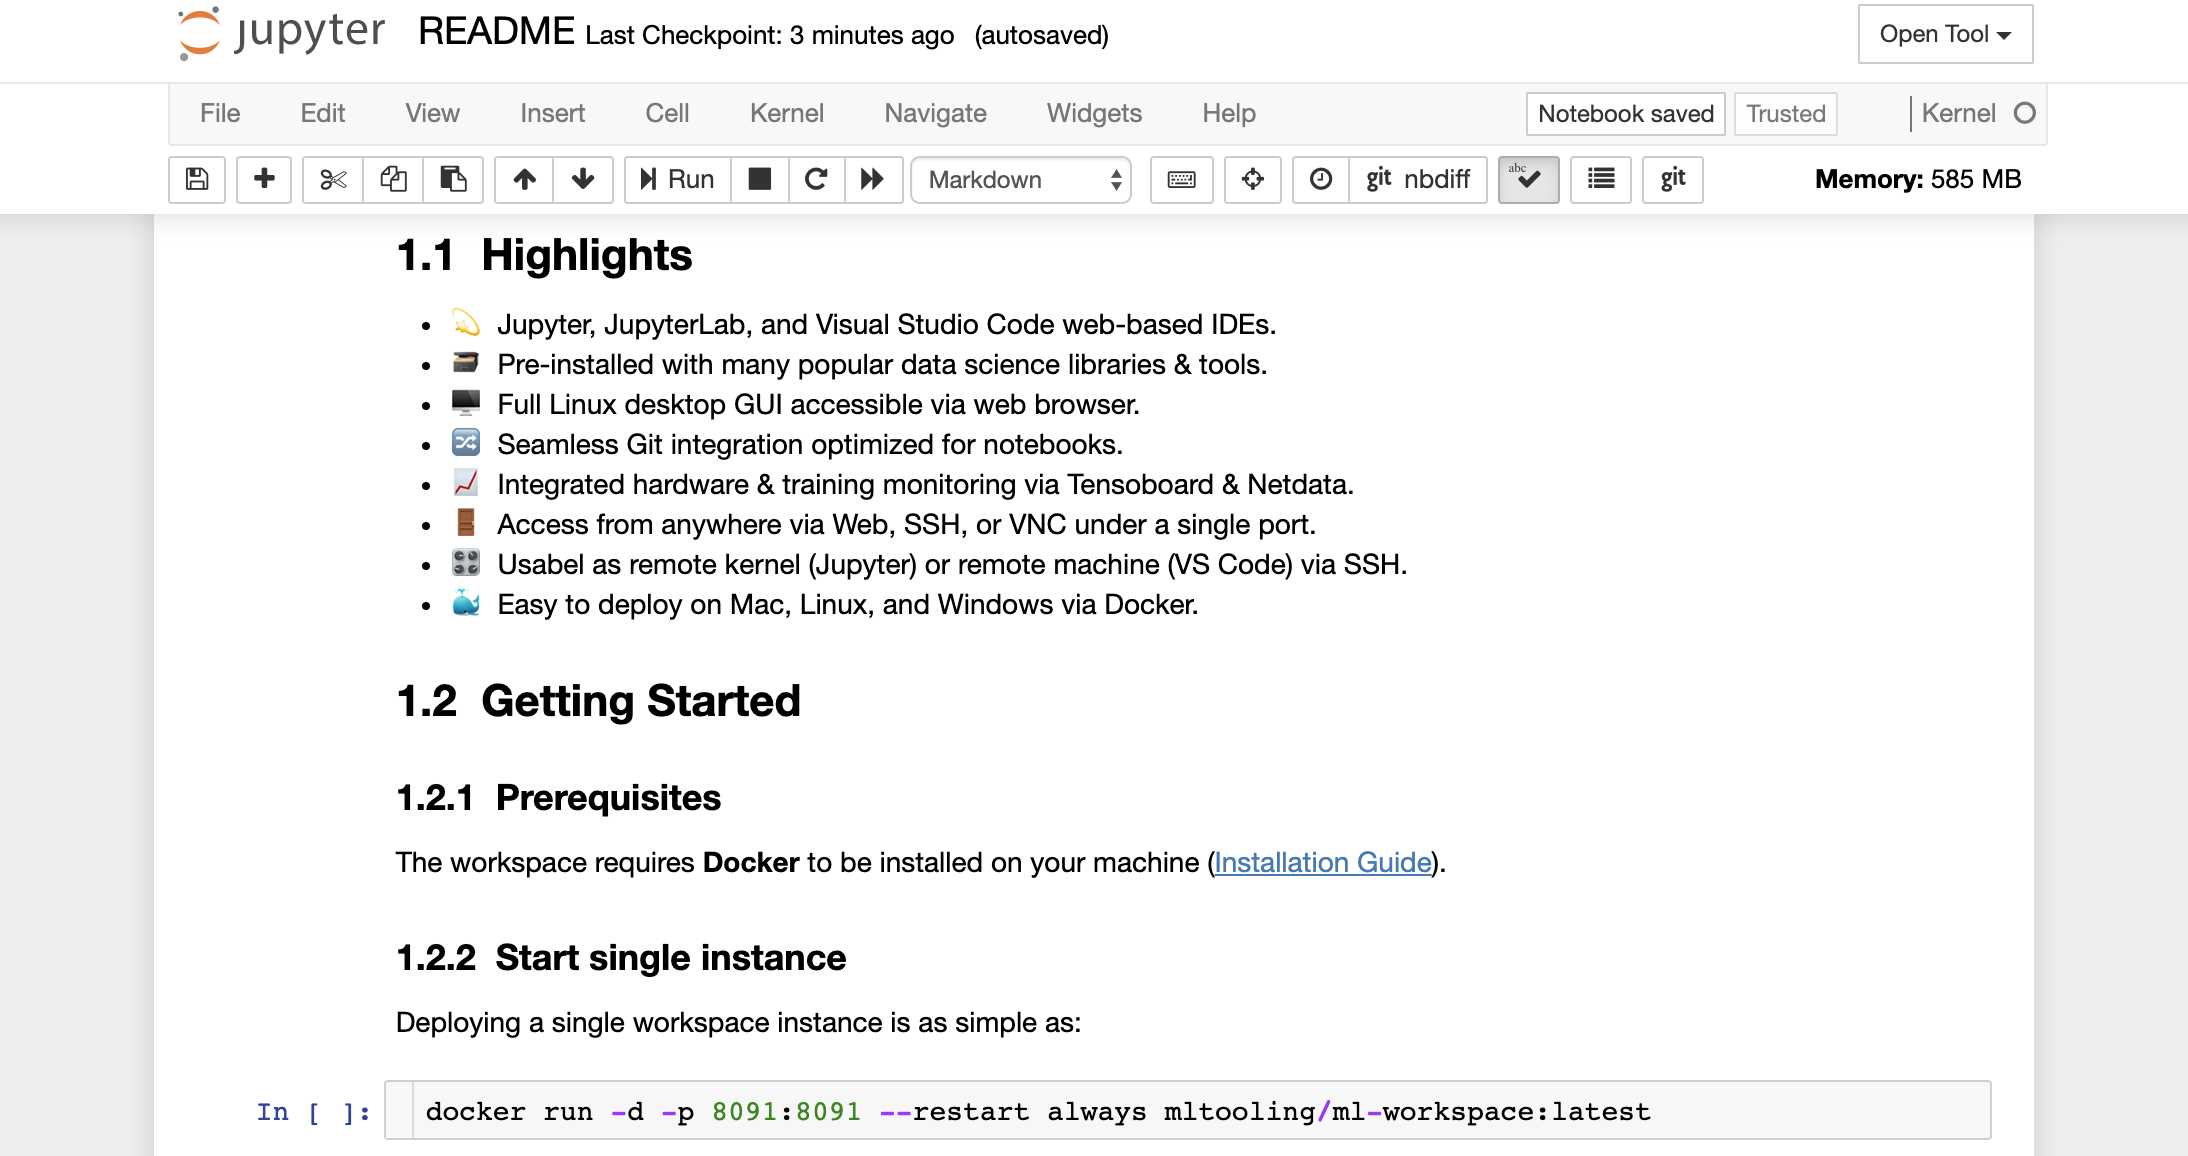
In combination with Git, jupytext enables a clear diff history and easy merging of version conflicts. With both of those tools, collaborating on Jupyter notebooks with Git becomes straightforward.
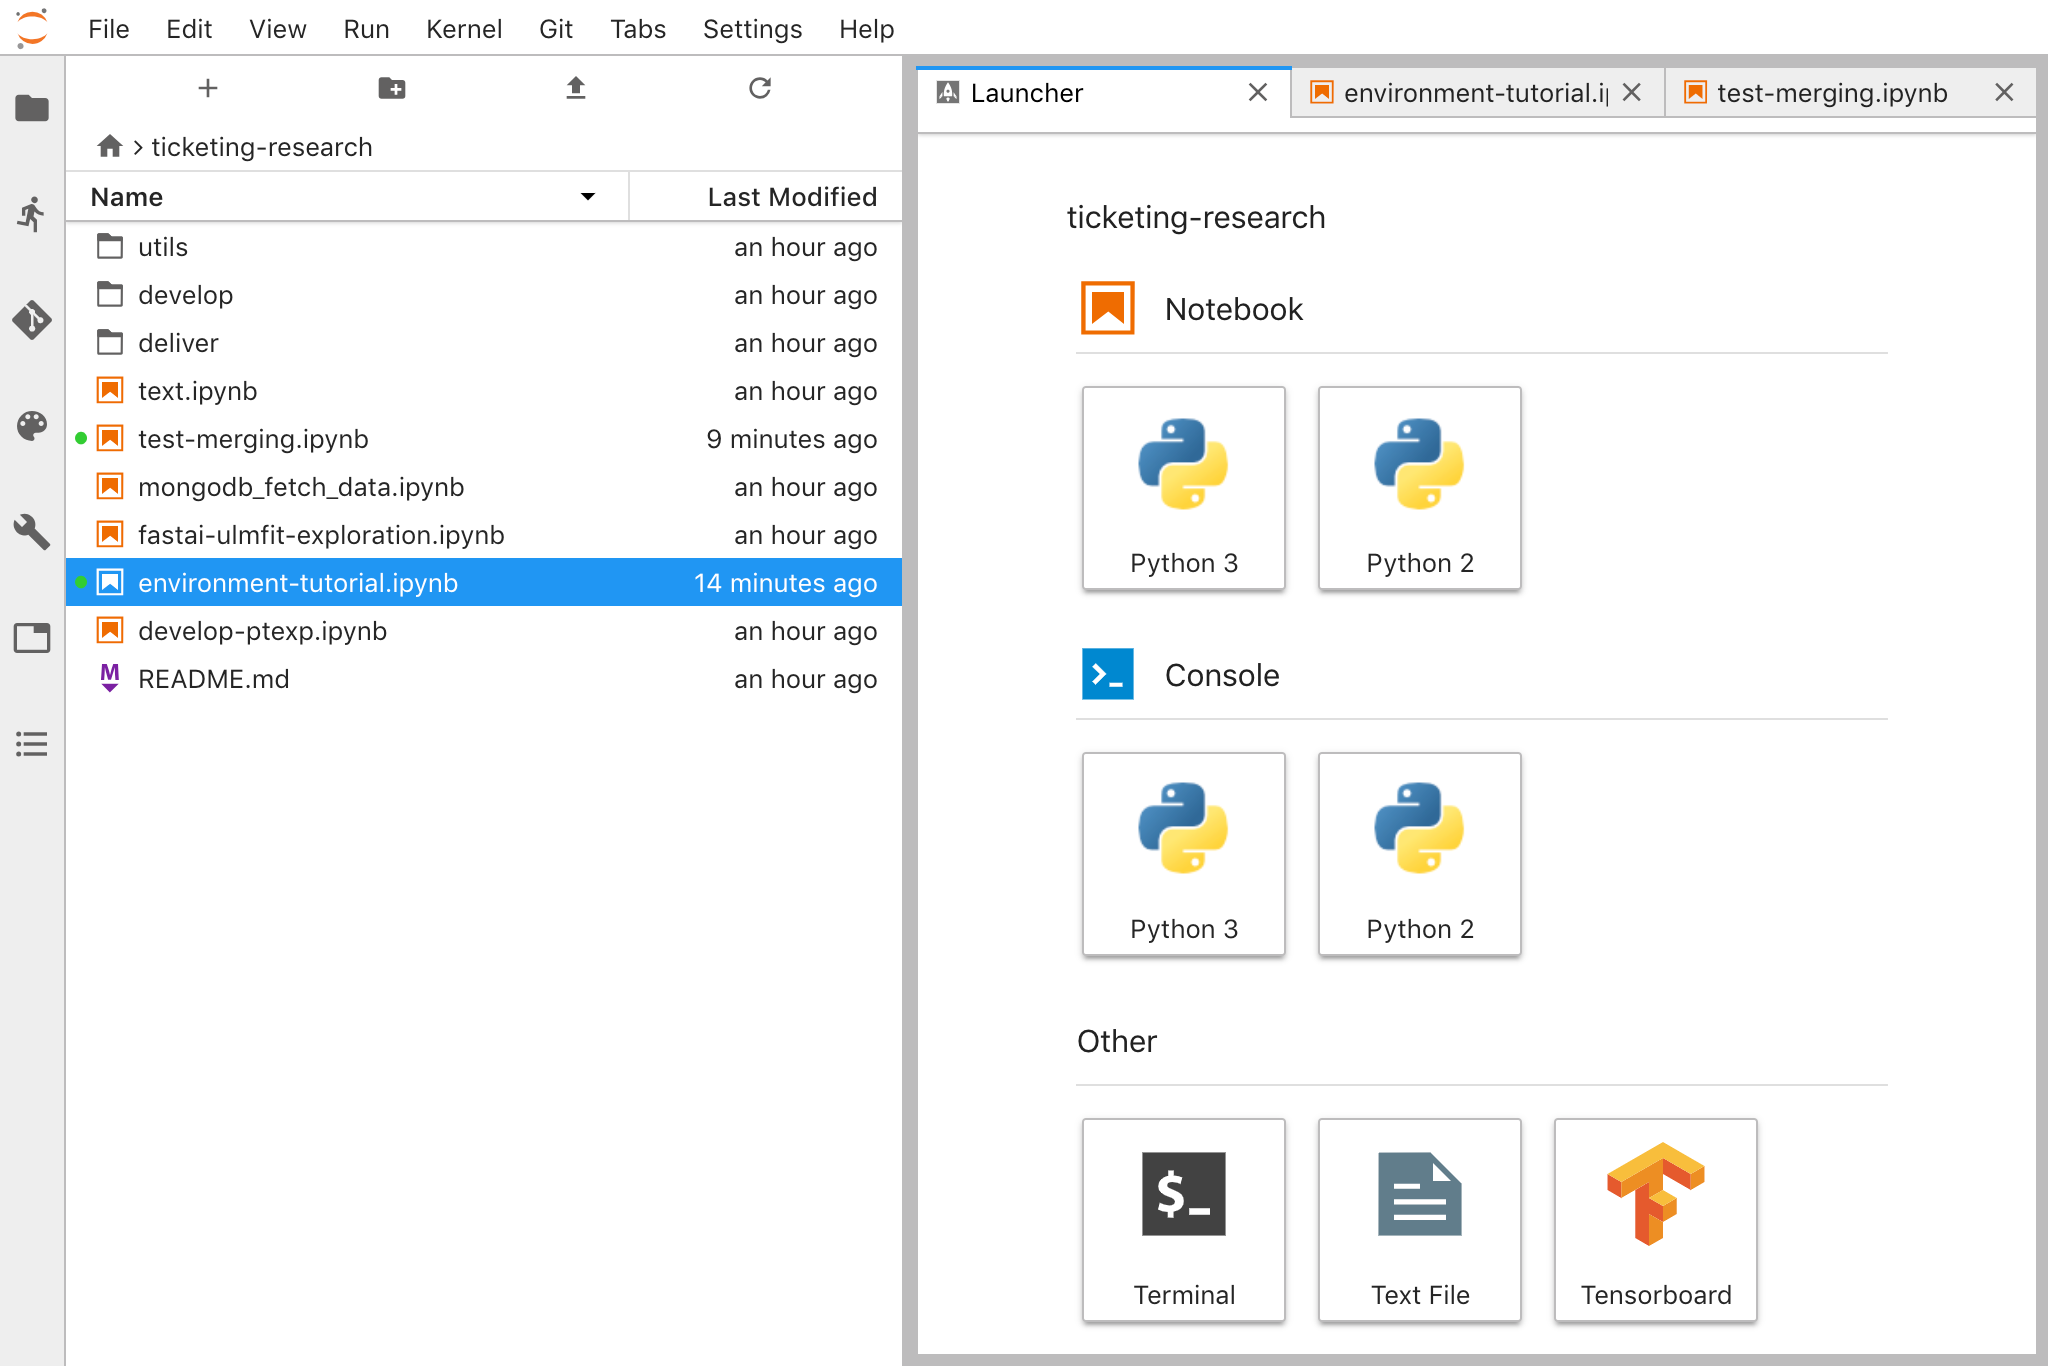
JupyterLab
JupyterLab (Open Tool -> JupyterLab) is the next-generation user interface for Project Jupyter. It offers all the familiar building blocks of the classic Jupyter Notebook (notebook, terminal, text editor, file browser, rich outputs, etc.) in a flexible and powerful user interface. This JupyterLab instance comes pre-installed with a few helpful extensions such as a the jupyterlab-toc, jupyterlab-git, and juptyterlab-tensorboard.
Hardware Monitoring
The workspace provides two preinstalled web-based tools to help developers during model training and other experimentation tasks to get insights into everything happening on the system and figure out performance bottlenecks.
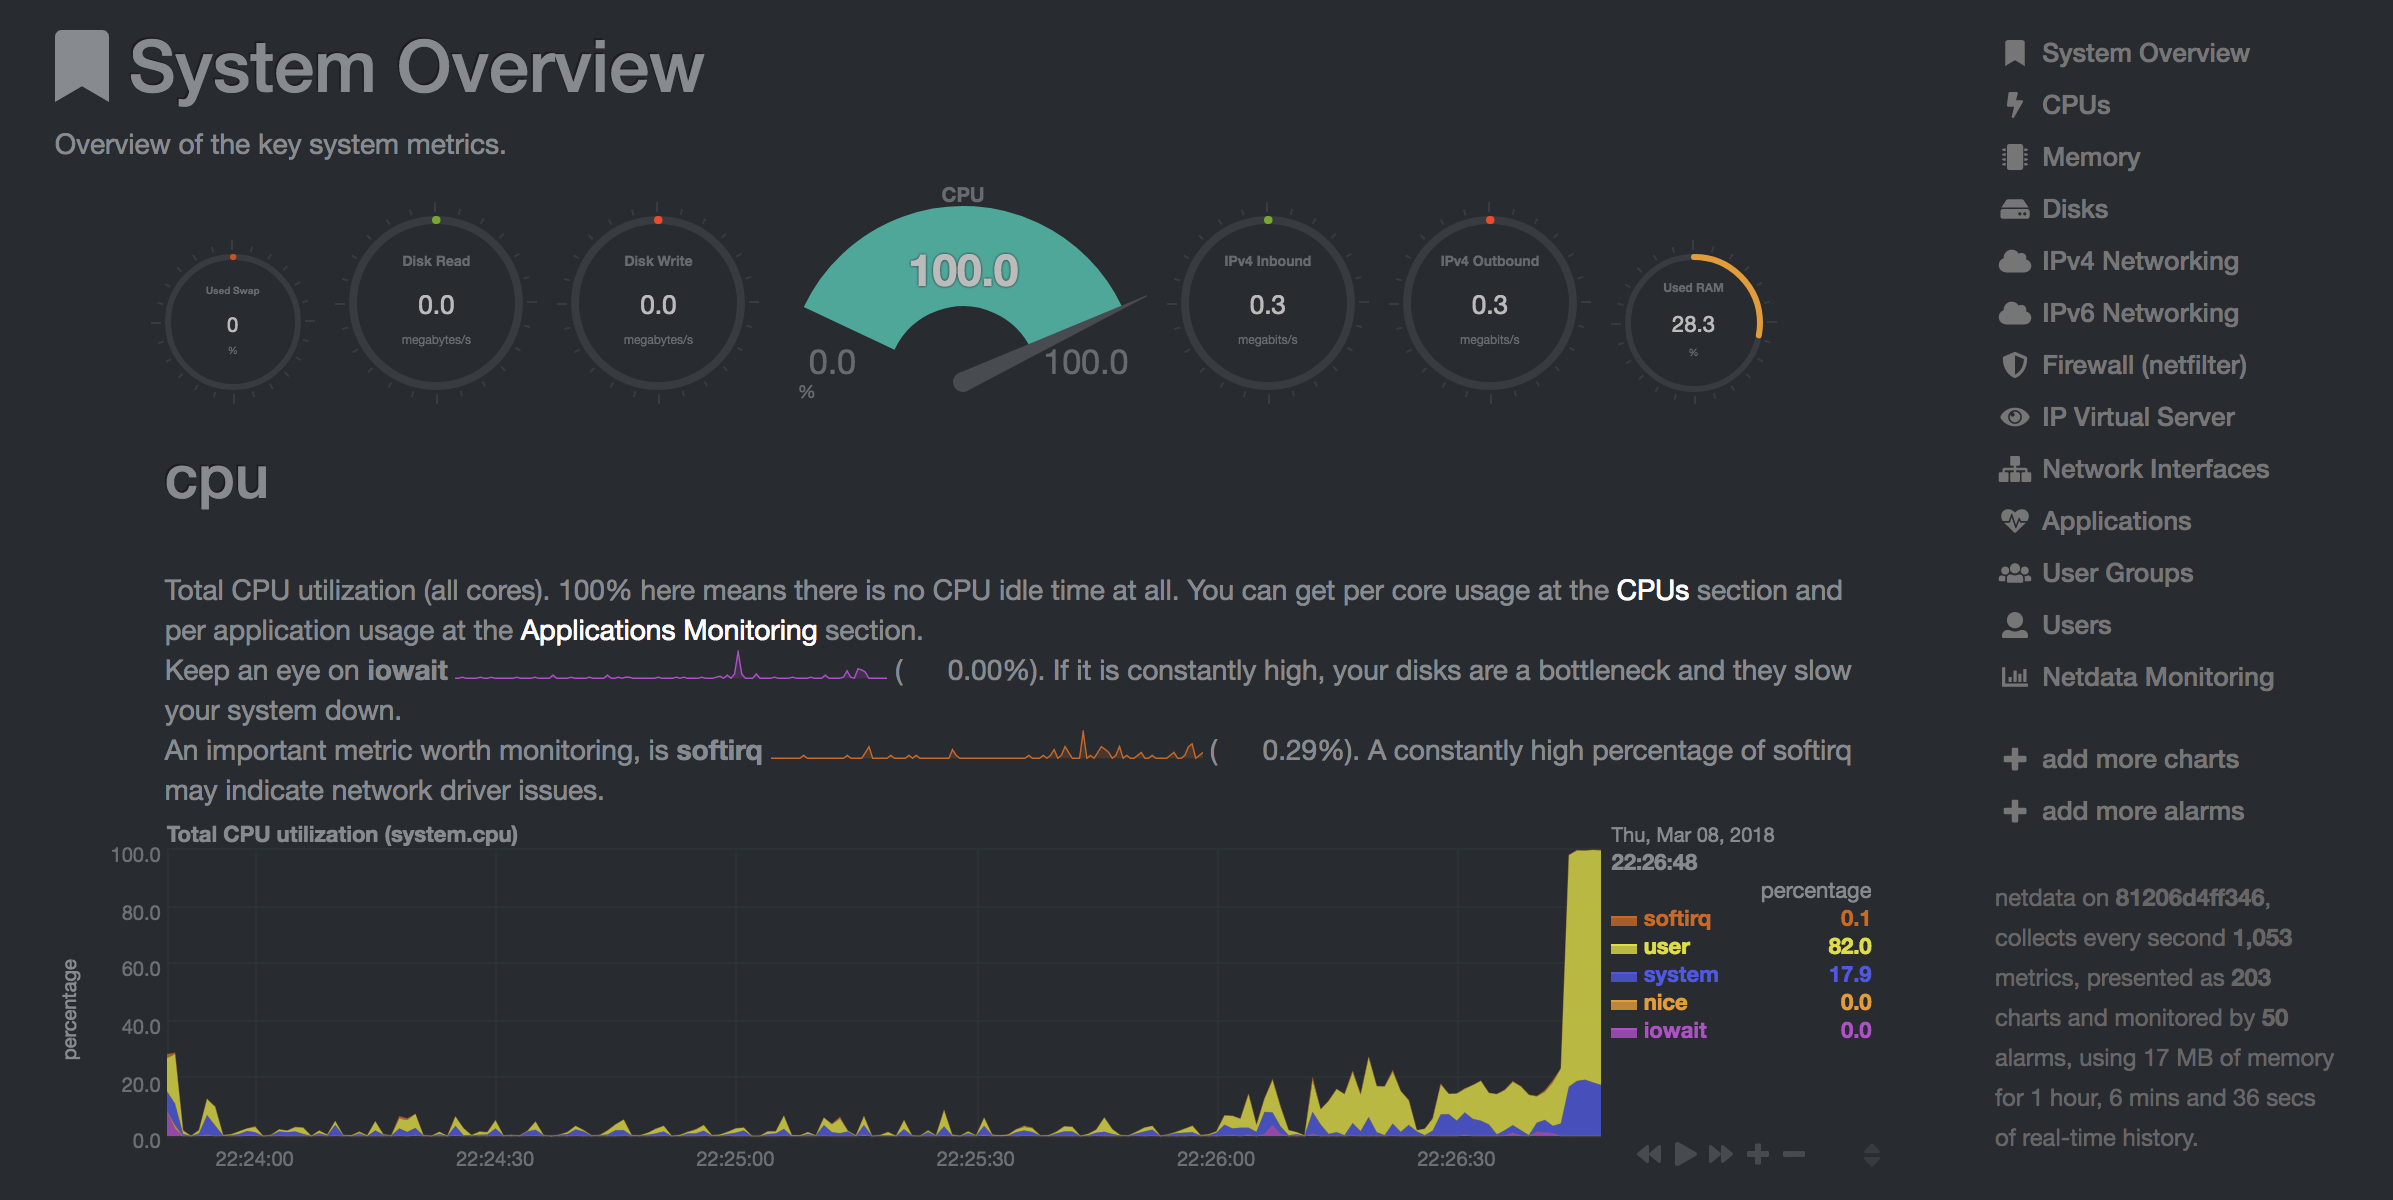
Netdata (Open Tool -> Netdata) is a real-time hardware and performance monitoring dashboard that visualize the processes and services on your Linux systems. It monitors metrics about CPU, GPU, memory, disks, networks, processes, and more.
Glances (Open Tool -> Glances) is a web-based hardware monitoring dashboard as well and can be used as an alternative to Netdata.
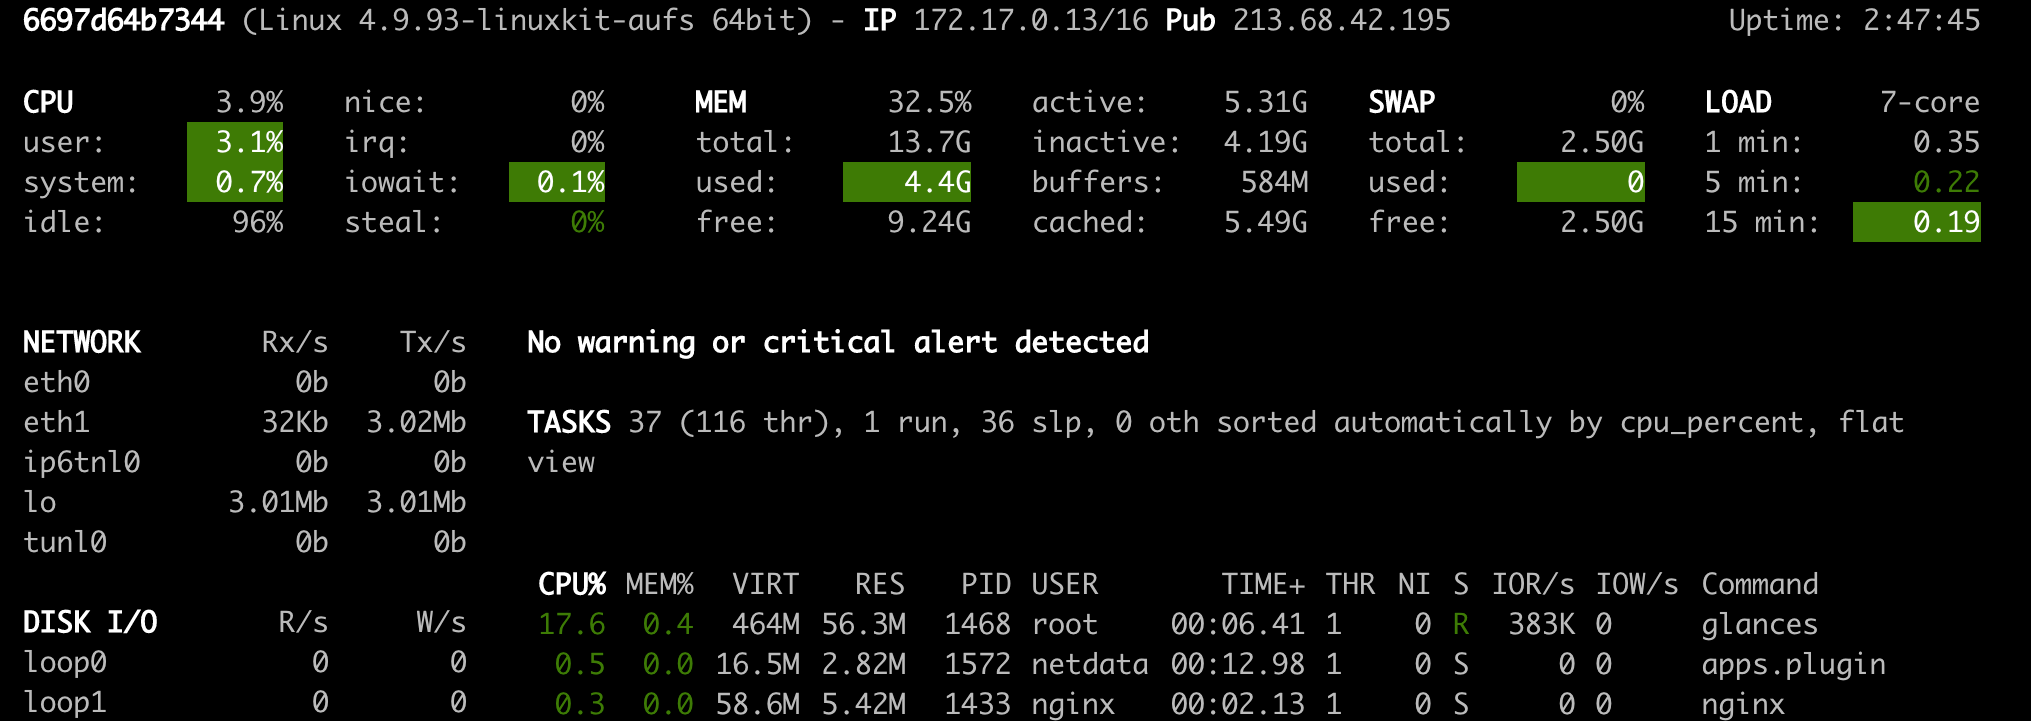
ℹ️ Netdata and Glances will show you the hardware statistics for the entire machine on which the workspace container is running.
Tensorboard
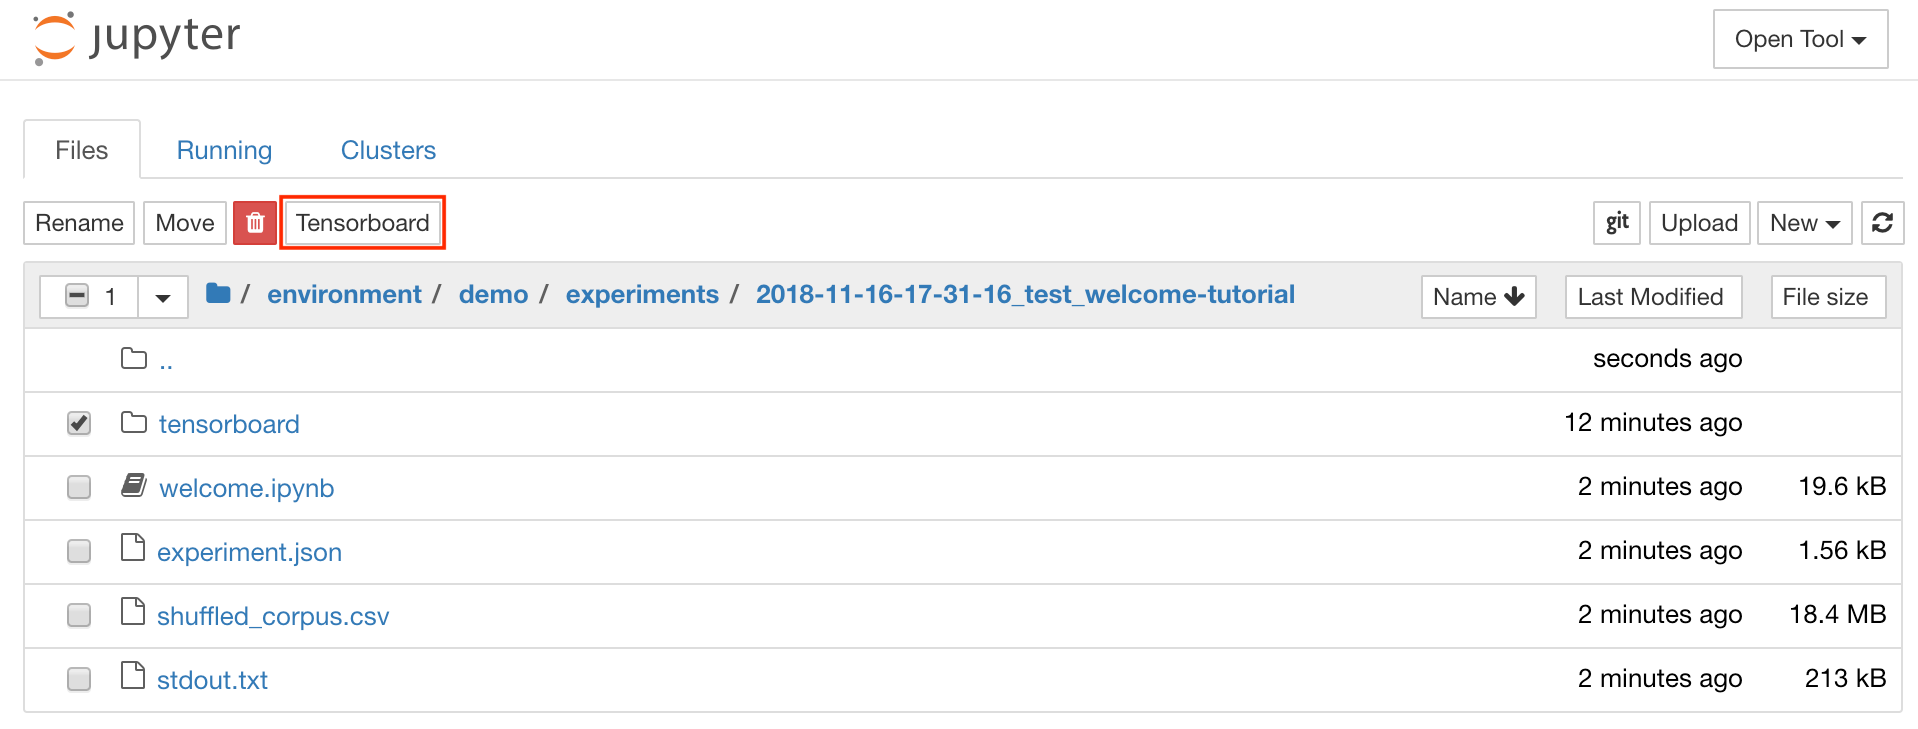
Tensorboard provides a suite of visualization tools to make it easier to understand, debug, and optimize your experiment runs. It includes logging features for scalar, histogram, model structure, embeddings, and text & image visualization. The workspace comes preinstalled with jupyter_tensorboard extension that integrates Tensorboard into the Jupyter interface with functionalities to start, manage, and stop instances. You can open a new instance for a valid logs directory as shown below:
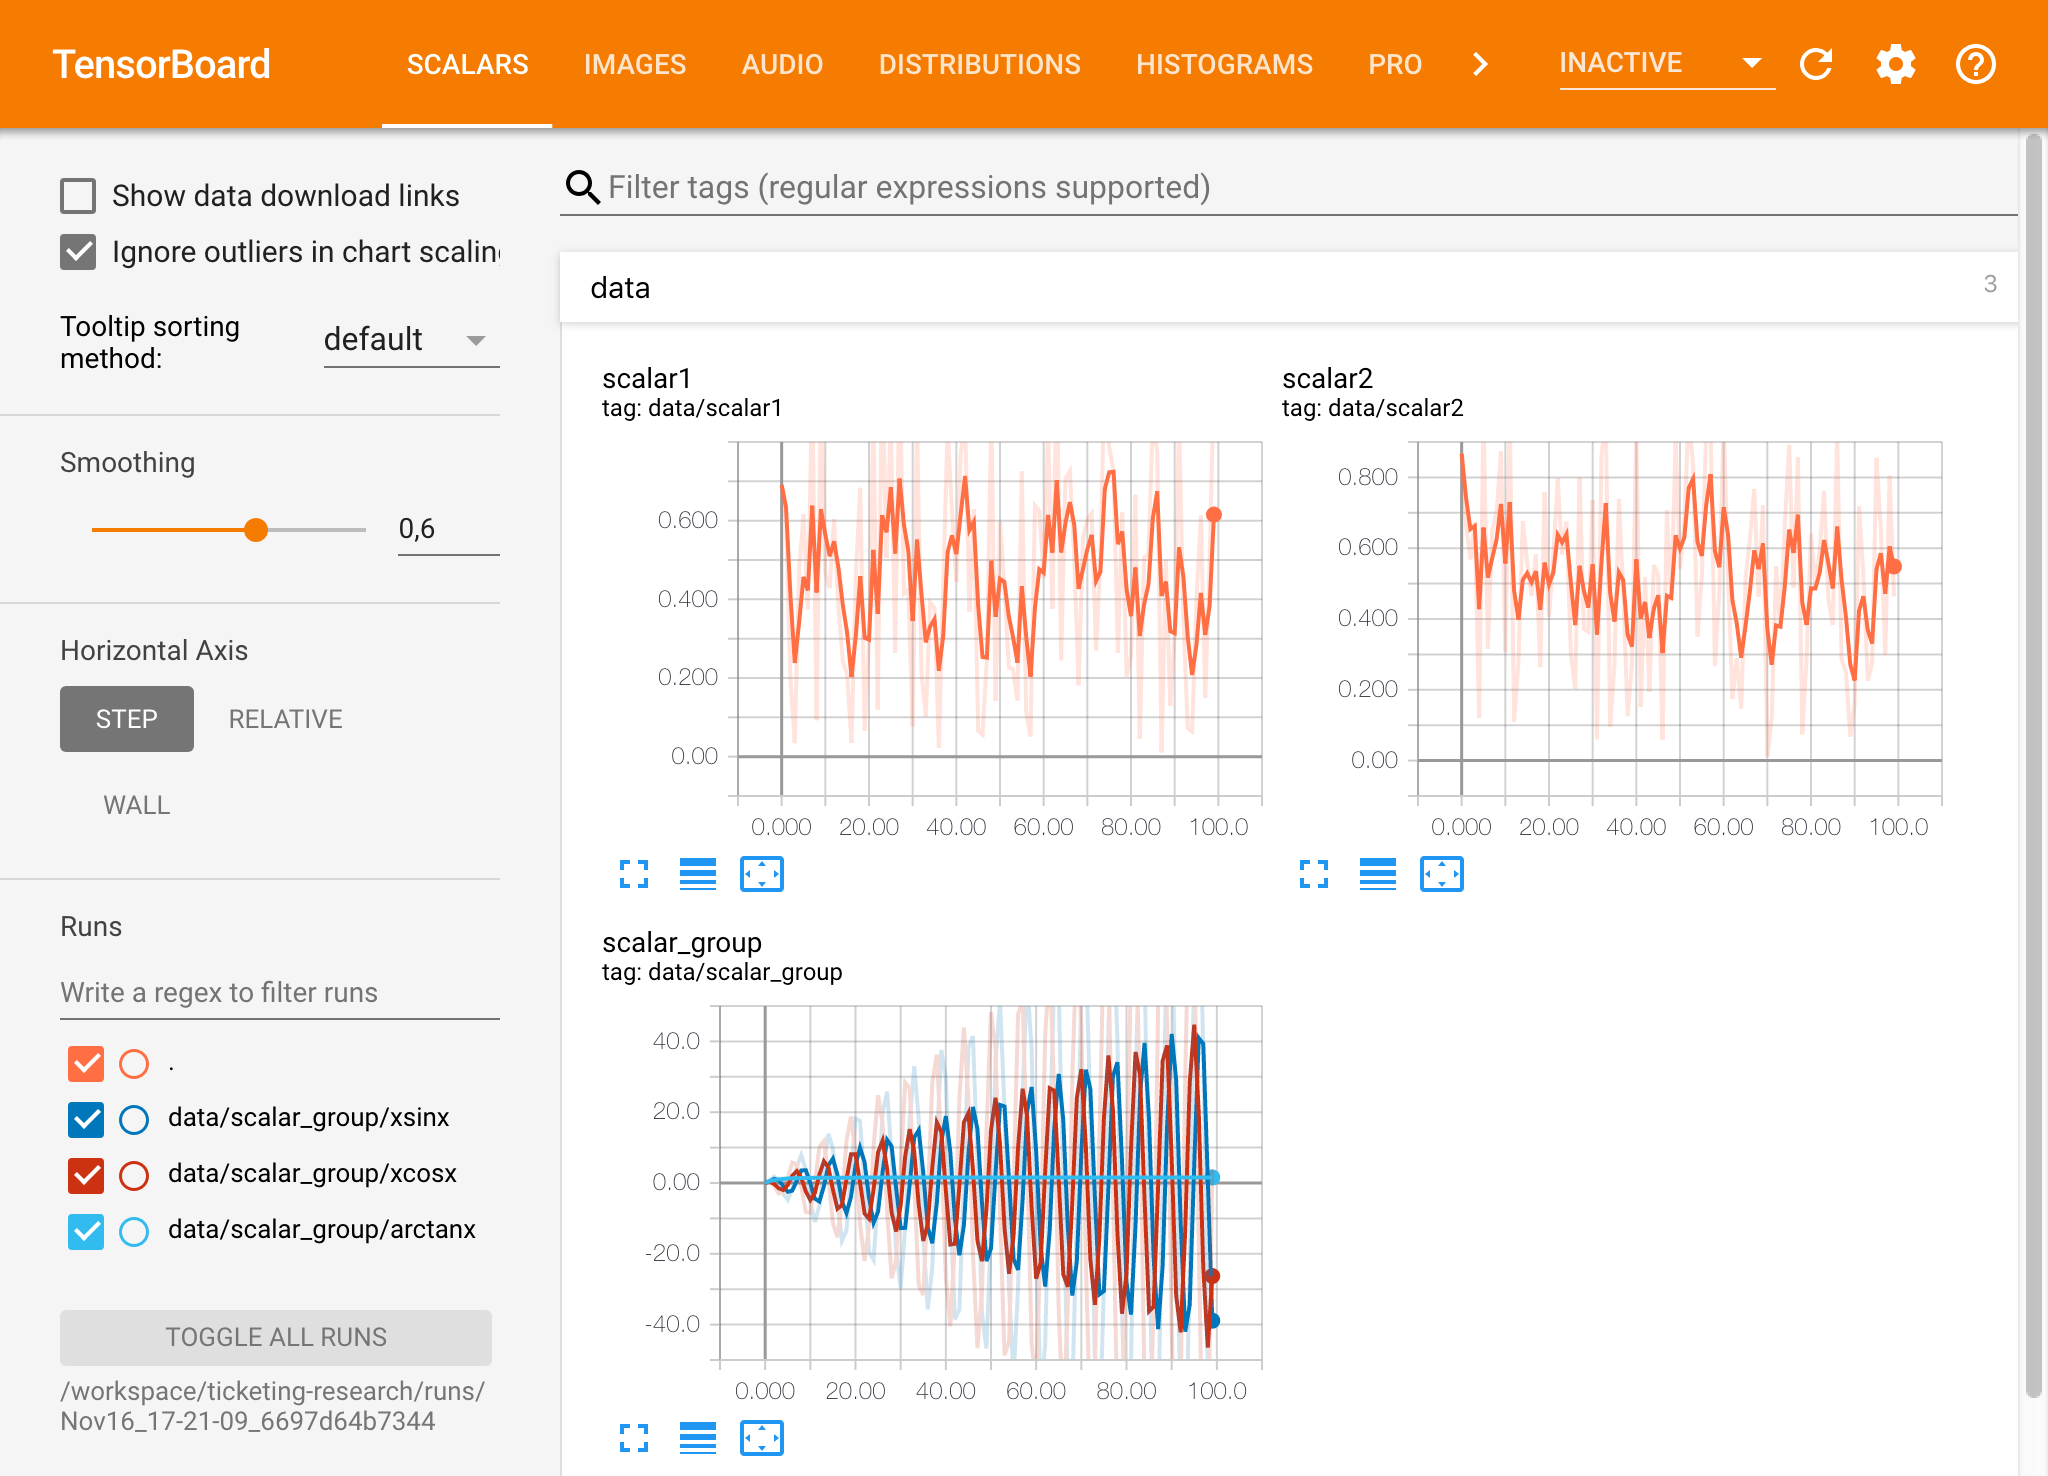
If you have opened a Tensorboard instance in a valid log directory, you will see the visualizations of your logged data:
ℹ️ Tensorboard can be used in combination with many other ML frameworks besides Tensorflow. By using the tensorboardX library you can log basically from any python based library. Also, PyTorch has a direct Tensorboard integration as described here.
If you prefer to see the tensorboard directly within your notebook, you can make use of following Jupyter magic:
%load_ext tensorboard.notebook
%tensorboard --logdir /workspace/path/to/logs
SSH Access
SSH provides a powerful set of features that enables you to be more productive with your development tasks. You can easily setup a secure and passwordless SSH connection to a workspace by selecting Open Tool -> SSH. This will download a customized setup script and shows some additional instructions:
ℹ️ The setup script only runs on Mac and Linux, Windows is currently not supported.
Just run the setup script on the machine from where you want to setup a connection to the workspace and input a name for the connection (e.g. my-workspace). You might also get asked for some additional input during the process. Once the connection is successfully setup and tested, you can securely connect to the workspace by simply executing ssh my-workspace.
Besides the ability to execute commands on a remote machine, SSH also provides a variety of other features that can improve your development workflow as described in the following sections.
Tunnel Ports
An SSH connection can be used for tunneling application ports from the remote machine to the local machine, or vice versa. For example, you can expose the workspace internal port 5901 (VNC Server) to the local machine on port 5000 by executing:
ssh -nNT -L 5000:localhost:5901 my-workspace
ℹ️ You can also expose an application port from your local machine to a workspace via the
-Roption (instead of-L).
After the tunnel is established, you can use your favorite VNC viewer on your local machine and connect to vnc://localhost:5000 (default password: vncpassword). To make the tunnel connection more resistant and reliable, we recommend to use autossh to automatically restart SSH tunnels in the case that the connection dies:
autossh -M 0 -f -nNT -L 5000:localhost:5901 my-workspace
Port tunneling is quite useful when you have started any server-based tool within the workspace that you like to make accessible for another machine. In its default setting, the workspace has a variety of tools already running on different ports, such as:
8091: Main workspace port with access to all integrated tools.8090: Jupyter server.8054: VS Code server.5901: VNC server.22: SSH server.
? For more information about port tunneling/forwarding, we recommend this guide.
Copy Data via SCP
SCP allows files and directories to be securely copied to, from, or between different machines via SSH connections. For example, to copy a local file (./local-file.txt) into the /workspace folder inside the workspace, execute:
scp ./local-file.txt my-workspace:/workspace
To copy the /workspace directory from my-workspace to the working directory of the local machine, execute:
scp -r local-workspace:/workspace .
? For more information about scp, we recommend this guide.
Sync Data via Rsync
rsync -avzP source/ destination
https://github.com/dooblem/bsync
https://github.com/bcpierce00/unison
https://axkibe.github.io/lsyncd/
https://github.com/deajan/osync
Mount Folders via SSHFS
Besides copying and syncing data, an SSH connection can also be used to mount directories from a remote machine into the local filesystem via SSHFS.
For example, to mount the /workspace directory of my-workspace into a local path (e.g. /local/folder/path), execute:
sshfs -o reconnect my-workspace:/workspace /local/folder/path
Once the remote directory is mounted, you can interact with the remote file system the same way as with any local directory and file.
? For more information about sshfs, we recommend this guide.
Remote Development
The workspace can be integrated and used as remote runtime for a variety of common development tools and IDE's.
. All of those integrations require a passwordless SSH connection from the local machine to the workspace. You can easily setup a
WIP: Remote Kernels, VS Code remote development, and usage as Colab local runtime.
Jupyter - Remote Kernel
The workspace can be added to a Jupyter instance as a remote kernel.
To a running
VS Code - Remote Machine
PyCharm - Remote Interpreter
Colab - Local Runtime
Preinstalled Libraries and Runtimes
The workspace is pre-installed with many popular runtimes, data science libraries, and ubuntu packages:
- Runtimes: Anaconda 3 (Python 3.6), Java 8, NodeJS 11
- Python libraries: Tensorflow, Keras, Pytorch, Sklearn, CNTK, XGBoost, Theano, Fastai, and many more
The full list of installed tools can be found within the Dockerfile.
ℹ️ An R-Runtime installation script is provided in the
Toolsfolder on the desktop of the VNC GUI.
GPU Support
WIP


