Bert-Multi-Label-Text-Classification
This repo contains a PyTorch implementation of a pretrained BERT model for multi-label text classification.
note: for the new pytorch-pretrained-bert package . use comd from pytorch_pretrained_bert.modeling import BertPreTrainedModel
Structure of the code
At the root of the project, you will see:
├── pybert
|  └── callback
|  |  └── lrscheduler.py
|  |  └── trainingmonitor.py
|  |  └── ...
|  └── config
|  |  └── basic_config.py #a configuration file for storing model parameters
|  └── dataset
|  └── io
|  |  └── dataset.py
|  |  └── data_transformer.py
|  └── model
|  |  └── nn
|  |  └── pretrain
|  └── output #save the ouput of model
|  └── preprocessing #text preprocessing
|  └── train #used for training a model
|  |  └── trainer.py
|  |  └── ...
|  └── utils # a set of utility functions
├── convert_tf_checkpoint_to_pytorch.py
├── train_bert_multi_label.py
├── inference.py
Dependencies
- csv
- tqdm
- numpy
- pickle
- scikit-learn
- PyTorch 1.0
- matplotlib
- pandas
- pytorch_pretrained_bert (load bert model)
How to use the code
you need download pretrained bert model (uncased_L-12_H-768_A-12)
- Download the Bert pretrained model from Google and place it into the
/pybert/model/pretraindirectory. pip install pytorch-pretrained-bertfrom github.- Run
python convert_tf_checkpoint_to_pytorch.pyto transfer the pretrained model(tensorflow version) into pytorch form . - Prepare kaggle data, you can modify the
io.data_transformer.pyto adapt your data. - Modify configuration information in
pybert/config/basic_config.py(the path of data,...). - Run
python train_bert_multi_label.pyto fine tuning bert model. - Run
python inference.pyto predict new data.
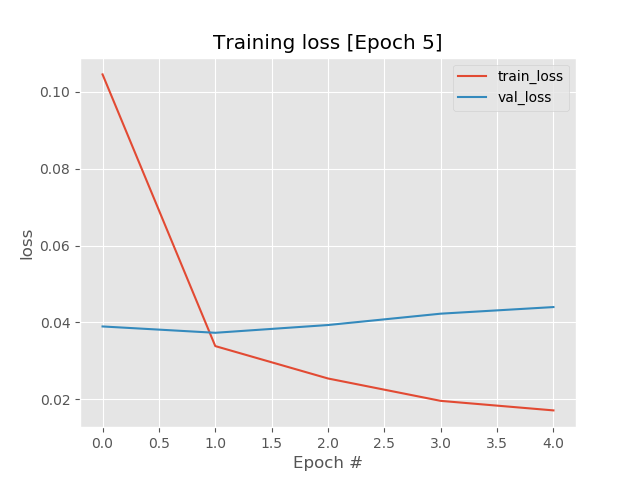
Fine-tuning result
training
[training] 8511/8511 [>>>>>>>>>>>>>>>>>>>>>>>>>>>>>>] -0.8s/step- loss: 0.0640
training result:
[2019-01-14 04:01:05]: bert-multi-label trainer.py[line:176] INFO
Epoch: 2 - loss: 0.0338 - val_loss: 0.0373 - val_auc: 0.9922
training figure
result
---- train report every label -----
Label: toxic - auc: 0.9903
Label: severe_toxic - auc: 0.9913
Label: obscene - auc: 0.9951
Label: threat - auc: 0.9898
Label: insult - auc: 0.9911
Label: identity_hate - auc: 0.9910
---- valid report every label -----
Label: toxic - auc: 0.9892
Label: severe_toxic - auc: 0.9911
Label: obscene - auc: 0.9945
Label: threat - auc: 0.9955
Label: insult - auc: 0.9903
Label: identity_hate - auc: 0.9927
Tips
- When converting the tensorflow checkpoint into the pytorch, it's expected to choice the "bert_model.ckpt", instead of "bert_model.ckpt.index", as the input file. Otherwise, you will see that the model can learn nothing and give almost same random outputs for any inputs. This means, in fact, you have not loaded the true ckpt for your model
- When using multiple GPUs, the non-tensor calculations, such as accuracy and f1_score, are not supported by DataParallel instance
- As recommanded by Jocob in his paper
https://arxiv.org/pdf/1810.04805.pdf , in fine-tuning tasks, the hyperparameters are expected to set as following: Batch_size: 16 or 32, learning_rate: 5e-5 or 2e-5 or 3e-5, num_train_epoch: 3 or 4 - The pretrained model has a limit for the sentence of input that its length should is not larger than 512, the max position embedding dim. The data flows into the model as: Raw_data -> WordPieces -> Model. Note that the length of wordPieces is generally larger than that of raw_data, so a safe max length of raw_data is at ~128 - 256
- Upon testing, we found that fine-tuning all layers could get much better results than those of only fine-tuning the last classfier layer. The latter is actually a feature-based way


