Clairvoyance: A Pipeline Toolkit for Medical Time Series
Authors: van der Schaar Lab
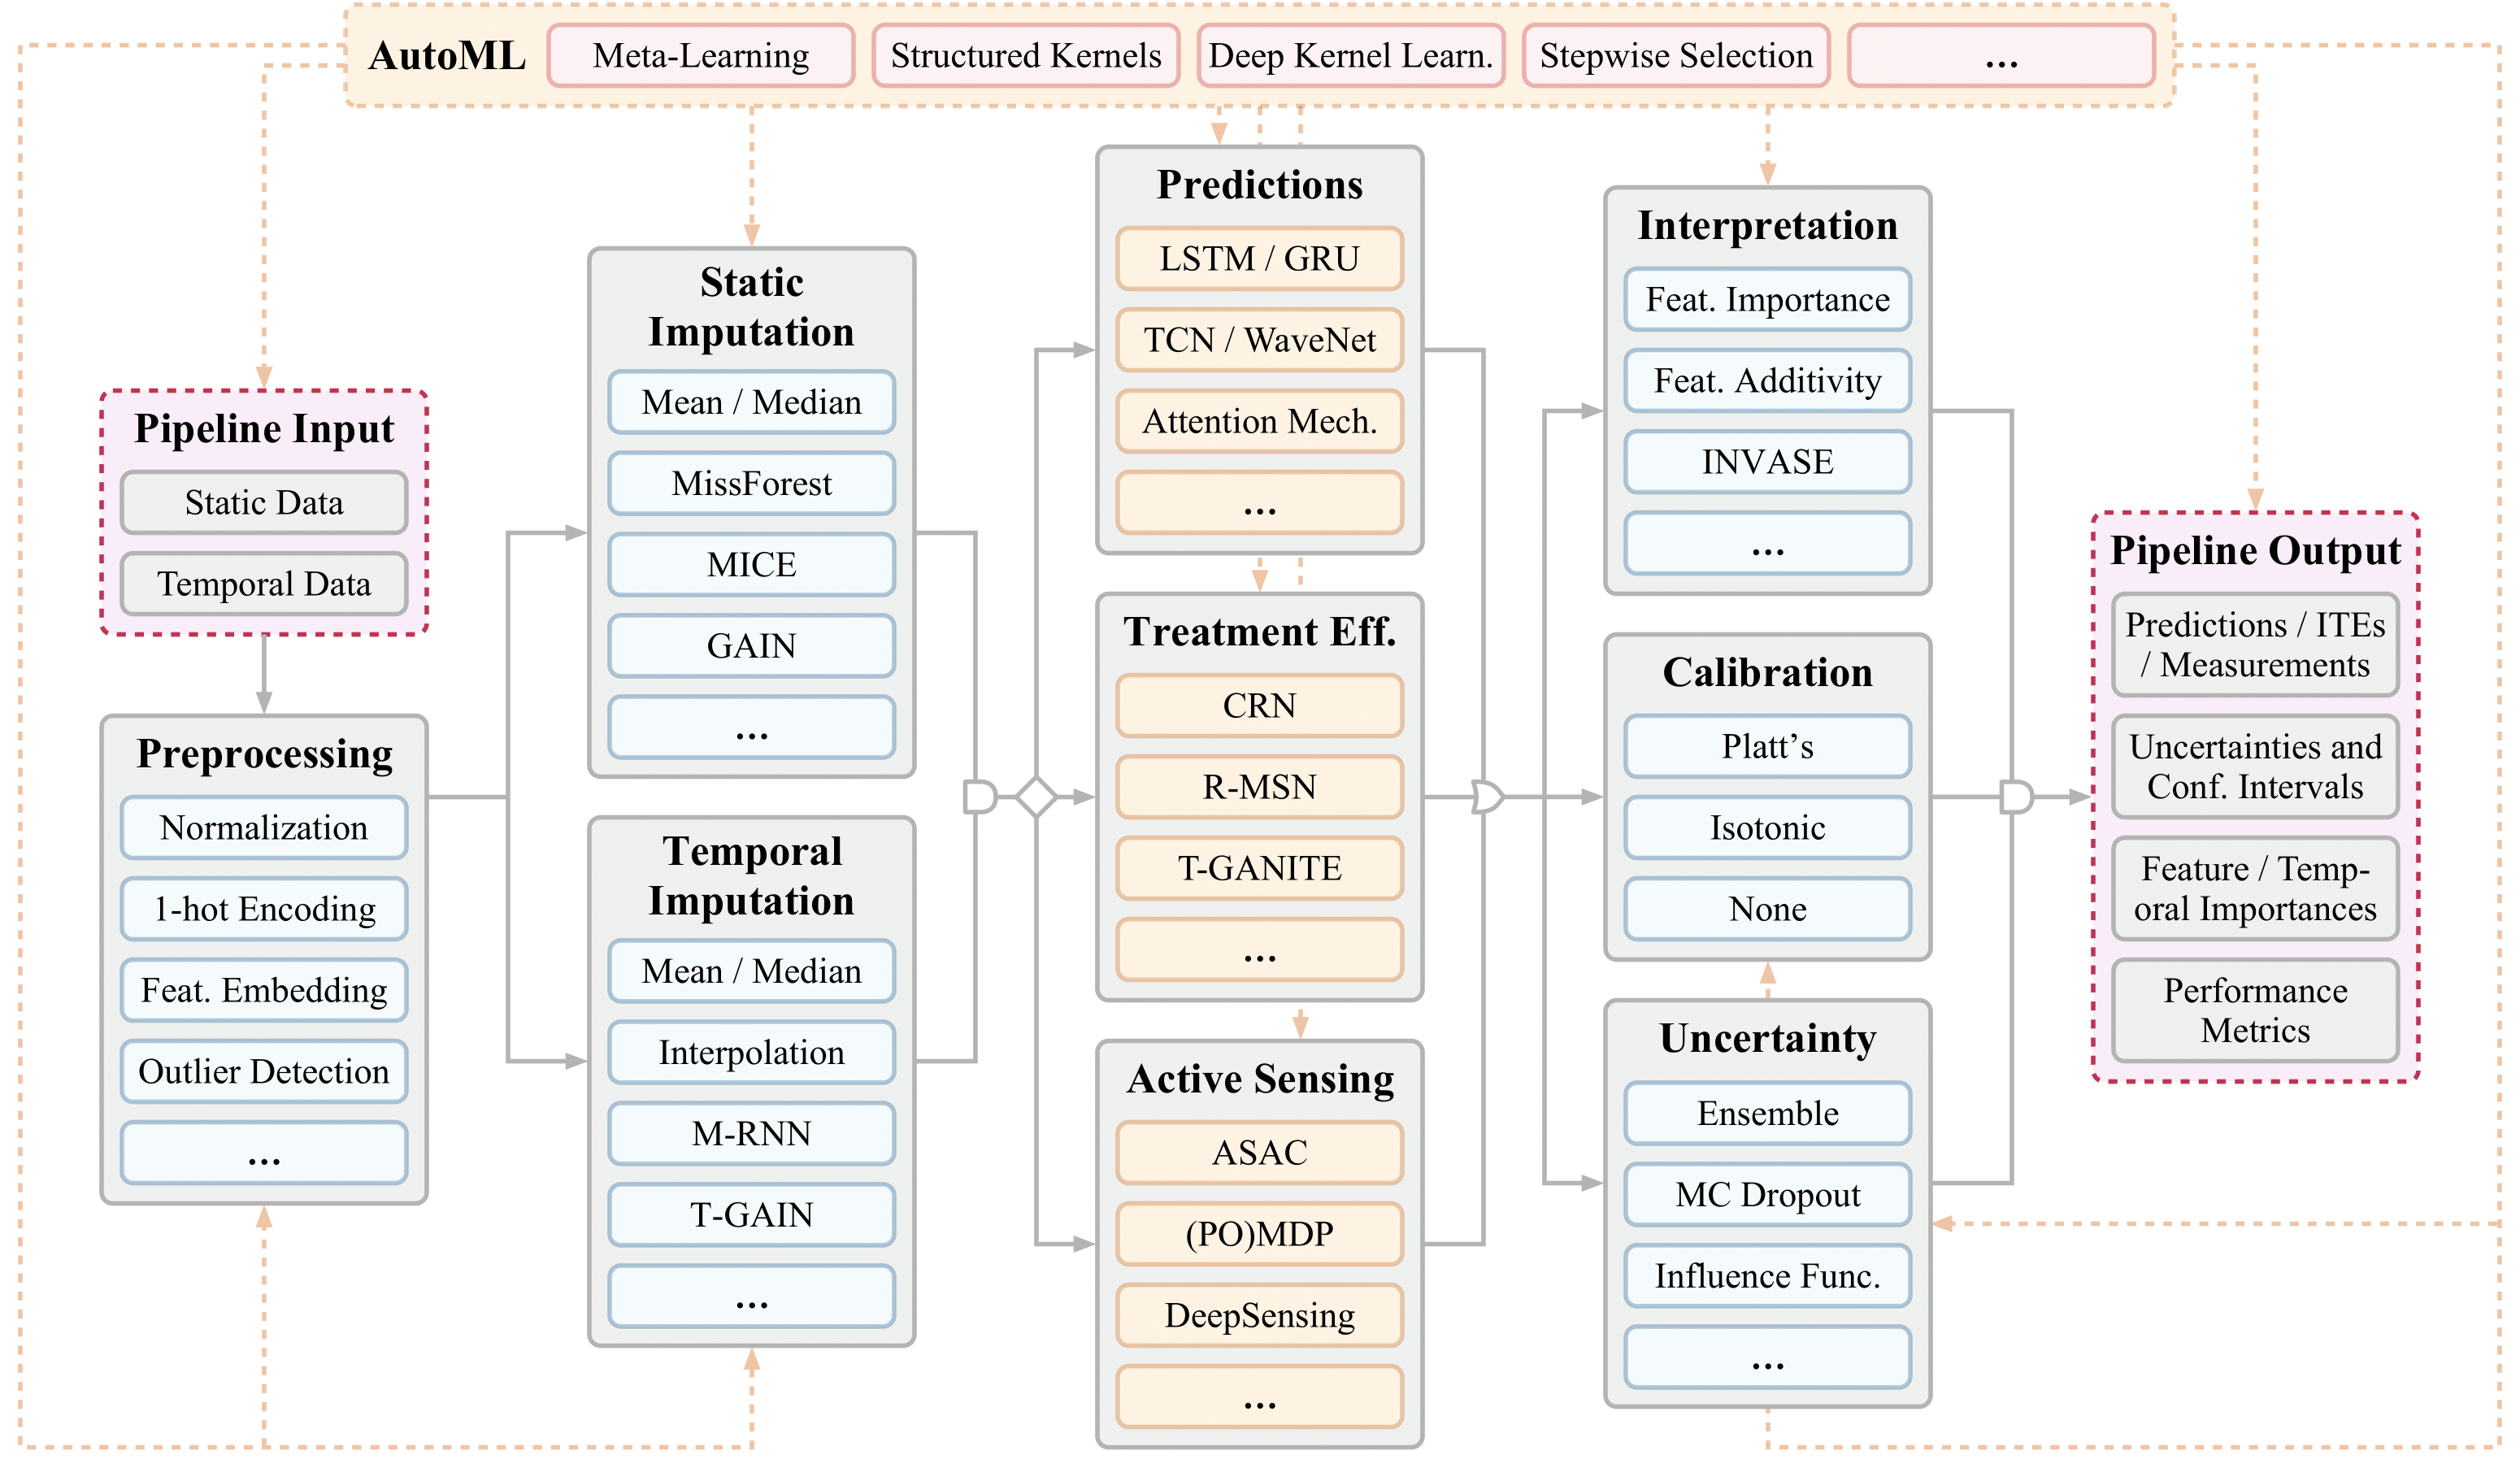
This repository contains implementations of Clairvoyance: A Pipeline Toolkit for Medical Time Series for the following applications.
- Time-series prediction (one-shot and online)
- Transfer learning
- Individualized time-series treatment effects (ITE) estimation
- Active sensing on time-series data
- AutoML
All API files for those applications can be found in /api folder.
All tutorials for those applications can be found in /tutorial folder.
Installation
There are currently two ways of installing the required dependencies: using Docker or using Conda.
Note on Requirements
- Clairvoyance has been tested on Ubuntu 20.04, but should be broadly compatible with common Linux systems.
- The Docker installation method is additionally compatible with Mac and Windows systems that support Docker.
- Hardware requirements depends on the underlying ML models used, but a machine that can handle ML research tasks is recommended.
- For faster computation, CUDA-capable Nvidia card is recommended (follow the CUDA-enabled installation steps below).
Docker installation
- If you are not familiar with Docker, have a look at the resources:
- Install Docker on your system: https://docs.docker.com/get-docker/.
- [Required for CUDA-enabled installation only] Install Nvidia container runtime: https://github.com/NVIDIA/nvidia-container-runtime/.
- Assumes Nvidia drivers are correctly installed on your system.
- Get the latest Clairvoyance Docker image:
$ docker pull clairvoyancedocker/clv:latest - To run the Docker container as a terminal, execute the below from the Clairvoyance repository root:
$ docker run -i -t --gpus all --network host -v $(pwd)/datasets/data:/home/clvusr/clairvoyance/datasets/data clairvoyancedocker/clv- Explanation of the
docker runarguments:-i -t: Run a terminal session.--gpus all: [Required for CUDA-enabled installation only], passes your GPU(s) to the Docker container, otherwise skip this option.--network host: Use your machine's network and forward ports. Could alternatively publish ports, e.g.-p 8888:8888.-v $(pwd)/datasets/data:/home/clvusr/clairvoyance/datasets/data: Share directory/ies with the Docker container as volumes, e.g. data.clairvoyancedocker/clv: Specifies Clairvoyance Docker image.
- If using Windows:
- Use PowerShell and first run the command
$pwdwin = $(pwd).Path. Then use$pwdwininstead of$(pwd)in thedocker runcommand.
- Use PowerShell and first run the command
- If using Windows or Mac:
- Due to how Docker networking works, replace
--network hostwith-p 8888:8888.
- Due to how Docker networking works, replace
- Explanation of the
- Run all following Clairvoyance API commands, jupyter notebooks etc. from within this Docker container.
Conda installation
Conda installation has been tested on Ubuntu 20.04 only.
- From the Clairvoyance repo root, execute:
$ conda env create --name clvenv -f ./environment.yml $ conda activate clvenv - Run all following Clairvoyance API commands, jupyter notebooks etc. in the
clvenvenvironment.
Data
Clairvoyance expects your dataset files to be defined as follows:
- Four CSV files (may be compressed), as illustrated below:
static_test_data.csv static_train_data.csv temporal_test_data.csv temporal_train_data.csv - Static data file content format:
id,my_feature,my_other_feature,my_third_feature_etc 3wOSm2,11.00,4,-1.0 82HJss,3.40,2,2.1 iX3fiP,7.01,3,-0.4 ... - Temporal data file content format:
id,time,variable,value 3wOSm2,0.0,my_first_temporal_feature,0.45 3wOSm2,0.5,my_first_temporal_feature,0.47 3wOSm2,1.2,my_first_temporal_feature,0.49 3wOSm2,0.0,my_second_temporal_feature,10.0 3wOSm2,0.1,my_second_temporal_feature,12.4 3wOSm2,0.3,my_second_temporal_feature,9.3 82HJss,0.0,my_first_temporal_feature,0.22 82HJss,1.0,my_first_temporal_feature,0.44 ... - The
idcolumn is required in the static data files. Theid,time,variable,valuecolumns are required in the temporal file. The IDs of samples must match between the static and temporal files. - Your data files are expected to be under:
<clairvoyance_repo_root>/datasets/data/<your_dataset_name>/ - See tutorials for how to define your dataset(s) in code.
- Clairvoyance examples make reference to some existing datasets, e.g.
mimic,ward. These are confidential datasets (or in case of MIMIC-III, it requires a training course and an access request) and are not provided here. Contact [email protected] for more details.
Extract data from MIMIC-III
To use MIMIC-III with Clairvoyance, you need to get access to MIMIC-III and follow the instructions for installing it in a Postgres database: https://mimic.physionet.org/tutorials/install-mimic-locally-ubuntu/
$ cd datasets/mimic_data_extraction && python extract_antibiotics_dataset.py
Usage
- To run tutorials:
- Launch jupyter lab:
$ jupyter-lab.- If using Windows or Mac and following the Docker installation method, run
jupyter-lab --ip="0.0.0.0".
- If using Windows or Mac and following the Docker installation method, run
- Open jupyter lab in the browser by following the URL with the token.
- Navigate to
tutorial/and run a tutorial of your choice.
- Launch jupyter lab:
- To run Clairvoyance API from the command line, execute the appropriate command from within the Docker terminal (see example command below).
Example: Time-series prediction
To run the pipeline for training and evaluation on time-series
prediction framework, simply run $ python -m api/main_api_prediction.py or take a look
at the jupyter notebook tutorial/tutorial_prediction.ipynb.
Note that any model architecture can be used as the predictor model such as
RNN, Temporal convolutions, and transformer. The condition for
predictor model is to have fit and predict functions as its subfunctions.
-
Stages of the time-series prediction:
- Import dataset
- Preprocess data
- Define the problem (feature, label, etc.)
- Impute missing components
- Select the relevant features
- Train time-series predictive model
- Estimate the uncertainty of the predictions
- Interpret the predictions
- Evaluate the time-series prediction performance on the testing set
- Visualize the outputs (performance, predictions, uncertainties, and interpretations)
-
Command inputs:
data_name:mimic,ward,cfnormalization:minmax,standard,Noneone_hot_encoding: input features that need to be one-hot encodedproblem:one-shotoronlinemax_seq_len: maximum sequence length after paddinglabel_name: the column name for the label(s)treatment: the column name for treatmentsstatic_imputation_model:mean,median,mice,missforest,knn,gaintemporal_imputation_model:mean,median,linear,quadratic,cubic,spline,mrnn,tgainfeature_selection_model:greedy-addition,greedy-deletion,recursive-addition,recursive-deletion,Nonefeature_number: selected feature numbermodel_name:rnn,gru,lstm,attention,tcn,transformerh_dim: hidden dimensionsn_layer: layer numbern_head: head number (only for transformer model)batch_size: number of samples in mini-batchepochs: number of epochslearning_rate: learning ratestatic_mode: how to utilize static features (concatenateorNone)time_mode: how to utilize time information (concatenateorNone)task:classificationorregressionuncertainty_model_name: uncertainty estimation model name (ensemble)interpretation_model_name: interpretation model name (tinvase)metric_name:auc,apr,mae,mse
-
Example command:
$ cd api $ python main_api_prediction.py \ --data_name cf --normalization minmax --one_hot_encoding admission_type \ --problem one-shot --max_seq_len 24 --label_name death \ --static_imputation_model median --temporal_imputation_model median \ --model_name lstm --h_dim 100 --n_layer 2 --n_head 2 --batch_size 400 \ --epochs 20 --learning_rate 0.001 \ --static_mode concatenate --time_mode concatenate \ --task classification --uncertainty_model_name ensemble \ --interpretation_model_name tinvase --metric_name auc -
Outputs:
- Model prediction
- Model performance
- Prediction uncertainty
- Prediction interpretation
Citation
To cite Clairvoyance in your publications, please use the following reference.
Daniel Jarrett, Jinsung Yoon, Ioana Bica, Zhaozhi Qian, Ari Ercole, and Mihaela van der Schaar (2021). Clairvoyance: A Pipeline Toolkit for Medical Time Series. In International Conference on Learning Representations. Available at: https://openreview.net/forum?id=xnC8YwKUE3k.
You can also use the following Bibtex entry.
@inproceedings{
  jarrett2021clairvoyance,
  title={Clairvoyance: A Pipeline Toolkit for Medical Time Series},
  author={Daniel Jarrett and Jinsung Yoon and Ioana Bica and Zhaozhi Qian and Ari Ercole and Mihaela van der Schaar},
  booktitle={International Conference on Learning Representations},
  year={2021},
  url={https://openreview.net/forum?id=xnC8YwKUE3k}
}
To cite the Clairvoyance alpha blog post, please use:
van Der Schaar, M., Yoon, J., Qian, Z., Jarrett, D., & Bica, I. (2020). clairvoyance alpha: the first pipeline toolkit for medical time series. [Webpages]. https://doi.org/10.17863/CAM.70020
@misc{https://doi.org/10.17863/cam.70020,
  doi = {10.17863/CAM.70020},
  url = {https://www.repository.cam.ac.uk/handle/1810/322563},
  author = {Van Der Schaar,  Mihaela and Yoon,  Jinsung and Qian,  Zhaozhi and Jarrett,  Dan and Bica,  Ioana},
  title = {clairvoyance alpha: the first pipeline toolkit for medical time series},
  publisher = {Apollo - University of Cambridge Repository},
  year = {2020}
}


