EDF R&D implementation of ISO 15118-20 FDIS
============
This project implements the ISO 15118-20 using Python.
Supported features:
- DC Bidirectional Power Transfer BPT with dynamic control mode.
- TLS 1.3 with mutual authentication.
- Set departure time from SECC side.
Project setup
Installation and setup for Ubuntu
Update your system using the command below:
sudo apt-get update
1. Install MiniConda
Visit the conda installation website link to install MiniConda according to your operating system.
If your operating system is Ubuntu, you can visit this link and follow instructions.
Next, to activate the command conda, execute the line below:
export PATH="[YOUR PATH OF INSTALLED MINICONDA]/bin":$PATH
Example path: /home/trang/miniconda3/bin/
To install conda's shell functions for easier access, once conda command is activated, then:
conda init bash
2. Install PyCharm
Install by Terminal:
sudo snap install pycharm-community --classic
Or you can download the installer via the following link: Download PyCharm Community for Ubuntu
Extract the downloaded file in [YOUR EXTRACTED DIRECTORY OF PYCHARM]. Then, to open PyCharm, run in Terminal :
cd [YOUR EXTRACTED DIRECTORY OF PYCHARM]
./pycharm-community-2021.3.1/bin/pycharm.sh
3. Install Java
This proyect uses OpenEXI for decode/encode xml to EXI. This is a java library, which has been coupled to python using jPype. Since the project imports java libraries, it is required to install JDK. For installing JDK follow the instructions here
For Ubuntu/Debian, you can follow instructions here
4. Create virtual environment and install dependencies
First of all, it is necessary to download the project Raiden V2X from github.
In Terminal:
cd [YOUR DOWNLOADED DIRECTORY OF PROJECT]
conda env create -f environment.yml
Normally, all of project's dependencies are installed automatically when setting virtual environment.
5. Setup virtual environment
From command line
To activate your new virtual environment in Terminal,run the command below:
conda activate edf15118-20
From PyCharm
Step 1:
Add your new virtual environment and interpreter in PyCharm:
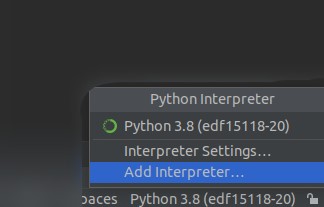
In Python Interpreter on bottom right corner of windows, choose Add Interpreter... like the screen shot below

Step 2:
In the popup window, choose your Python interpreter of edf15118-20 environment.
The environment is located in [YOUR PATH OF INSTALLED MINICONDA]/envs/
Then choose the package python of edf15118-20 virtual environment.
For example, the complete Python Interpreter path is:
/home/trang/miniconda3/envs/edf15118-20/bin/python
Installation and setup for Raspberry Pi
1. Install VSCode:
Install with the command line below:
sudo apt-get update
sudo apt install code
2. Install dependencies:
First, install PyQt5 independently with the following command :
sudo apt-get install python3-pyqt5
Next, install all remaining dependencies as below:
pip install -r requirement_rasp.txt
3. Install missing packages
Some packages are not installed automatically via requirement_rasp.txt. To execute the project, it is required to install these librairies manually via the command below:
sudo apt-get install libatlas-base-dev libhdf5-dev libhdf5-serial-dev libatlas-base-dev libjasper-dev
4. Setup Python for VSCode:
In VSCode, press Ctrl+Shift+X to install Python extension then select Python interpreter
5. Install Java
Follow the same steps of Linux PC.
Execute EVCC and SECC
1. Setup configuration files config.ini:
From the terminal, check for network interfaces by using the following command:
ifconfig
For example, the result returned by ifconfig:
enp0s3: flags=4163<UP,BROADCAST,RUNNING,MULTICAST>  mtu 1500
        inet 10.0.2.15  netmask 255.255.255.0  broadcast 10.0.2.255
        inet6 fe80::1c00:5e0f:2cb2:e69f  prefixlen 64  scopeid 0x20<link>
        ether 08:00:27:e4:6d:1b  txqueuelen 1000  (Ethernet)
        RX packets 277  bytes 39834 (39.8 KB)
        RX errors 0  dropped 0  overruns 0  frame 0
        TX packets 1110  bytes 92105 (92.1 KB)
        TX errors 0  dropped 0 overruns 0  carrier 0  collisions 0

lo: flags=73<UP,LOOPBACK,RUNNING>  mtu 65536
        inet 127.0.0.1  netmask 255.0.0.0
        inet6 ::1  prefixlen 128  scopeid 0x10<host>
        loop  txqueuelen 1000  (Local Loopback)
        RX packets 475  bytes 42714 (42.7 KB)
        RX errors 0  dropped 0  overruns 0  frame 0
        TX packets 475  bytes 42714 (42.7 KB)
        TX errors 0  dropped 0 overruns 0  carrier 0  collisions 0
Setup the configuration file an interface which has ipv6 address. In this case, we will use enp0s3 interface.
EVSE :
In file evse_config.ini, setup the parameters as shown below:
[NETWORK]
    interface = enp0s3
    tcp_port = 49152
    # See table 10, must range from 49152 to 65535

[SETTINGS]
    virtual_mode = true
The parameter virtual_mode in [SETTINGS], allows to set and verify the 61851-1 states from a communication card.To simulate the communication card the virtual_mode parmeter can be set to true.
If it is required to verify or set 61851-1 states, some adaptations of the provided interfaces are needed to read and set the states from the communication card.
EVCC :
Setup configuration file ev_config.ini, as follows:
[NETWORK]
    interface = enp0s3
    udp_port = 49153
    # See table 18, must range from 49152 to 65535
    tcp_port = 49154
    # See table 10, must range from 49152 to 65535

[SETTINGS]
    virtual_mode = true
Like EVSE, you set virtual_mode = true/false based on your own situation.
2. Install certificates for mutual authentication
Before running ISO 15118-20, you need to install the certificates for TLS with mutual authentication by running the command below in the terminal:
cd /shared/certificates/
and then run :
sh generateCertificates.sh
3. Run ISO 15118-20
To run a communication session, the server which corresponds to the SECC needs to be running first:
- If you run using the GUI, go to directory /secc run python3 evse_gui.py
- In GUI, click Set to define a departure time and target state of charge SoC from the charging station side and then click Start

- If you run without GUI, run start_evse.py
Then, you can run electric vehicle communication controller EVCC:
- If you execute with GUI, go to directory /evcc and execute python3 ev_gui.py
- In GUI, click Set to define a departure time and target state of charge SoC from the EV and then click Start

- To execute without GUI, run start_ev.py
The session sequence can be seen in the terminal by the printed logs or in the GUI, in the information tab.

Once the session is in the charging loop you can control dinamically the power transfer by moving the control bar at the left side of the SECC control window:

To stop the charging session, click on stop button of the EVCC start window.
Note: If you have the error message below when runing the project:
qt.qpa.plugin: Could not load the Qt platform plugin "xcb" in "" even though it was found.
This application failed to start because no Qt platform plugin could be initialized. Reinstalling the application may fix this problem.

Available platform plugins are: eglfs, linuxfb, minimal, minimalegl, offscreen, vnc, xcb.

Aborted (core dumped)
This error comes from the library libxcb which is used in package Qt for GUI. To fix it, you need to re-install this library with the command below:
sudo apt-get install libxcb-randr0-dev libxcb-xtest0-dev libxcb-xinerama0-dev libxcb-shape0-dev libxcb-xkb-dev
Generate documentation
In order to generate the documentation, one has to use the sphinx module from the docs directory:
make html
 EDF-Lab

