Exploring Image Deblurring via Encoded Blur Kernel Space
We introduce a method to encode the blur operators of an arbitrary dataset of sharp-blur image pairs into a blur kernel space. Assuming the encoded kernel space is close enough to in-the-wild blur operators, we propose an alternating optimization algorithm for blind image deblurring. It approximates an unseen blur operator by a kernel in the encoded space and searches for the corresponding sharp image. Due to the method's design, the encoded kernel space is fully differentiable, thus can be easily adopted in deep neural network models.
Detail of the method and experimental results can be found in our following paper:
@inproceedings{m_Tran-etal-CVPR21,
  author = {Phong Tran and Anh Tran and Quynh Phung and Minh Hoai},
  title = {Explore Image Deblurring via Encoded Blur Kernel Space},
  year = {2021},
  booktitle = {Proceedings of the {IEEE} Conference on Computer Vision and Pattern Recognition (CVPR)}
}
Please CITE our paper whenever this repository is used to help produce published results or incorporated into other software.
![]()
Getting started
Prerequisites
- Python >= 3.7
- Pytorch >= 1.4.0
- CUDA >= 10.0
Installation
git clone https://github.com/VinAIResearch/blur-kernel-space-exploring.git
cd blur-kernel-space-exploring


conda create -n BlurKernelSpace -y python=3.7
conda activate BlurKernelSpace
conda install --file requirements.txt
Training and evaluation
Preparing datasets
You can download the datasets in the model zoo section.
To use your customized dataset, your dataset must be organized as follow:
root
├── blur_imgs
    ├── 000
    ├──── 00000000.png
    ├──── 00000001.png
    ├──── ...
    ├── 001
    ├──── 00000000.png
    ├──── 00000001.png
    ├──── ...
├── sharp_imgs
    ├── 000
    ├──── 00000000.png
    ├──── 00000001.png
    ├──── ...
    ├── 001
    ├──── 00000000.png
    ├──── 00000001.png
    ├──── ...
where root, blur_imgs, and sharp_imgs folders can have arbitrary names. For example, let root, blur_imgs, sharp_imgs be REDS, train_blur, train_sharp respectively (That is, you are using the REDS training set), then use the following scripts to create the lmdb dataset:
python create_lmdb.py --H 720 --W 1280 --C 3 --img_folder REDS/train_sharp --name train_sharp_wval --save_path ../datasets/REDS/train_sharp_wval.lmdb
python create_lmdb.py --H 720 --W 1280 --C 3 --img_folder REDS/train_blur --name train_blur_wval --save_path ../datasets/REDS/train_blur_wval.lmdb
where (H, C, W) is the shape of the images (note that all images in the dataset must have the same shape), img_folder is the folder that contains the images, name is the name of the dataset, and save_path is the save destination (save_path must end with .lmdb).
When the script is finished, two folders train_sharp_wval.lmdb and train_blur_wval.lmdb will be created in ./REDS.
Training
To do image deblurring, data augmentation, and blur generation, you first need to train the blur encoding network (The F function in the paper). This is the only network that you need to train. After creating the dataset, change the value of dataroot_HQ and dataroot_LQ in options/kernel_encoding/REDS/woVAE.yml to the paths of the sharp and blur lmdb datasets that were created before, then use the following script to train the model:
python train.py -opt options/kernel_encoding/REDS/woVAE.yml
where opt is the path to yaml file that contains training configurations. You can find some default configurations in the options folder. Checkpoints, training states, and logs will be saved in experiments/modelName. You can change the configurations (learning rate, hyper-parameters, network structure, etc) in the yaml file.
Testing
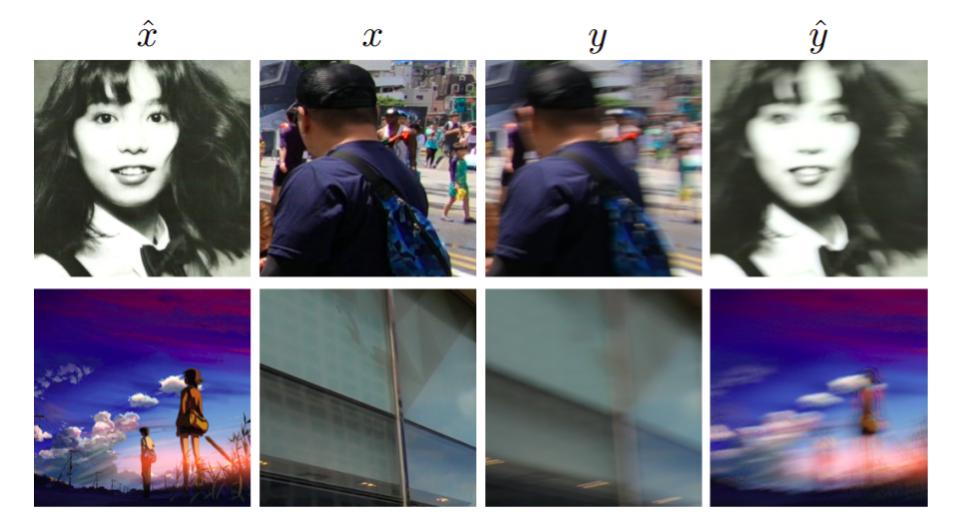
Data augmentation
To augment a given dataset, first, create an lmdb dataset using scripts/create_lmdb.py as before. Then use the following script:
python data_augmentation.py --target_H=720 --target_W=1280 \
			    --source_H=720 --source_W=1280\
			    --augmented_H=256 --augmented_W=256\
                            --source_LQ_root=datasets/REDS/train_blur_wval.lmdb \
                            --source_HQ_root=datasets/REDS/train_sharp_wval.lmdb \
			    --target_HQ_root=datasets/REDS/test_sharp_wval.lmdb \
                            --save_path=results/GOPRO_augmented \
                            --num_images=10 \
                            --yml_path=options/data_augmentation/default.yml
(target_H, target_W), (source_H, source_W), and (augmented_H, augmented_W) are the desired shapes of the target images, source images, and augmented images respectively. source_LQ_root, source_HQ_root, and target_HQ_root are the paths of the lmdb datasets for the reference blur-sharp pairs and the input sharp images that were created before. num_images is the size of the augmented dataset. model_path is the path of the trained model. yml_path is the path to the model configuration file. Results will be saved in save_path.
Generate novel blur kernels
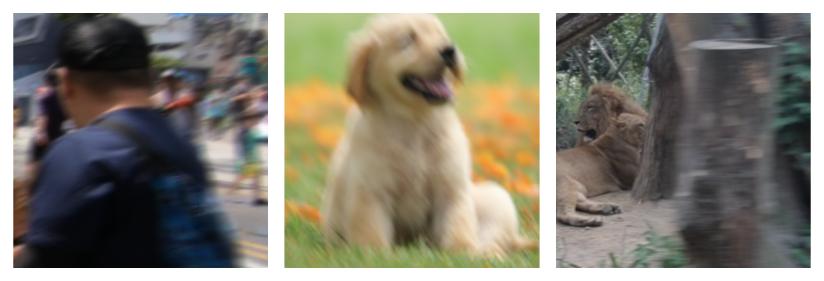
To generate a blur image given a sharp image, use the following command:
python generate_blur.py --yml_path=options/generate_blur/default.yml \
		        --image_path=imgs/sharp_imgs/mushishi.png \
			--num_samples=10
			--save_path=./res.png
where model_path is the path of the pre-trained model, yml_path is the path of the configuration file. image_path is the path of the sharp image. After running the script, a blur image corresponding to the sharp image will be saved in save_path. Here is some expected output:
Note: This only works with models that were trained with --VAE flag. The size of input images must be divisible by 128.
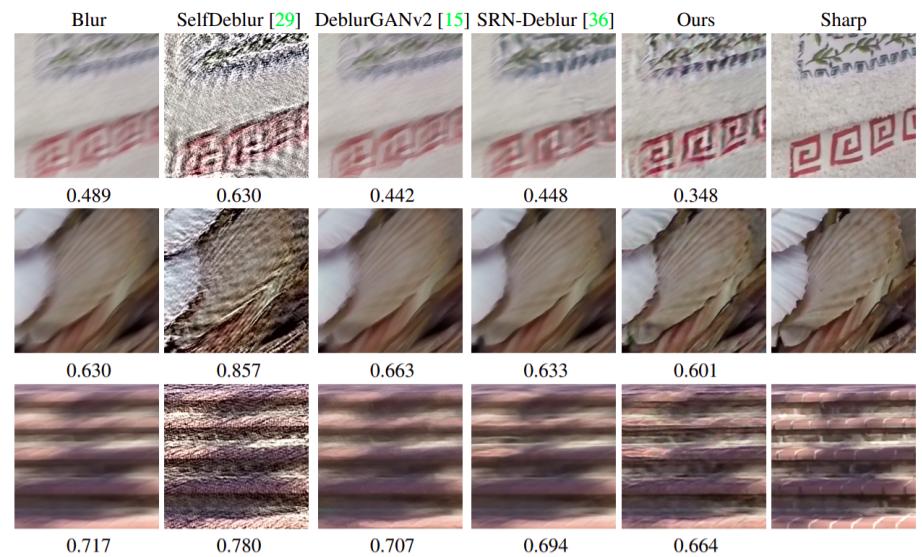
Generic Deblurring
To deblur a blurry image, use the following command:
python generic_deblur.py --image_path imgs/blur_imgs/blur1.png --yml_path options/generic_deblur/default.yml --save_path ./res.png
where image_path is the path of the blurry image. yml_path is the path of the configuration file. The deblurred image will be saved to save_path.
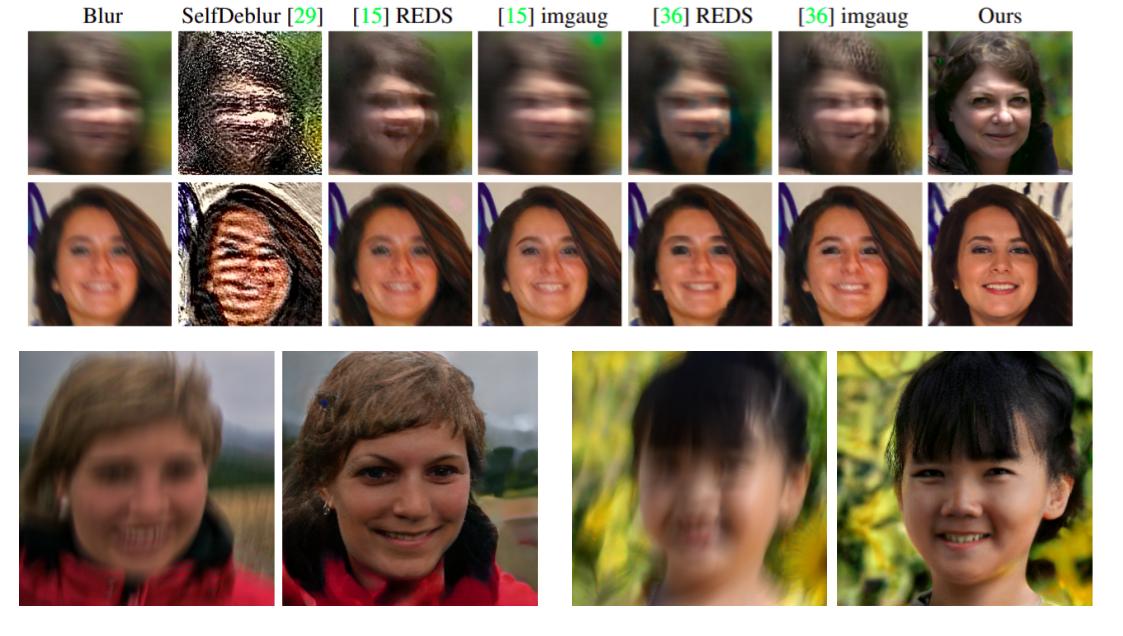
Deblurring using sharp image prior
First, you need to download the pre-trained styleGAN or styleGAN2 networks. If you want to use styleGAN, download the mapping and synthesis networks, then rename and copy them to experiments/pretrained/stylegan_mapping.pt and experiments/pretrained/stylegan_synthesis.pt respectively. If you want to use styleGAN2 instead, download the pretrained model, then rename and copy it to experiments/pretrained/stylegan2.pt.
To deblur a blurry image using styleGAN latent space as the sharp image prior, you can use one of the following commands:
python domain_specific_deblur.py --input_dir imgs/blur_faces \
		    --output_dir experiments/domain_specific_deblur/results \
		    --yml_path options/domain_specific_deblur/stylegan.yml  # Use latent space of stylegan
python domain_specific_deblur.py --input_dir imgs/blur_faces \
		    --output_dir experiments/domain_specific_deblur/results \
		    --yml_path options/domain_specific_deblur/stylegan2.yml  # Use latent space of stylegan2
Results will be saved in experiments/domain_specific_deblur/results.
Note: Generally, the code still works with images that have the size divisible by 128. However, since our blur kernels are not uniform, the size of the kernel increases as the size of the image increases.
Model Zoo
Pretrained models and corresponding datasets are provided in the below table. After downloading the datasets and models, follow the instructions in the testing section to do data augmentation, generating blur images, or image deblurring.
| Model name | dataset(s) | status |
|---|---|---|
| REDS woVAE | REDS | :heavy_check_mark: |
| GOPRO woVAE | GOPRO | :heavy_check_mark: |
| GOPRO wVAE | GOPRO | :heavy_check_mark: |
| GOPRO + REDS woVAE | GOPRO, REDS | :heavy_check_mark: |
GitHub
https://github.com/VinAIResearch/blur-kernel-space-exploring


