Albumentations
fast image augmentation library and easy to use wrapper around other libraries.
- The library works with images in
HWCformat. - The library is faster than other libraries on most of the transformations.
- Based on numpy, OpenCV, imgaug picking the best from each of them.
- Simple, flexible API that allows the library to be used in any computer vision pipeline.
- Large, diverse set of transformations.
- Easy to extend the library to wrap around other libraries.
- Easy to extend to other tasks.
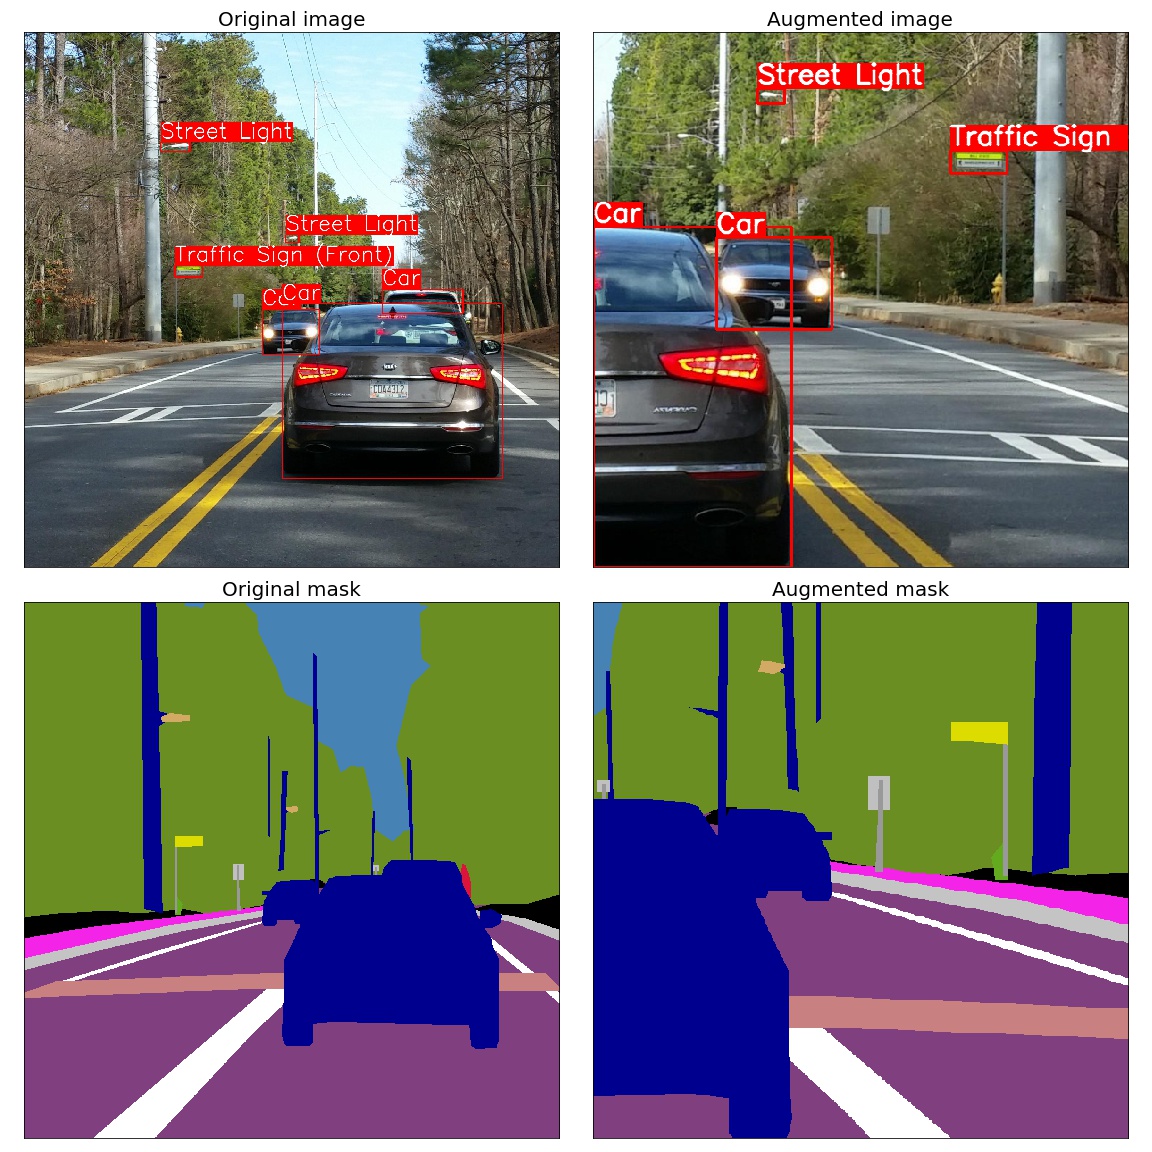
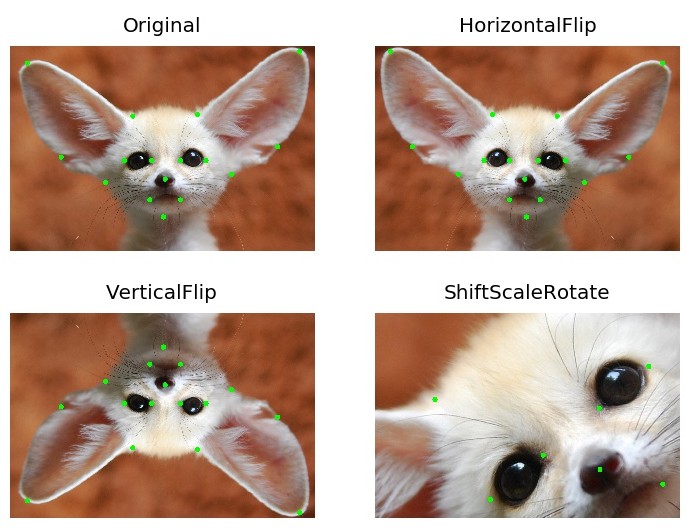
- Supports transformations on images, masks, key points and bounding boxes.
- Supports python 3.5-3.7
- Easy integration with PyTorch.
- Easy transfer from torchvision.
- Was used to get top results in many DL competitions at Kaggle, topcoder, CVPR, MICCAI.
- Written by Kaggle Masters.
How to use
All in one showcase notebook - showcase.ipynb
Classification - example.ipynb
Object detection - example_bboxes.ipynb
Non-8-bit images - example_16_bit_tiff.ipynb
Image segmentation example_kaggle_salt.ipynb
Keypoints example_keypoints.ipynb
Custom targets example_multi_target.ipynb
Weather transforms example_weather_transforms.ipynb
Serialization serialization.ipynb
Replay/Deterministic mode replay.ipynb
You can use this Google Colaboratory notebook
to adjust image augmentation parameters and see the resulting images.

Installation
PyPI
You can use pip to install albumentations:
pip install albumentations
If you want to get the latest version of the code before it is released on PyPI you can install the library from GitHub:
pip install -U git+https://github.com/albu/albumentations
And it also works in Kaggle GPU kernels (proof)
!pip install albumentations > /dev/null
Conda
To install albumentations using conda we need first to install imgaug via conda-forge collection
conda install -c conda-forge imgaug
conda install albumentations -c albumentations
Documentation
The full documentation is available at albumentations.readthedocs.io.
Pixel-level transforms
Pixel-level transforms will change just an input image and will leave any additional targets such as masks, bounding boxes, and keypoints unchanged. The list of pixel-level transforms:
- Blur
- CLAHE
- ChannelDropout
- ChannelShuffle
- CoarseDropout
- Cutout
- Downscale
- Equalize
- FancyPCA
- FromFloat
- GaussNoise
- GaussianBlur
- HueSaturationValue
- IAAAdditiveGaussianNoise
- IAAEmboss
- IAASharpen
- IAASuperpixels
- ISONoise
- ImageCompression
- InvertImg
- JpegCompression
- MedianBlur
- MotionBlur
- MultiplicativeNoise
- Normalize
- Posterize
- RGBShift
- RandomBrightness
- RandomBrightnessContrast
- RandomContrast
- RandomFog
- RandomGamma
- RandomRain
- RandomShadow
- RandomSnow
- RandomSunFlare
- GlassBlur
- Solarize
- ToFloat
- ToGray
- ToSepia
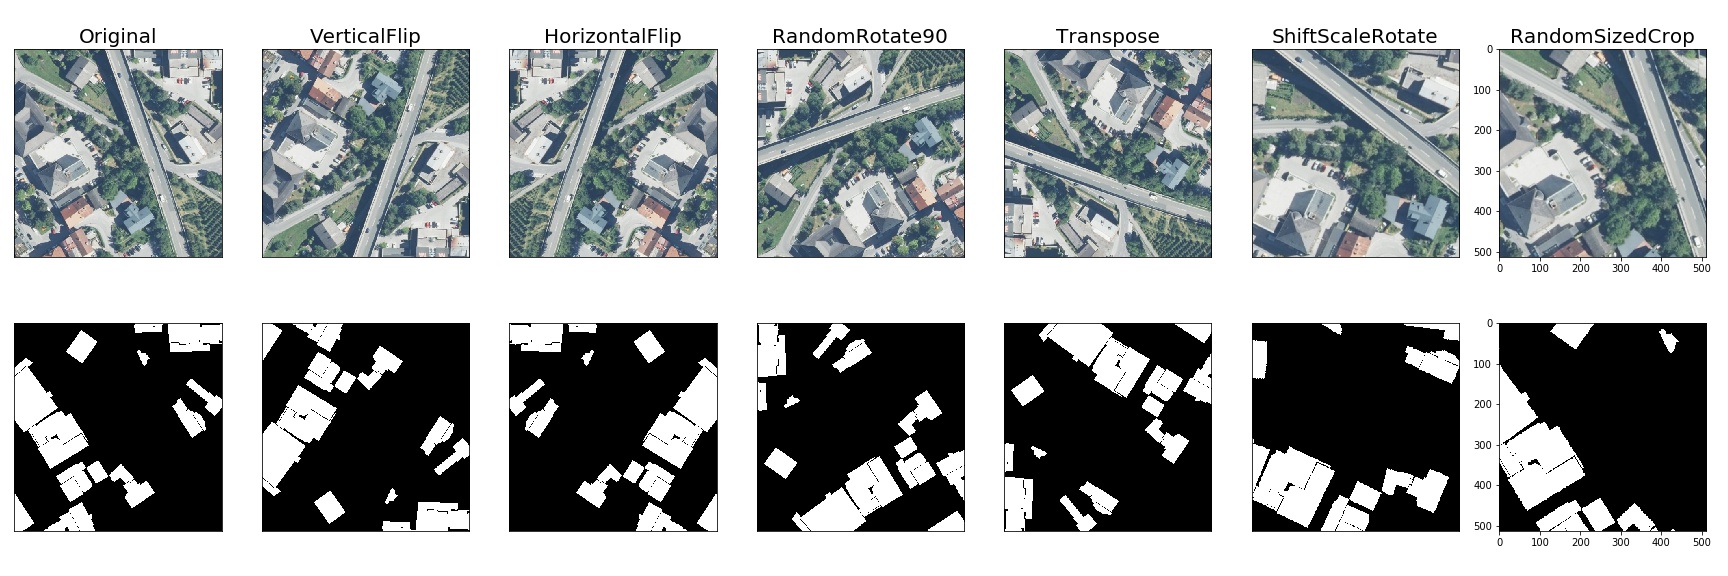
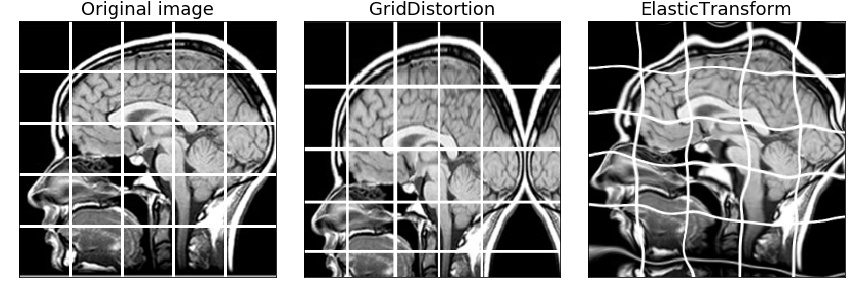
Spatial-level transforms
Spatial-level transforms will simultaneously change both an input image as well as additional targets such as masks, bounding boxes, and keypoints. The following table shows which additional targets are supported by each transform.
| Transform | Image | Masks | BBoxes | Keypoints |
|---|---|---|---|---|
| CenterCrop | ✓ | ✓ | ✓ | ✓ |
| Crop | ✓ | ✓ | ✓ | ✓ |
| CropNonEmptyMaskIfExists | ✓ | ✓ | ✓ | ✓ |
| ElasticTransform | ✓ | ✓ | ||
| Flip | ✓ | ✓ | ✓ | ✓ |
| GridDistortion | ✓ | ✓ | ||
| GridDropout | ✓ | ✓ | ||
| HorizontalFlip | ✓ | ✓ | ✓ | ✓ |
| IAAAffine | ✓ | ✓ | ✓ | ✓ |
| IAACropAndPad | ✓ | ✓ | ✓ | ✓ |
| IAAFliplr | ✓ | ✓ | ✓ | ✓ |
| IAAFlipud | ✓ | ✓ | ✓ | ✓ |
| IAAPerspective | ✓ | ✓ | ✓ | ✓ |
| IAAPiecewiseAffine | ✓ | ✓ | ✓ | ✓ |
| Lambda | ✓ | ✓ | ✓ | ✓ |
| LongestMaxSize | ✓ | ✓ | ✓ | ✓ |
| MaskDropout | ✓ | ✓ | ||
| NoOp | ✓ | ✓ | ✓ | ✓ |
| OpticalDistortion | ✓ | ✓ | ||
| PadIfNeeded | ✓ | ✓ | ✓ | ✓ |
| RandomCrop | ✓ | ✓ | ✓ | ✓ |
| RandomCropNearBBox | ✓ | ✓ | ✓ | ✓ |
| RandomGridShuffle | ✓ | ✓ | ||
| RandomResizedCrop | ✓ | ✓ | ✓ | ✓ |
| RandomRotate90 | ✓ | ✓ | ✓ | ✓ |
| RandomScale | ✓ | ✓ | ✓ | ✓ |
| RandomSizedBBoxSafeCrop | ✓ | ✓ | ✓ | |
| RandomSizedCrop | ✓ | ✓ | ✓ | ✓ |
| Resize | ✓ | ✓ | ✓ | ✓ |
| Rotate | ✓ | ✓ | ✓ | ✓ |
| ShiftScaleRotate | ✓ | ✓ | ✓ | ✓ |
| SmallestMaxSize | ✓ | ✓ | ✓ | ✓ |
| Transpose | ✓ | ✓ | ✓ | ✓ |
| VerticalFlip | ✓ | ✓ | ✓ | ✓ |
Migrating from torchvision to albumentations
Migrating from torchvision to albumentations is simple - you just need to change a few lines of code.
Albumentations has equivalents for common torchvision transforms as well as plenty of transforms that are not presented in torchvision.
migrating_from_torchvision_to_albumentations.ipynb shows how one can migrate code from torchvision to albumentations.
Benchmarking results
To run the benchmark yourself follow the instructions in benchmark/README.md
Results for running the benchmark on first 2000 images from the ImageNet validation set using an Intel Xeon Platinum 8168 CPU.
All outputs are converted to a contiguous NumPy array with the np.uint8 data type.
The table shows how many images per second can be processed on a single core, higher is better.
| albumentations 0.4.2 |
imgaug 0.3.0 |
torchvision (Pillow-SIMD backend) 0.4.1 |
keras 2.3.1 |
augmentor 0.2.6 |
solt 0.1.8 |
|
|---|---|---|---|---|---|---|
| HorizontalFlip | 2183 | 1403 | 1757 | 1068 | 1779 | 1031 |
| VerticalFlip | 4217 | 2334 | 1538 | 4196 | 1541 | 3820 |
| Rotate | 456 | 368 | 163 | 32 | 60 | 116 |
| ShiftScaleRotate | 800 | 549 | 146 | 34 | - | - |
| Brightness | 2209 | 1288 | 405 | 211 | 403 | 2070 |
| Contrast | 2215 | 1387 | 338 | - | 337 | 2073 |
| BrightnessContrast | 2208 | 740 | 193 | - | 193 | 1060 |
| ShiftRGB | 2214 | 1303 | - | 407 | - | - |
| ShiftHSV | 468 | 443 | 61 | - | - | 144 |
| Gamma | 2281 | - | 730 | - | - | 925 |
| Grayscale | 5019 | 436 | 788 | - | 1451 | 4191 |
| RandomCrop64 | 173877 | 3340 | 43792 | - | 36869 | 36178 |
| PadToSize512 | 2906 | - | 553 | - | - | 2711 |
| Resize512 | 663 | 506 | 968 | - | 954 | 673 |
| RandomSizedCrop_64_512 | 2565 | 933 | 1395 | - | 1353 | 2360 |
| Equalize | 759 | 457 | - | - | 684 | - |
Python and library versions: Python 3.7.5 (default, Oct 19 2019, 00:03:48) [GCC 8.3.0], numpy 1.17.3, pillow-simd 6.0.0.post0, opencv-python 4.1.1.26, scikit-image 0.16.2, scipy 1.3.1.
Contributing
To create a pull request to the repository follow the documentation at docs/contributing.rst
Adding new transforms
If you are contributing a new transformation, make sure to update "Pixel-level transforms" or/and "Spatial-level transforms" sections of this file (README.md). To do this, simply run (with python3 only):
python3 tools/make_transforms_docs.py make
and copy/paste the results into the corresponding sections. To validate your modifications, you
can run:
python3 tools/make_transforms_docs.py check README.md
Building the documentation
- Go to
docs/directorycd docs - Install required libraries
pip install -r requirements.txt - Build html files
make html - Open
_build/html/index.htmlin browser.
Alternatively, you can start a web server that rebuilds the documentation
automatically when a change is detected by running make livehtml


