This repo shows how to implement and use the pix2pix GAN model for image to image translation. The model is demonstrated on satellite images, and the purpose is to convert the sattelite images to map images.
The Model
The pix2pix model is composed from a generator and discriminator. The purpose of the generator is to convert the original image to a new image that is similar to target image – in our case convert a sattelite image to a street maps image. The Discriminator goal is to detect which of the images are a generated images and which of them are actually the target images. In that way, the generator and discriminator are competing each other, result in a model that learnes the mathematical mapping of the input sattelite images to the street view images.

Generator architecture:
The input image is inserted into a the generator, which is made from a Unet convolution model. The Unet model is composed of encoder and decoder with a skips connection between them. The Unet architecture is describe in the following image:

The input image is inserted into the model, the encoder module is composed of several convolution layers that shrinks the original image to the basic image feauture. The decoder module is then reconstruct the image to the original image size using a transposed convolutions layers. A skip connection between the encoder and decoder is used in each layer of the the encoder-decoter convolutions in order to preserve more information of the original image. The idea behind using this architecure is very intiutive – we want to transform image of sattelite maps to an image of a street maps. Therfore we want to convert the image to another image, but we want to keep the basic structure of the image. The Unet encoder decoder module allows us to acheieve that.
Discriminator architecture:
The Discriminator receives the images and shrinks it to a smaller image. It is doint that by using several convolution layers, each layers shrinks the image to a smaller size. The outputs is a smaller image, in our case it’s a 30x30x1 image. Each pixel represent transformation of part of the image to a value between 0 1. The pixels value will represent the probability of the image slice to come from the real target. The method of converting the image to slices of smaller imagine in order to decide wheather this image is real or fake is called “Patch GAN”. Transforming the image to patches of images gives better result then just converting the image to one outpat like was use in the original GAN.

The Loss Function
We will have two losses – one for the generator loss and one for the discriminator loss.
Then Generator loss is responsible to “fool” the discriminator and will try make it predict the generated image is real, and in the other hand it will also want to let the output image to be close to the target image. Therefore, the first part of the loss will be a Binary Crossentropy loss of the discriminator output for the generated images, together with labels of 1. This part will be responsiple for “tricking” the discriminator. The other part will be L1 loss – it will make the output to be symilar to the targets.
The Discriminator loss will also be combined from two parts – the first part is making the discriminator output to predict value close to 1 for all the images that came from the true targets, and the second part will make the discriminator predict value close to 0 for all the images that came from the generator. Both of the losses will be using Binary Crossentropy loss for this purpose.
Data Preperation
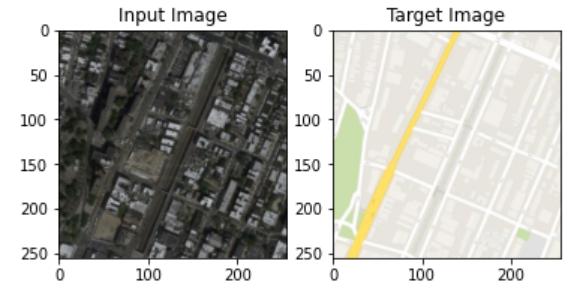
The dataset contains combined images of the sattelite images and it’s correconponded street maps images. We will split this images to two images – the input images (the sattelite image) and target images (the street maps images). We will load the images to a pytorch DataLoader to make the training more efficient. This is how random input and target image looks like:
Results
We will inset the data into the models and run the training loop.
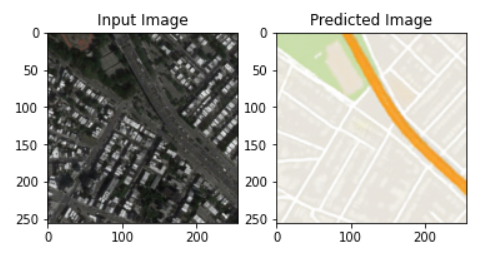
After 100 epochs, we get a result that is very similar to the target images. All the following example are taken from the test dataset, which the model wasn’t train on.
Here are some of the results:


Summary
The model worked well and was able to generate images that are very similar to target images. It was able to generalize it very well to the testing set as well.


