Pixel2Mesh++
This is an implementation of the ICCV'19 paper "Pixel2Mesh++: Multi-View 3D Mesh Generation via Deformation".
Our method takes multi-view images as input and the network outputs a refined 3D mesh model via deformation.
Please check our paper and the project webpage for more details.
If you have any question, please contact Chao Wen (cwen18 at fudan dot edu dot cn).
Citation
If you use this code for any purpose, please consider citing:
@inProceedings{wen2019pixel2mesh++,
  title={Pixel2Mesh++: Multi-View 3D Mesh Generation via Deformation},
  author={Chao Wen and Yinda Zhang and Zhuwen Li and Yanwei Fu},
  booktitle={ICCV},
  year={2019}
}
Dependencies
Requirements:
- Python3.6
- numpy
- Tensorflow==1.12.0
- tflearn==0.3.2
- opencv-python
Our code has been tested with Python 3.6, TensorFlow 1.12.0, CUDA 9.0 on Ubuntu 16.04.
Compile CUDA-op
If you use Chamfer Distance for training or evaluation, we have included the cuda implementations of Fan et. al. in external/.
We recommend readers to follow the official tutorial of Tensorflow for how to compile the CUDA code. Please refer to official tutorial.
Dataset
We used the ShapeNet dataset for 3D models, and rendered views from 3D-R2N2. When using the provided data make sure to respect the shapenet license.
The training/testing split can be found in data/train_list.txt and data/test_list.txt.
If you are interested in using our data, please check ./data for terms of usage.
Pre-trained Model
We provide pre-trained models on ShapeNet datasets. Please check ./data for download links.
Quick Demo
First, please refer to the documentation in ./data to download the pre-trained model.
Then, execute the script below, the input images for demo has placed in data/demo/ and the final mesh will be output to data/demo/predict.obj:
python demo.py
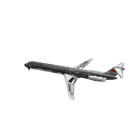
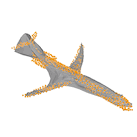
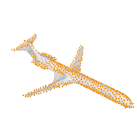
Input images, coarse shape and shape generated by pixel2mesh++


Training
Our released code consists of a coarse shape generation and the refined block.
For training, you should first train the coarse shape generation network, then generate intermediate results, and finally train the multi-view deformation network.
Step1
For training coarse shape generation, please set your own configuration in cfgs/mvp2m.yaml. Specifically, the meaning of the setting items is as follows. For more details, please refer to modulles/config.py.
train_file_path: the path of your own train split file which contains training data name for each instancetrain_image_path: input image pathtrain_data_path: ground-truth model pathcoarse_result_***: the configuration items related to the coarse intermediate mesh should be same as the training data
Then execute the script:
python train_mvp2m.py -f cfgs/mvp2m.yaml
Step2
Before training multi-view deformation network, you should generated coarse intermediate mesh.
python generate_mvp2m_intermediate.py -f cfgs/mvp2m.yaml
Step3
For training multi-view deformation network, please set your own configuration in cfgs/p2mpp.yaml.
The configuration item is similar to Step1. In particular, train_mesh_root should be set to the output path of intermediate coarse shape generation.
Then execute the script:
python train_p2mpp.py -f cfgs/p2mpp.yaml
Evaluation
First, download the pre-trained model from the link in ./data.
Then the model can output predict mesh as follows.
Step 1
Generate coarse shape, you also need to set your own configuration in cfgs/mvp2m.yaml as mentioned previously, then execute the script:
python test_mvp2m.py -f cfgs/mvp2m.yaml
Step2
You should set test_mesh_root in cfgs/p2mpp.yaml to the output folder in step1 and test_image_path,test_file_path as it mentioned in Training step.
Then execute the script:
python test_p2mpp.py -f cfgs/p2mpp.yaml
For evaluate F-score and Chamfer distance you can execute the script below, and the evaluation result will be output and stored in result/refine_p2mpp/log:
python f_score.py -f cfgs/p2mpp.yaml
python cd_distance.py -f cfgs/p2mpp.yaml
Please check that you config the correct ground truth path, image path and test split file path in yaml config file.
Due to the stochastic nature during training. The released pre-trained model has slightly better F-score 67.23, CD 0.381 compared to F-score 66.48, CD 0.486 in the paper.
Statement
This software is for research purpose only.
Please contact us for the licence of commercial purposes. All rights are preserved.


