Rhino
Rhino is Picovoice's Speech-to-Intent engine. It directly infers intent from spoken commands within a given context of interest, in real-time. For example, given a spoken command:
Made in Vancouver, Canada by Picovoice
Can I have a small double-shot espresso?
Rhino infers that the user and emits the following inference result:
{
  "isUnderstood": "true",
  "intent": "orderBeverage",
  "slots": {
    "beverage": "espresso",
    "size": "small",
    "numberOfShots": "2"
  }
}
Rhino is:
- using deep neural networks trained in real-world environments.
- compact and computationally-efficient. It is perfect for IoT.
- cross-platform: Raspberry Pi, BeagleBone, Android, iOS, Linux (x86_64), Mac (x86_64), Windows (x86_64), and web
browsers are supported. Additionally, enterprise customers have access to the ARM Cortex-M SDK. - self-service. Developers can train custom models using Picovoice Console.
Use Cases
Rhino is the right choice if the domain of voice interactions is specific (limited).
- If you want to create voice experiences similar to Alexa or Google, see the Picovoice platform.
- If you need to recognize a few static (always listening) voice commands, see Porcupine.
Try It Out
-
Rhino and Porcupine on an ARM Cortex-M7

Language Support
- English, German, French and Spanish.
- Support for additional languages is available for commercial customers on a case-by-case basis.
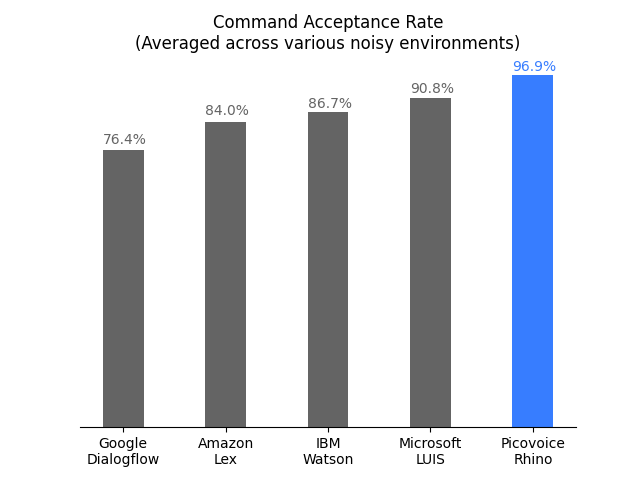
Performance
A comparison between the accuracy of Rhino and major cloud-based alternatives is provided
here. Below is the summary of the benchmark:
Terminology
Rhino infers the user's intent from spoken commands within a domain of interest. We refer to such a specialized domain as
a Context. A context can be thought of a set of voice commands, each mapped to an intent:
turnLightOff:
  - Turn off the lights in the office
  - Turn off all lights
setLightColor:
  - Set the kitchen lights to blue
In examples above, each voice command is called an Expression. Expressions are what we expect the user to utter
to interact with our voice application.
Consider the expression:
Turn off the lights in the office
What we require from Rhino is:
- To infer the intent (
turnLightOff) - Record the specific details from the utterance, in this case the location (
office)
We can capture these details using slots by updating the expression:
turnLightOff:
  - Turn off the lights in the $location:lightLocation.
$location:lightLocation means that we expect a variable of type location to occur and we want to capture its value
in a variable named lightLocation. We call such variable a Slot. Slots give us the ability to capture details of the
spoken commands. Each slot type is be defined as a set of phrases. For example:
lightLocation:
  - "attic"
  - "balcony"
  - "basement"
  - "bathroom"
  - "bedroom"
  - "entrance"
  - "kitchen"
  - "living room"
  - ...
You can create custom contexts using the Picovoice Console.
To learn the complete expression syntax of Rhino, see the Speech-to-Intent Syntax Cheat Sheet.
Demos
Python Demos
Install PyAudio and then the demo package:
sudo pip3 install pvrhinodemo
With a working microphone connected to your device run the following in the terminal:
rhino_demo_mic --context_path ${CONTEXT_FILE_PATH}
Replace ${CONTEXT_FILE_PATH} with either a context file created using Picovoice Console or one within the repository.
For more information about Python demos, go to https://github.com/Picovoice/rhino/blob/master/demo/python.
.NET Demos
Rhino .NET demo is a command-line application that lets you choose between running Rhino on an audio
file or on real-time microphone input.
Make sure there is a working microphone connected to your device. From demo/dotnet/RhinoDemo
run the following in the terminal:
dotnet run -c MicDemo.Release -- --context_path ${CONTEXT_FILE_PATH}
Replace ${CONTEXT_FILE_PATH} with either a context file created using Picovoice Console or one within the repository.
For more information about .NET demos, go to demo/dotnet.
Java Demos
The Rhino Java demo is a command-line application that lets you choose between running Rhino on a
audio file or on real-time microphone input.
To try the real-time demo, make sure there is a working microphone connected to your device. From the root of the repository run the following command:
java -jar demo/java/bin/rhino-mic-demo.jar -c ${CONTEXT_FILE_PATH}
Replace ${CONTEXT_FILE_PATH} with either a context file created using Picovoice Console or one within the repository.
For more information about Java demos go to demo/java.
Unity Demos
To run the Rhino Unity demo, import the Rhino Unity package into your project, open the RhinoDemo scene and hit play. To run on other platforms or in the player, go to File > Build Settings, choose your platform and hit the Build and Run button.
To browse the demo source go to demo/unity.
Flutter Demos
To run the Rhino demo on Android or iOS with Flutter, you must have the Flutter SDK installed on your system. Once installed, you can run flutter doctor to determine any other missing requirements for your relevant platform. Once your environment has been set up, launch a simulator or connect an Android/iOS device.
Before launching the app, use the copy_assets.sh script to copy the rhino demo context file into the demo project. (NOTE: on Windows, Git Bash or another bash shell is required, or you will have to manually copy the context into the project.).
Run the following command from demo/flutter to build and deploy the demo to your device:
flutter run
The demo uses a smart lighting context, which can understand commands such as:
Turn off the lights.
or
Set the lights in the living room to purple.
React Native Demos
To run the React Native Rhino demo app you will first need to setup your React Native environment. For this,
please refer to React Native's documentation. Once your environment has
been set up, navigate to demo/react-native to run the following commands:
For Android:
yarn android-install    # sets up environment
yarn android-run        # builds and deploys to Android
For iOS:
yarn ios-install        # sets up environment
yarn ios-run            # builds and deploys to iOS
Both demos use a smart lighting context, which can understand commands such as:
Turn off the lights.
or
Set the lights in the living room to purple.
Android Demos
Using Android Studio, open demo/android/Activity as an Android project and then run the
application. After pressing the start button you can issue commands such as:
Turn off the lights.
or:
Set the lights in the living room to purple.
For more information about Android demo and the complete list of available expressions, go to demo/android.
iOS Demos
Using Xcode, open
demo/ios/RhinoDemo/RhinoDemo.xcodeproj and run the application. After pressing
the start button you can issue commands such as:
Turn off the lights.
or:
Set the lights in the living room to purple.
For more information about Android demo and the complete list of available expressions go to demo/ios/RhinoDemo.
JavaScript Demos
From demo/javascript run the following in the terminal:
yarn
yarn start
This will launch a local server running the demo. Open http://localhost:5000 in your web browser and follow the
instructions on the page.
NodeJS Demos
Install the node-record-lpcm16 NPM package, and follow the instructions
there for setting up your microphone. Then install the demo package:
yarn global add @picovoice/rhino-node-demo
With a working microphone connected to your device, run the following in the terminal:
rhn-mic-demo --context_path ${CONTEXT_FILE_PATH}
Replace ${CONTEXT_FILE_PATH} with either a context file created using Picovoice Console or one within the repository.
For more information about NodeJS demos go to demo/nodejs.
C Demos
The Microphone demo runs on Linux-based systems (e.g. Ubuntu, Raspberry Pi, and BeagleBone).
Build the demo:
gcc -std=c99 -O3 -o demo/c/rhino_demo_mic -I include demo/c/rhino_demo_mic.c -ldl -lasound
Find the name of audio input device (microphone) on your computer using arecord -L and then from the root of the
repository run the demo:
./demo/c/rhino_demo_mic \
${RHINO_LIBRARY_PATH} \
lib/common/rhino_params.pv \
resources/contexts/${SYSTEM}/smart_lighting_${SYSTEM}.rhn \
${INPUT_AUDIO_DEVICE}
Replace ${RHINO_LIBRARY_PATH} with path to appropriate library available under lib, ${SYSTEM} with the
name of the platform you are running on (linux, raspberry-pi, or beaglebone), and ${INPUT_AUDIO_DEVICE} with
the name of your microphone device. The demo opens an audio stream and your intent from spoken commands in the context
of a smart lighting system. For example you can say:
Turn on the lights in the bedroom.
SDKs
Python
Install the Python SDK:
pip3 install pvrhino
The SDK exposes a factory method to create instances of the engine:
import pvrhino

handle = pvrhino.create(context_path='/absolute/path/to/context')
Where context_path is the absolute path to the Speech-to-Intent context created either using Picovoice Console or one of
the default contexts available on Rhino's GitHub repository.
When initialized, the required sample rate can be obtained using rhino.sample_rate. The expected frame length
(number of audio samples in an input array) is provided by rhino.frame_length. The object can be used to infer intent from spoken
commands as below:
import pvrhino

handle = pvrhino.create(context_path='/absolute/path/to/context')

def get_next_audio_frame():
    pass

while True:
    is_finalized = handle.process(get_next_audio_frame())

    if is_finalized:
        inference = handle.get_inference()
        if not inference.is_understood:
            # add code to handle unsupported commands
            pass
        else:
            intent = inference.intent
            slots = inference.slots
            # add code to take action based on inferred intent and slot values
Finally, when done be sure to explicitly release the resources using handle.delete().
.NET
Install the .NET SDK using NuGet or the dotnet CLI:
dotnet add package Rhino
The SDK exposes a factory method to create instances of the engine as below:
using Pv

Rhino handle = Rhino.Create(contextPath:"/absolute/path/to/context");
When initialized, the valid sample rate is given by handle.SampleRate. The expected frame length (number of audio samples
in an input array) is handle.FrameLength. The engine accepts 16-bit linearly-encoded PCM and operates on
single-channel audio.
short[] GetNextAudioFrame()
{
    // .. get audioFrame
    return audioFrame;
}

while(true)
{
    bool isFinalized = handle.Process(GetNextAudioFrame());
    if(isFinalized)
    {
        Inference inference = handle.GetInference();
        if(inference.IsUnderstood)
        {
            string intent = inference.Intent;
            Dictionary<string, string> slots = inference.Slots;
            // .. code to take action based on inferred intent and slot values
        }
        else
        {
            // .. code to handle unsupported commands
        }
    }
}
Rhino will have its resources freed by the garbage collector, but to have resources freed
immediately after use, wrap it in a using statement:
using(Rhino handle = Rhino.Create(contextPath:"/absolute/path/to/context"))
{
    // .. Rhino usage here
}
Java
You can install the Rhino Java SDK by downloading and referencing the latest Rhino JAR file.
The SDK exposes a Builder that allows you to create an instance of the engine:
import ai.picovoice.rhino.*;

try{
    Rhino handle = new Rhino.Builder()
                    .setContextPath("/absolute/path/to/context")
                    .build();
} catch (RhinoException e) { }
When initialized, the valid sample rate is given by handle.getSampleRate(). The expected frame length (number of audio samples
in an input array) is handle.getFrameLength(). The engine accepts 16-bit linearly-encoded PCM and operates on
single-channel audio.
short[] getNextAudioFrame(){
    // .. get audioFrame
    return audioFrame;
}

while(true) {
    boolean isFinalized = handle.process(getNextAudioFrame());
    if(isFinalized){
        RhinoInference inference = handle.getInference();
        if(inference.getIsUnderstood()){
            String intent = inference.getIntent();
            Map<string, string> slots = inference.getSlots();
            // .. code to take action based on inferred intent and slot values
        } else {
            // .. code to handle unsupported commands
        }
    }
}
Once you are done with Rhino, ensure you release its resources explicitly:
handle.delete();
Unity
Import the Rhino Unity Package into your Unity project.
The SDK provides two APIs:
High-Level API
RhinoManager provides a high-level API that takes care of audio recording. This class is the quickest way to get started.
Using the constructor RhinoManager.Create will create an instance of the RhinoManager using the provided context file.
using Pv.Unity;

try
{
    RhinoManager _rhinoManager = RhinoManager.Create(
                                    "/path/to/context/file.rhn",
                                    (inference) => {});
}
catch (Exception ex)
{
    // handle rhino init error
}
Once you have instantiated a RhinoManager, you can start audio capture and intent inference by calling:
_rhinoManager.Process();
Audio capture stops and Rhino resets once an inference result is returned via the inference callback. When you wish to result, call .Process() again.
Once the app is done with using an instance of RhinoManager, you can explicitly release the audio resources and the resources allocated to Rhino:
_rhinoManager.Delete();
There is no need to deal with audio capture to enable intent inference with RhinoManager.
This is because it uses our
unity-voice-processor
Unity package to capture frames of audio and automatically pass it to the inference engine.
Low-Level API
Rhino provides low-level access to the inference engine for those who want to incorporate speech-to-intent into a already existing audio processing pipeline.
To create an instance of Rhino, use the .Create static constructor and a context file.
using Pv.Unity;

try
{
    Rhino _rhino = Rhino.Create("path/to/context/file.rhn");
}
catch (Exception ex)
{
    // handle rhino init error
}
To feed Rhino your audio, you must send it frames of audio to its Process function until it has made an inference.
short[] GetNextAudioFrame()
{
    // .. get audioFrame
    return audioFrame;
}

try
{
    bool isFinalized = _rhino.Process(GetNextAudioFrame());
    if(isFinalized)
    {
        Inference inference = _rhino.GetInference();
        if(inference.IsUnderstood)
        {
            string intent = inference.Intent;
            Dictionary<string, string> slots = inference.Slots;
            // .. code to take action based on inferred intent and slot values
        }
        else
        {
            // .. code to handle unsupported commands
        }
    }
}
catch (Exception ex)
{
    Debug.LogError(ex.ToString());
}
For process to work correctly, the audio data must be in the audio format required by Picovoice.
Rhino implements the IDisposable interface, so you can use Rhino in a using block. If you don't use a using block, resources will be released by the garbage collector automatically or you can explicitly release the resources like so:
_rhino.Dispose();
Flutter
Add the Rhino Flutter plugin to your pub.yaml.
dependencies:
  rhino: ^<version>
The SDK provides two APIs:
High-Level API
RhinoManager provides a high-level API that takes care of audio recording. This class is the quickest way to get started.
The constructor RhinoManager.create will create an instance of the RhinoManager using a context file that you pass to it.
import 'package:rhino/rhino_manager.dart';
import 'package:rhino/rhino_error.dart';

void createRhinoManager() async {
    try{
        _rhinoManager = await RhinoManager.create(
            "/path/to/context/file.rhn",
            _inferenceCallback);
    } on PvError catch (err) {
        // handle rhino init error
    }
}
The inferenceCallback parameter is a function that you want to execute when Rhino makes an inference.
The function should accept a map that represents the inference result.
void _infererence(Map<String, dynamic> inference){
    if(inference['isUnderstood']){
        String intent = inference['intent']
        Map<String, String> = inference['slots']
        // add code to take action based on inferred intent and slot values
    }
    else{
        // add code to handle unsupported commands
    }
}
Once you have instantiated a RhinoManager, you can start audio capture and intent inference using the .process() function.
Audio capture stops and rhino resets once an inference result is returned via the inference callback.
try{
    await _rhinoManager.process();
} on PvAudioException catch (ex) { }
Once your app is done with using RhinoManager, be sure you explicitly release the resources allocated for it:
_rhinoManager.delete();
Our flutter_voice_processor Flutter plugin captures the frames of audio and automatically passes it to the speech-to-intent engine.
Low-Level API
Rhino provides low-level access to the inference engine for those who want to incorporate
speech-to-intent into a already existing audio processing pipeline.
Rhino is created by passing a context file to its static constructor create:
import 'package:rhino/rhino_manager.dart';
import 'package:rhino/rhino_error.dart';

void createRhino() async {
    try{
        _rhino = await Rhino.create('/path/to/context/file.rhn');
    } on PvError catch (err) {
        // handle rhino init error
    }
}
To deliver audio to the engine, you must send audio frames to its process function.
Each call to process will return a Map object that will contain the following items:
- isFinalized - whether Rhino has made an inference
- isUnderstood - if isFinalized, whether Rhino understood what it heard based on the context
- intent - if isUnderstood, name of intent that were inferred
- slots - if isUnderstood, dictionary of slot keys and values that were inferred
List<int> buffer = getAudioFrame();

try {
    Map<String, dynamic> inference = _rhino.process(buffer);
    if(inference['isFinalized']){
        if(inference['isUnderstood']){
            String intent = inference['intent']
            Map<String, String> = inference['slots']
            // add code to take action based on inferred intent and slot values
        }
    }
} on PvError catch (error) {
    // handle error
}

// once you are done
this._rhino.delete();
React Native
Install @picovoice/react-native-voice-processor and
@picovoice/rhino-react-native. The SDK provides two APIs:
High-Level API
RhinoManager provides a high-level API that takes care of
audio recording. This class is the quickest way to get started.
The constructor RhinoManager.create will create an instance of a RhinoManager using a context file that you pass to it.
async createRhinoManager(){
    try{
        this._rhinoManager = await RhinoManager.create(
            '/path/to/context/file.rhn',
            inferenceCallback);
    } catch (err) {
        // handle error
    }
}
Once you have instantiated a RhinoManager, you can start/stop audio capture and wake word detection by calling .process().
Upon receiving an inference callback, audio capture will stop automatically and Rhino will reset. To restart it you must
call .process() again.
let didStart = await this._rhinoManager.process();
When you are done using Rhino, release you must explicitly resources:
this._rhinoManager.delete();
@picovoice/react-native-voice-processor handles
audio capture and RhinoManager passes frames to the inference engine for you.
Low-Level API
Rhino provides low-level access to the inference engine for those
who want to incorporate speech-to-intent into a already existing audio processing pipeline.
Rhino is created by passing a context file to its static constructor create:
async createRhino(){
    try{
        this._rhino = await Rhino.create('/path/to/context/file.rhn');
    } catch (err) {
        // handle error
    }
}
To deliver audio to the enine, you must pass it audio frames
using the process function. The JSON result that is returned from process will have up to four fields:
- isFinalized - whether Rhino has made an inference
- isUnderstood - if isFinalized, whether Rhino understood what it heard based on the context
- intent - if isUnderstood, name of intent that were inferred
- slots - if isUnderstood, dictionary of slot keys and values that were inferred
let buffer = getAudioFrame();
try {
    let result = await this._rhino.process(buffer);
    // use result
    // ..
    }
} catch (e) {
    // handle error
}

// once you are done
this._rhino.delete();
Android
There are two possibilities for integrating Rhino into an Android application: the High-level API and the Low-level API.
High-Level API
RhinoManager provides a high-level API
for integrating Rhino into Android applications. It manages all activities related to creating an input audio stream,
feeding it into Rhino, and invoking a user-provided inference callback.
    final String modelPath = ... // Available at lib/common/rhino_params.pv
    final String contextPath = ...
    final float sensitivity = 0.5;

RhinoManager manager = new RhinoManager(
        modelPath,
        contextPath,
        sensitivity,
        new RhinoManagerCallback() {
            @Override
            public void invoke(RhinoInference inference) {
                // Insert infernce event logic
            }
        });
Sensitivity is the parameter that enables developers to trade miss rate for false alarm. It is a floating point number within
[0, 1]. A higher sensitivity reduces miss rate at cost of increased false alarm rate.
When initialized, input audio can be processed using manager.process(). When done, be sure to release the resources
using manager.delete().
Low-Level API
Rhino provides a binding for Android using JNI. It can be initialized using:
final String modelPath = ... // Available at lib/common/rhino_params.pv
final String contextPath = ...
final float sensitivity = 0.5;

Rhino handle = new Rhino(modelPath, contextPath, sensitivity);
Once initialized, handle can be used for intent inference:
private short[] getNextAudioFrame();

while (!handle.process(getNextAudioFrame()));

final RhinoInference inference = handle.getInference();
if (inference.getIsUnderstood()) {
    // logic to perform an action given the intent object.
} else {
    // logic for handling out of context or unrecognized command
}
Finally, prior to exiting the application be sure to release resources acquired:
handle.delete()
iOS
There are two approaches for integrating Rhino into an iOS application: The High-level API and the direct approach.
High-Level API
The RhinoManager class manages all activities related to creating an input audio stream
feeding it into Rhino's library, and invoking a user-provided detection callback. The class can be initialized as below:
let modelPath: String = ... // It is available at lib/common/rhino_params.pv
let contextPath: String = ...
let onInferenceCallback: ((Inference) -> Void) = { inference in
    // detection event callback
}

let manager = RhinoManager(
    modelPath: modelPath,
    contextPath: contextPath,
    onInferenceCallback: onInferenceCallback);
When initialized, input audio can be processed using manager.process().
Direct
Rhino is shipped as a precompiled ANSI C library and can directly be used in Swift using module maps. It can be
initialized to detect multiple wake words concurrently using:
let modelPath: String = ... // Available at lib/common/rhino_params.pv
let contextPath: String = "/path/to/context/file.rhn"
let sensitivity: Float32 = 0.35

var handle: OpaquePointer?
let status = pv_rhino_init(
    modelPath,
    contextPath,
    sensitivity,
    &handle)
if status != PV_STATUS_SUCCESS {
    // error handling logic
}
Then handle can be used to process incoming audio stream.
func getNextAudioFrame() -> UnsafeMutablePointer<Int16> {
    //
}

while true {
    let pcm = getNextAudioFrame()

    var isFinalized: Bool = false
    let status = pv_rhino_process(handle, pcm, &isFinalized)
    if status != PV_STATUS_SUCCESS {
        // error handling logic
    }

    if isFinalized {
        var isUnderstood: Bool = false
        var intent = ""
        var slots = [String: String]()

        status = pv_rhino_is_understood(handle, &isUnderstood)
        if status != PV_STATUS_SUCCESS {
            // error handling logic
        }

        if isUnderstood {
            var cIntent: UnsafePointer<Int8>?
            var numSlots: Int32 = 0
            var cSlotKeys: UnsafeMutablePointer<UnsafePointer<Int8>?>?
            var cSlotValues: UnsafeMutablePointer<UnsafePointer<Int8>?>?
            status = pv_rhino_get_intent(
                handle,
                &cIntent,
                &numSlots,
                &cSlotKeys,
                &cSlotValues)
            if status != PV_STATUS_SUCCESS {
                // error handling logic
            }

            if isUnderstood {
                intent = String(cString: cIntent!)
                for i in 0...(numSlots - 1) {
                    let slot = String(cString: cSlotKeys!.advanced(by: Int(i)).pointee!)
                    let value = String(cString: cSlotValues!.advanced(by: Int(i)).pointee!)
                    slots[slot] = value
                }

                // Insert inference logic

                status = pv_rhino_free_slots_and_values(handle, cSlotKeys, cSlotValues)
                if status != PV_STATUS_SUCCESS {
                    // error handling logic
                }
            } else {
                // Insert logic for invalid commands
            }
        }

        pv_rhino_reset(handle)
    }
}
When finished, release the resources:
pv_rhino_delete(handle)
JavaScript
Create a new instance of the Rhino engine:
let context = new Uint8Array([...]);

let handle = Rhino.create(context)
context is an array of 8-bit unsigned integers (i.e. UInt8Array) representing the domain of interest. When
instantiated, handle can process audio via its .process method.
    let getNextAudioFrame = function() {
        ...
    };

    let result = {};
    do {
        result = handle.process(getNextAudioFrame())
    } while (Object.keys(result).length === 0);

    if (result.isUnderstood) {
        // callback to act upon inference result
    } else {
        // callback to handle failed inference
    }
When done be sure to release resources acquired by WebAssembly using .release.
handle.release();
NodeJS
Install the NodeJS SDK:
yarn add @picovoice/rhino-node
Create instances of the Rhino class by specifying the path to the context file:
const Rhino = require("@picovoice/rhino-node");

let handle = new Rhino("/path/to/context/file.rhn");
When instantiated, handle can process audio via its .process method:
let getNextAudioFrame = function() {
    ...
};

let isFinalized = false;
while (!isFinalized) {
  isFinalized = handle.process(getNextAudioFrame());
  if (isFinalized) {
    let inference = engineInstance.getInference();
    // Insert inference event callback
  }
}
When done, be sure to release resources acquired by WebAssembly using release():
handle.release();
C
Rhino is implemented in ANSI C and therefore can be directly linked to C applications. The pv_rhino.h
header file contains relevant information. An instance of the Rhino object can be constructed as follows:
const char *model_path = ... // Available at lib/common/rhino_params.pv
const char *context_path = ... // absolute path to context file for the domain of interest
const float sensitivity = 0.5f;

pv_rhino_t *handle = NULL;
const pv_status_t status = pv_rhino_init(model_path, context_path, sensitivity, &handle);
if (status != PV_STATUS_SUCCESS) {
    // add error handling code
}
Now the handle can be used to infer intent from an incoming audio stream. Rhino accepts single channel, 16-bit PCM
audio. The sample rate can be retrieved using pv_sample_rate(). Finally, Rhino accepts input audio in consecutive chunks
(frames); the length of each frame can be retrieved using pv_rhino_frame_length().
extern const int16_t *get_next_audio_frame(void);

while (true) {
    const int16_t *pcm = get_next_audio_frame();

    bool is_finalized = false;
    pv_status_t status = pv_rhino_process(handle, pcm, &is_finalized);
    if (status != PV_STATUS_SUCCESS) {
        // add error handling code
    }

    if (is_finalized) {
        bool is_understood = false;
        status = pv_rhino_is_understood(rhino, &is_understood);
        if (status != PV_STATUS_SUCCESS) {
            // add error handling code
        }

        if (is_understood) {
            const char *intent = NULL;
            int32_t num_slots = 0;
            const char **slots = NULL;
            const char **values = NULL;
            status = pv_rhino_get_intent(rhino, &intent, &num_slots, &slots, &values);
            if (status != PV_STATUS_SUCCESS) {
                // add error handling code
            }

            // add code to take action based on inferred intent and slot values

            pv_rhino_free_slots_and_values(rhino, slots, values);
        } else {
            // add code to handle unsupported commands
        }

        pv_rhino_reset(rhino);
    }
}
When done, remember to release the resources acquired.
pv_rhino_delete(rhino);


