Tesla Light Show xLights Guide
Welcome to the Tesla Light Show xLights guide! You can create and run your own light shows on Tesla vehicles.

Running a custom show on a vehicle
A custom show can be run on a supported vehicle by loading it via a USB flash drive. Create and share your shows with others! A single show can be shared and run on any supported vehicle; they are not model-specific. The sequence data is stored in a .fseq file and the music comes from your choice of .mp3 or .wav.
Supported Vehicles
- Model S (2021+)
- Model 3
- Model X (2021+)
- Model Y
- Running Software v11.0 (2021.44.25) or newer
USB flash drive requirements
- Must contain a base-level folder called “LightShow” (without quotation marks and case sensitive).
- The LightShow folder must contain 2 files:
- “lightshow.fseq”
- “lightshow.mp3” or “lightshow.wav” (wav is recommended)
- Must be formatted as exFAT, FAT 32 (for Windows), MS-DOS FAT (for Mac), ext3, or ext4. NTFS is currently not supported.
- Must not contain a base-level TeslaCam folder.
- Must not contain any map update or firmware update files.
Running the custom light show on a vehicle
-
Insert the flash drive into one of the front USB or USB-C ports, or glovebox USB port, then wait a few seconds.
-
In Toybox, select Light Show and tap Start The Show. If the files on the USB flash drive meet the requirements, then the custom show will be used instead of the built-in show.

-
As the custom light show loads, the status at the bottom of the popup cycles through “Loading lightshow.fseq” and “Loading light show…”. When the status becomes “Light show ready!”, you can exit the vehicle and the custom show will start.


Debug
- If the popup title is “Light Show” instead of “Custom Light Show”, then the requirements are not being met for the USB flash drive formatting and/or required folder and files.
- Error messages will be provided if the required files exist but there is a problem with the light show sequence file.
General Limitations of Custom Shows
- The maximum duration for a custom Tesla xLights show is 5 minutes.
- The maximum number of commands during a custom show is 681:
- Any transition of a light or closure contributes towards this command limit. Eg, turning a light on and off is 2 transitions.
- Within each of the following 3 categories, transitions that happen at the same timestamp will only contribute 1 command towards the overall limit. Therefore, within these categories, it is recommended to align transitions at the same timestamp as much as possible.
- Boolean light
- Ramping light
- Closures
Getting started with the Tesla xLights project directory
-
Visit xLights Downloads to download and install the xLights application.
-
Download and unzip tesla_xlights_show_folder.zip, which is the Tesla xLights bare project directory.
- It is recommended to keep the project directory structure as-is and leave all files in their default locations.
-
Open the xLights application.
-
IMPORTANT: In File > Preferences > Sequences > FSEQ Version, select “V2 Uncompressed”.

-
In File > Select Show Folder, navigate to and select the unzipped project directory, then select Open.
-
Select the Layout tab to view the Tesla 3D vehicle model. You should see the Tesla Model S model listed under the Model/Group table.

-
Make sure that the 3D preview checkbox is selected. Mac users may need to resize the window in order to see this checkbox.

-
Users may want to adjust the size of the lights on the model, for better visibility. In Layout > Models > Tesla Model S, open the Appearance dropdown and change Pixel Size.

-
Select the Sequencer tab. For the best editing experience, only the timeline, House Preview, and Color windows are needed.

-
Note that the official Tesla Model S .xmodel file includes the superset of lights and closures that are needed for all supported vehicles, and should be used to generate shows for all vehicle types. See light locations for information about where the lights are on each vehicle.


Opening the example sequence
An example sequence is provided that can be run on the vehicle and/or opened in xLights. These instructions cover how to open it in xLights.
-
Follow the getting started instructions to set up the xLights project.
-
Download and unzip the example light show, lightshow_example_1.zip.
-
In File > Open Sequence, navigate to the unzipped folder and select the
lightshow.xsqexample file, then select Open. -
In the Sequencer tab, double click on “Tesla Model S” then double click on “All Lights and Closures” to view all channels.


Creating a new sequence
-
Follow the getting started instructions to set up the xLights project.
-
Select File > New Sequence
-
Select Musical Sequence
-
Navigate to your chosen .wav or mp3 file, select it, then select Open
-
In the Wizard tab select Custom
-
Change the Frame interval to 20ms then select OK.

Note: any value between 15ms and 100ms is supported by the vehicle, but 20ms is recommended for nearly all use cases. The maximum show size limits do not depend on the frame interval.
-
Select Quick Start and wait for the sequencer to load
-
In the Sequencer tab, double click on “Tesla Model S” then double click on “All Lights and Closures” to view all channels

-
To add effects, click and drag an “On” effect onto a given channel in the effects window. In the Color window (shown by default, but can be found in View > Window > Colors), adjust Brightness if needed according to ramping light channels or closures channel mappings.


-
For more information on the workflow of creating xLights sequences, please use existing online resources. The rest of these instructions contain Tesla-specific information for show creators.


Light Show Sequence Validator Script
A Python validator script is provided to help check if your custom light show sequence meets these limitations, without needing a Tesla vehicle.
For usage, run:
python3 validator.py lightshow.fseq
Expected output looks like:
> python3 validator.py lightshow.fseq
Found 2247 frames, step time of 20 ms for a total duration of 0:00:44.940000.
Used 16.45% of the available memory
Boolean Light Channels
Most lights available on the vehicle can only turn on or off instantly, which corresponds to 0% or 100% brightness of an ‘Effect’ in xLights.
- For off, use blank space in the xLights timeline
- For on, use an ‘On’ effect with 100% brightness (this is the default for On effects)
The minimum on-time for boolean light channels to produce light is 15ms, although human eyes will have a hard time seeing anything this short! Minimum on-time or off-time of 100ms generally makes the show more pleasing to look at.
In this example, the Left Front Fog turns on and off 3x:

Ramping Light Channels
Some channels can have a slow ramp in the intensity during turn-on or turn-off, to create graceful visual effects:
| Channel | Model S | Model X | Model 3/Y |
|---|---|---|---|
| Outer Main Beam | Ramping | Ramping | Ramping on LED reflector headlights; Boolean on LED projector headlights |
| Inner Main Beam | Ramping | Ramping | Ramping |
| Signature | Boolean | Boolean | Ramping |
| Channels 4-6 | Ramping | Ramping | Ramping |
| Front Turn | Boolean | Boolean | Ramping |
To command a light to turn on or off and follow a ramp profile, add an ‘On’ effect and adjust the effect’s Brightness parameter in the Color window:
| Ramping Function | xLights Effect Brightness |
|---|---|
| Turn off; Instant | 0% |
| Turn off; 500 ms | 10% |
| Turn off; 1000 ms | 20% |
| Turn off; 2000 ms | 30% |
| Turn on; 2000 ms | 70% |
| Turn on; 1000 ms | 80% |
| Turn on; 500 ms | 90% |
| Turn on; Instant | 100% |
Other notes
- Ramping can only prolong the time it takes to fully turn a light on or turn off. It is not possible to command a steady-state brightness setpoint between 0% and 100% intensity.
- If an xLights effect is longer than the ramping duration, then the light will stay at 0% or 100% intensity after it finishes ramping.
- Ramping effects can end early or be reversed before completion, and the light will immediately start following the new profile that is commanded.
- To guarantee that a light reaches the 0% or 100% setpoint, the xLights effect must have a duration at least 50ms greater than the ramp duration. Conversely, to guarantee that a light does not fully reach the 0% or 100% setpoint, the xLights effect must have a duration at least 100ms less than the ramp duration.
- Ramping Channels 4-6 have some unique aspects compared to other lights in order to use them effectively – see notes in Ramping Channels 4-6.
Ramping light examples
-
Left inner main beam, 70% brightness, effect duration 1s: causes the light to ramp from 0% to 50% intensity over 1s, then instantly turn off (because an empty xLights timeline corresponds to 0% brightness).

-
Left inner main beam, 70% brightness, effect duration 4s: causes the light to ramp from 0% to 100% intensity over 2s, then stay at 100% intensity for 2s, then instantly turn off after 4s.

-
Left inner main beam, 70% for 2.06s, 30% for 1.9s, 70% for 2.06s: causes light to ramp to 100% intensity, then down close to, but not reaching, 0% intensity, then back up to 100% intensity, then instantly turn off.


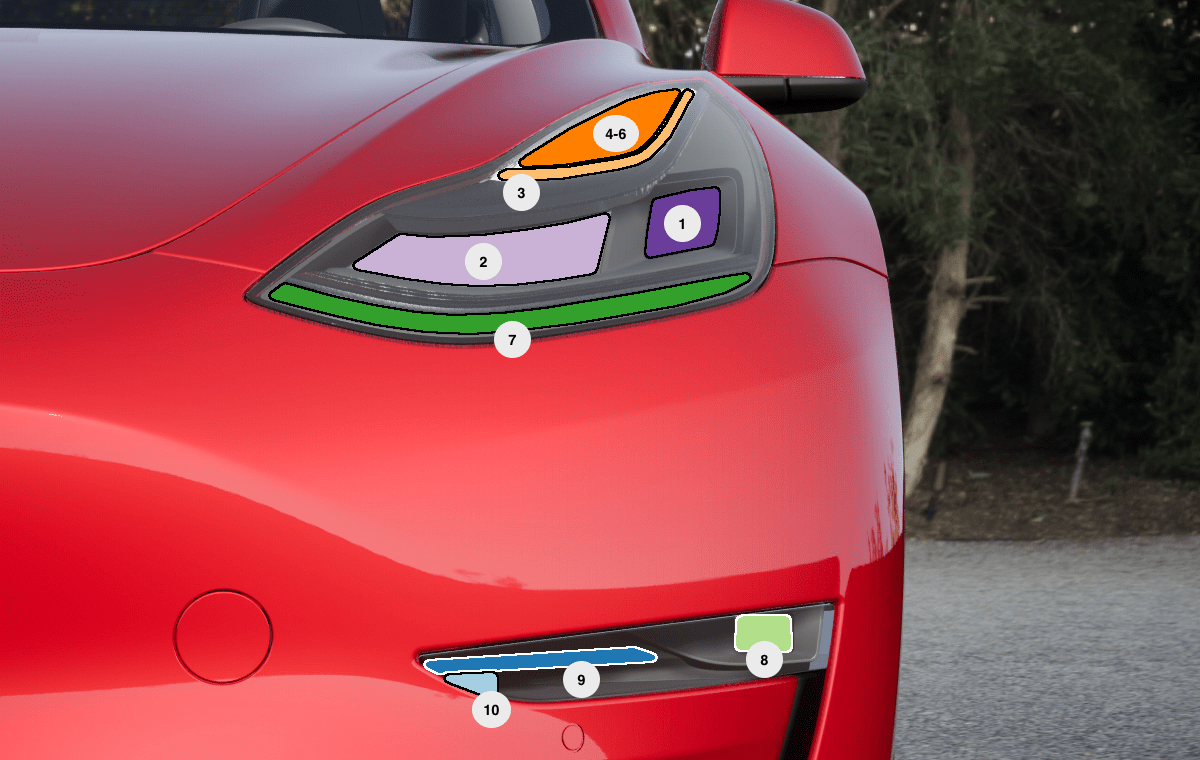
Light Channel Locations
The following tables and images help show which channels are controlled on each car. Some vehicles have lights that do not exist, or have multiple lights driven by the same control output – see notes in Light channel mapping details for this information.
| Light Channel Name | Identifier in image – Model S/X | Identifier in image – Model 3/Y |
|---|---|---|
| Outer Main Beam | 1 | 1 |
| Inner Main Beam | 2 | 2 |
| Signature | 3 | 3 |
| Channel 4 | 4 | 4-6 |
| Channel 5 | 5 | 4-6 |
| Channel 6 | 6 | 4-6 |
| Front Turn | 7 | 7 |
| Front Fog | 8 | 8 |
| Aux Park | 9 | 9 |
| Side Marker | 10 | 10 |
Model 3/Y with LED reflector lamps

Model 3/Y with LED projector lamps
Model S

Model X

Closures channels
In custom xLights shows, the following closures can be commanded:
| Channel | Model S | Model X | Model 3/Y | Supports Dance? | Command Limit Per Show |
|---|---|---|---|---|---|
| Liftgate | Yes | Yes | Only vehicles with power liftgate | Yes | 6 |
| Mirrors | Yes | Yes | Yes | – | 20 |
| Charge Port | Yes | Yes | Yes | Yes | 3 |
| Windows | Yes | Yes | Yes | Yes | 6 |
| Door Handles | Yes | – | – | – | 20 |
| Front Doors | – | Yes | – | – | 6 |
| Falcon Doors | – | Yes | – | Yes | 6 |
To command a closure to move in a particular manner, add an ‘On’ effect and adjust the effect’s Brightness parameter in the Color window:
| Closure Movement | xLights Effect Brightness |
|---|---|
| Idle | 0% |
| Open | 25% |
| Dance | 50% |
| Close | 75% |
| Stop | 100% |
Definitions for closure movements:
- Idle: The closure will stop, unless the closure is in the middle of an Open or Close in which case that movement will finish first.
- Open: The closure will open and then stop once fully opened.
- Dance: Get your party on! The closure will oscillate between 2 predefined positions. For the charge port, Dance causes the charge port LED to flash in rainbow colors.
- Close: The closure will close and then stop once fully closed.
- Stop: The closure will immediately stop.
Other notes
- For closures that do not support Dance, it’s recommended to use Open and Close requests to cause movement during the show.
- It’s recommended to avoid closing windows during the show so that music stays more audible. Music only plays from the cabin speakers during the show.
- Closures can only dance for a limited time before encountering thermal limits. This depends on multiple factors including ambient temperature, etc. If thermal limits are encountered, the given closure will stop moving until it cools down. Dancing for ~30s or less per show is recommended.
Closures Command Limitations
- All closures have actuation limits listed in the table above. Only Open, Close, and Dance count towards the actuation limits. The limits are counted separately for each individual closure.
- With the exception of windows, closures will not honor Dance requests unless the respective closure is already in the open position. The show creator must account for this by adding a delay between Open and Dance requests.
- The charge port door will automatically close if 2 minutes have elapsed since opening.
- Closure commands spaced very close together (eg, 20ms) will not cause much visible movement, and will use up the command limits quickly. Leave reasonable time between commands to see the best effects.
Closures Command xLights Notes
-
For Idle, Open, Close, and Stop, there is no minimum xLights effect duration in order for the command to take effect. For example, the following sequence has a liftgate open command with duration of only 1s ahead of the dance that comes later, and this is sufficient to open the liftgate all the way:

-
For Dance, the xLights effect must persist until the dancing is desired to stop.

Tips for platform-agnostic light shows
Light channel mapping recommendations
- Not all vehicles have all types of lights installed. When turning on/off lights in sync with key parts of the music’s beat, try to use lights that are installed on all vehicle variants.
- Not all vehicles have individual control over every light. In these cases, multiple xLights channels are OR’d together to decide whether to turn on a given group of lights. These are outlined in the section below.
- For lights that are controlled by multiple OR’d channels, keep in mind that some shared off-time on all of the OR’d channels is required to cause an apparent flash of the light.
-
This example will cause Aux Park lights to turn on constantly on Model 3/Y:

-
This example will cause the Aux Park lights to flash on Model 3/Y:

-


Light channel mapping details
Side Markers and Aux Park
- Side markers are only installed in North America vehicles
- Aux park are not installed in Model 3 Standard Range +
- On Model 3/Y, all aux park and side markers operate together. They will activate during
(Left side marker || Left aux park || Right side marker || Right aux park)requests from xLights. - On Model S, aux park and side markers operate together, but they have independent left/right control. They will activate during the following requests from xLights:
- Left side:
(Left side marker || Left aux park) - Right side:
(Right side marker || Right aux park)
- Left side:
Ramping Channels 4-6
- For Model S/X:
- Individual on/off control is supported for each channel
- Only a single ramping duration is allowed between all 3 channels.
- The ramping duration for all 3 is defined only by the effect placed in xLights for Channel 4.
- For Model 3/Y:
- All 3 of these channels are combined into a single output on the vehicle, see light channel locations.
- The on/off state is OR’d together between all 3 channels:
(Channel 4 || Channel 5 || Channel 6). - The ramping duration is defined by the effect placed in xLights for Channel 4.
- Because channel 4 acts as the leader for setting ramping duration on all platforms, a ramping effect must sometimes be included on Channel 4 even when Channel 4 is not turned on.
-
In this example, each channel blinks 3x and ramps down after its last blink. Notice how an On effect with 10% brightness is added always on Channel 4, even when it’s Channel 5 or Channel 6 that were turned on.

-

Front Fog
- Front fog lights are installed in all vehicles except Model 3 Standard Range +.
- Vehicles without front fog lights will not use any other light in place of front fog lights.
Rear Fog
- Rear fog lights are installed in non-North America vehicles, and North America Model X.
- Vehicles without rear fog lights will not use any other light in place of rear fog lights.
Tail lights and License Plate Lights
- On Model 3 built before October 2020: left tail, right tail, and license plate lights operate together. They will activate during
(Left tail || Right tail)requests from xLights – note that the license plate lights xLights channel will have no effect on these vehicles.

