Labeling Tool lite
This repository provides you with a labeling tool with little to no configuration needed! The Tool was reduced in its functional scope to the most necessary. You can start labeling your images for State-of-the-art Deep Learning training purposes right away with our Dockerized labeling tool. You can also directly use the labels provided by the LabelingTool to train with our Yolov4 and Tensorflow Training GUI repositories:
https://github.com/BMW-InnovationLab/BMW-TensorFlow-Training-GUI
https://github.com/BMW-InnovationLab/BMW-YOLOv3-Training-Automation
Prerequisites
-
Windows or Ubuntu
-
Docker and Docker-compose
Installing Prerequisites:
To verify that you have docker and docker-compose,open a terminal and use the following commands:
-Verify docker:
docker --version
-Verify docker-compose:
docker-compose --version
If you do have docker and docker-compose on your machine skip to "Getting Started", otherwise follow the steps below:
- For Windows:
Go to https://hub.docker.com/editions/community/docker-ce-desktop-windows/ and download the stable version of docker (docker-compose will be automatically installed with docker)
PS: You may need to increase the shared memory docker is using
- For Ubuntu:
-if you don't have neither docker nor docker-compose, open a Terminal, go to your project's repository, use the following command :
chmod +x install_full.sh && source install_full.sh
-if you have docker and wish to only install docker-compose, open a terminal, go to your project's repository, then use the following command inside your project's repository:
chmod +x install_compose.sh && source install_compose.sh
- For Mac:
-Go to https://docs.docker.com/docker-for-mac/install/ and follow the documentation to download and install docker and docker-compose together !
Running the labeling tool:
We provide a sample_dataset in case you don't have your own custom dataset.
- To run the labeling tool and start labeling, simply go to your projects repository and run the command below:
docker-compose up
- Open any browser,go to localhost:8081 and start labeling !

Preparing your custom dataset:
In your project's repository, this is how the training-data folder structure should look like after preparing your dataset (follow steps below):
│──training-data
  │──myfirstdataset
  │  │──images
  │  │──labels
  │  │──objectclasses.json
  │
  │──topics.json
-
The training-data folder is where all your datasets should be.
-
For a new dataset, create a folder inside training-data (for example a folder called "myfirstdataset")
-
Let's say that the topics.json file that is inside training-data currently looks like this:
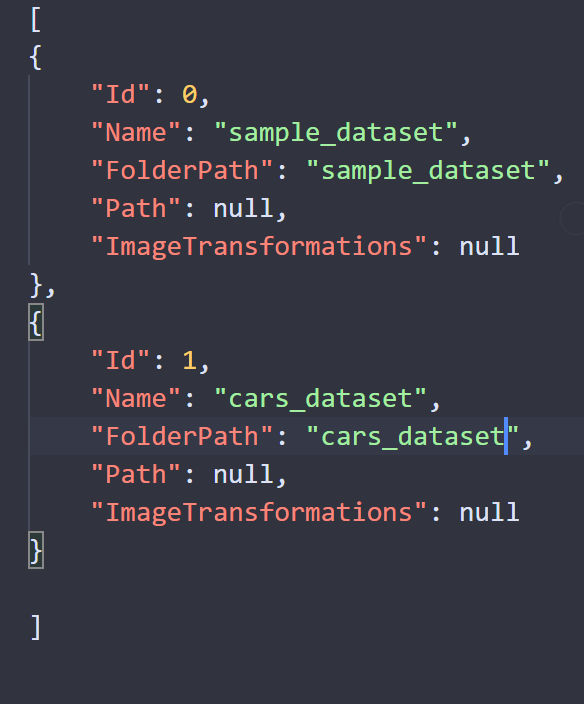
please add the following to your topics.json file just above the "]":
  ,
  {
      "Id": 2,
      "Name": "myfirstdataset",
      "FolderPath": "myfirstdataset",
      "Path": null,
      "ImageTransformations": null
  }
Make sure you replace "myfirstdataset" with your dataset's name.
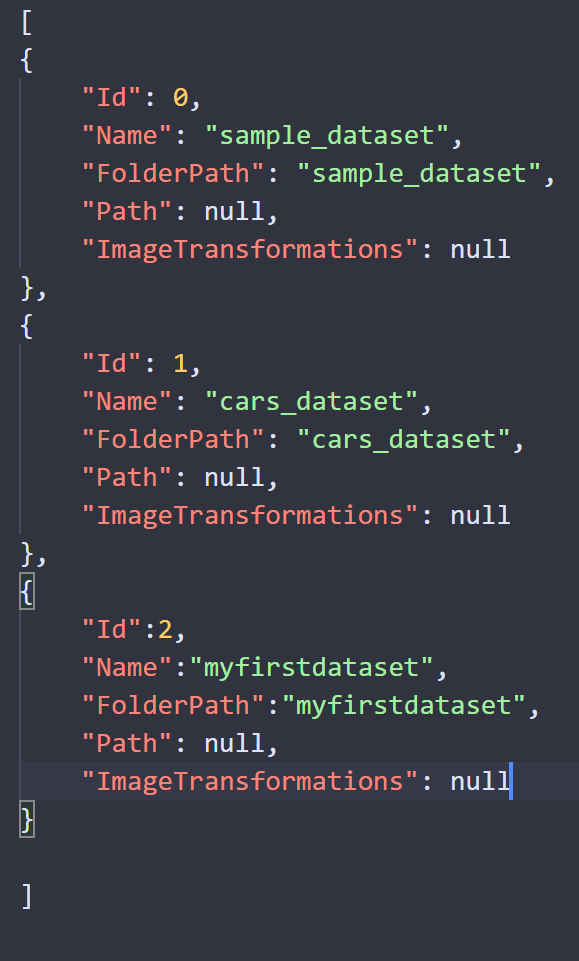
After finishing , your topics.json file should look like this :
-
Inside your "myfirstdataset" folder :
-
Create a folder called "images", this is where you put all the images that you need to label.
-
Create a folder called "labels", this is where the labels are generated after labeling your images
-
Create a json file called "objectclasses", this is where you define your classes. An example of two different classes is shown below:
In this example the classes are "Dog" and "Cat". Add the following to your "objectclasses.json" file. Make sure to edit the classes names to match your own dataset. You can add or remove classes as needed.
[
    {
        "Id": 0,
        "Name": "Dog"
    },
    {
        "Id": 1,
        "Name": "Cat"
    }
]
-
Running the labeling tool:
-
Open the docker-compose.yml file in your project's repository.
-
The labeling tool runs on localhost:8081, if you want to change the port , replace 8081 in "ports" under "rcvlabeltoollite" by the port number that you want
-
Under "volumes" replace what's written before the ":" with your training-data folder absolute path. For Windows users, replace the "\" in the path with "\\". (check the example below)
-
Open a Terminal , go to your project's repository , and run the command below :
docker-compose up -
go to localhost:Chosen_port , choose your topic and start labeling

Training with our Tensorflow Gui
To use the generated labels with our tensorflow gui follow the steps below :
-
Make sure you downloaded our
project.
-
Go to training-data/yourdatasetsfolder/
-
Copy "images" and "objectclasses.json"
-
Go to our Tensorflow Gui project's repository
-
Go to "datasets" and create a new folder (call it "mydataset" for example)
-
In "mydataset" (the newly created folder) , paste the copied folders.
-
Create a folder called "labels", in "labels" create a folder called "json"
-
Copy the labels from training-data/yourdatasetsfolder/labels to the "json" folder just created
Follow the instructions on our Tensorflow Gui Github repository to launch it and train
Training with our Yolov4 and Yolov3-Training-Automation
To use the labels with our Yolov4-v3-Training-Automation, go to the labeltool's repository and run the command below :
python3 converttoyolo.py --imagespath training-data/myfirstdataset/images/ --labelspath training-data/myfirstdataset/labels/
Make sure to replace "myfirstdataset" in the command with your dataset's folder name
A new folder "labels" is created inside your labeling project's repository.
-
Copy the new "labels" folder
-
Go to your Yolo project's repository
-
Create a new folder (for example "mydataset")
-
Paste the "labels" folder inside "mydataset"
-
Go to training-data/yourdatasetsfolder inside the labeling project's repository , copy the folder "images" and paste it inside your newly created folder "mydataset" in your
project's repository. -
Please note that a "train_config.json" file should be created inside your dataset's folder (Check our Yolov4-v3 Training Automation documentation). You can just copy the file from our sample_dataset and edit the classes field ( Check image below)
Follow the instructions on our Yolov4-v3 Training Automation Github repository to launch it and train
Known Errors
-All JSON files inside the labeltool should be encoded to "UTF-16 LE" , otherwise an error could be caused.


