StripeMe
Stripe Me is an e-commerce and portfolio website offering communication services, including web-development, graphic design and branding consultancy.
This is my final project of four Milestone Projects that make up the Full-Stack Web Development Diploma Training at Code Institute. Project main requirements are: to build a full-stack website with the use of HTML, CSS, JavaScript, Python, Django and a relational database; as well as the implementation of a checkout functionality, which has been achieved through the use of Stripe.
Stripe Me is therefore a Python-Django web application, backed by a PostgreSQL (and SQLite3) database, and deployed via the Heroku PaaS. This project uses the Stripe Checkout API (for educational purposes only: not currently taking real card payments) and is styled using the Bootstrap Grid System.
NOTE: If you would like to test the payment functionality of this project, please create an account and use the card number 4242 4242 4242 4242 with any address details, expiry date and CVC that you choose.
Click here to view the project live.
As you read this document, you will find my complete development process, from UX strategy to deployment. Thank you for reading! -- Kes Cardoso
UX
Wireframe
Link to the wireframe on Figma
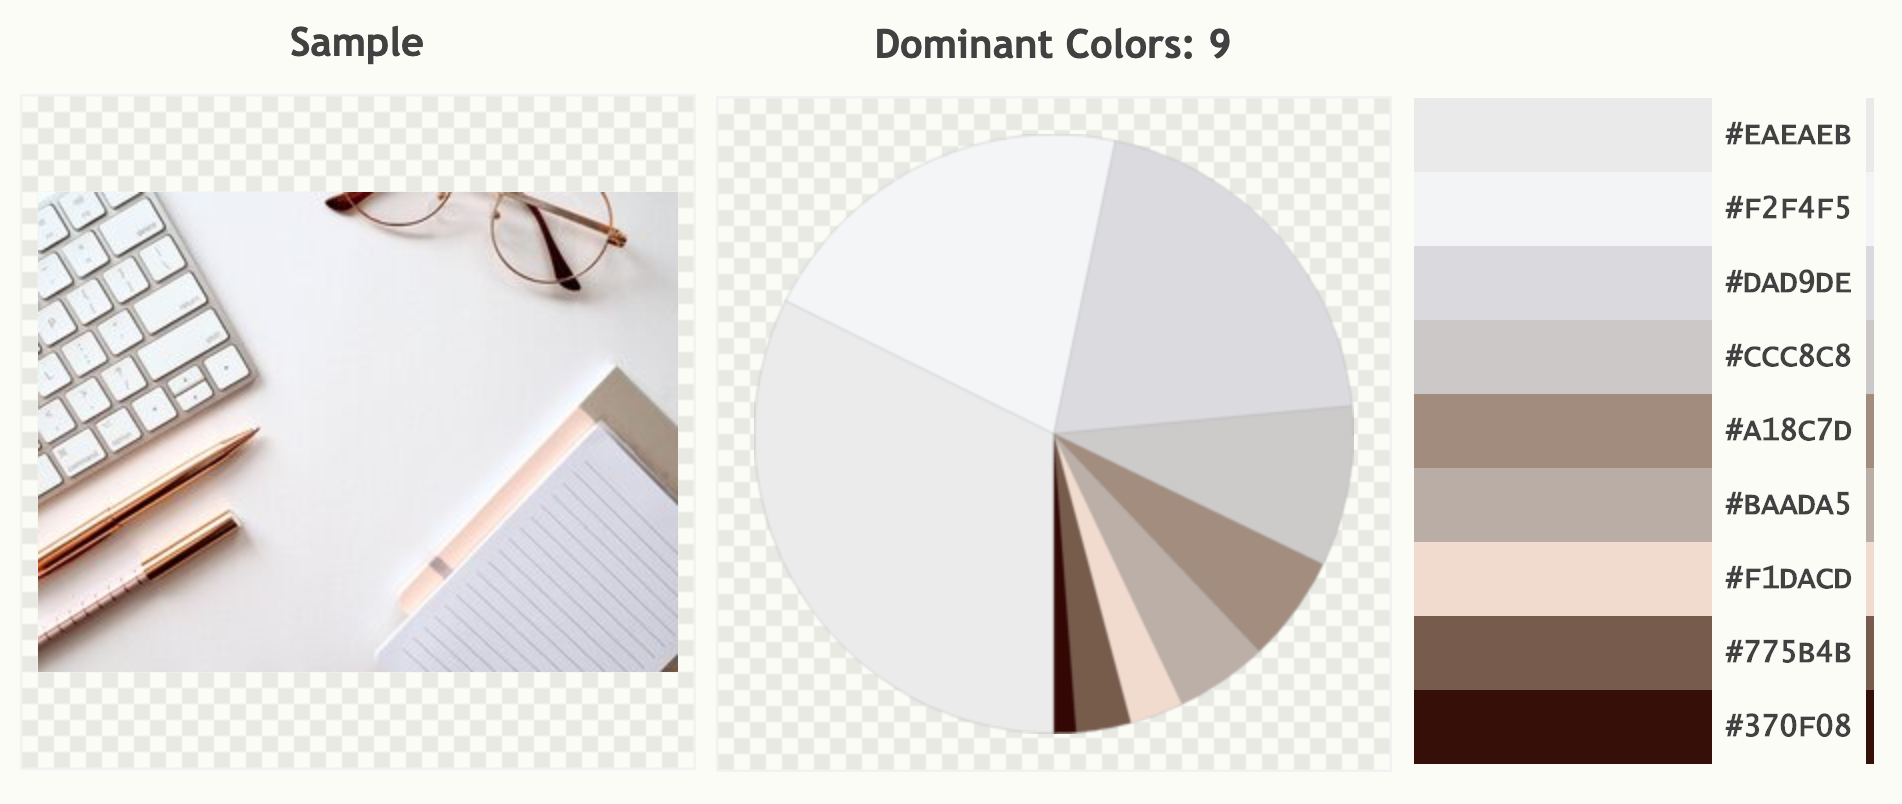
Color Palette
App Logo
Stripe Me Favicon

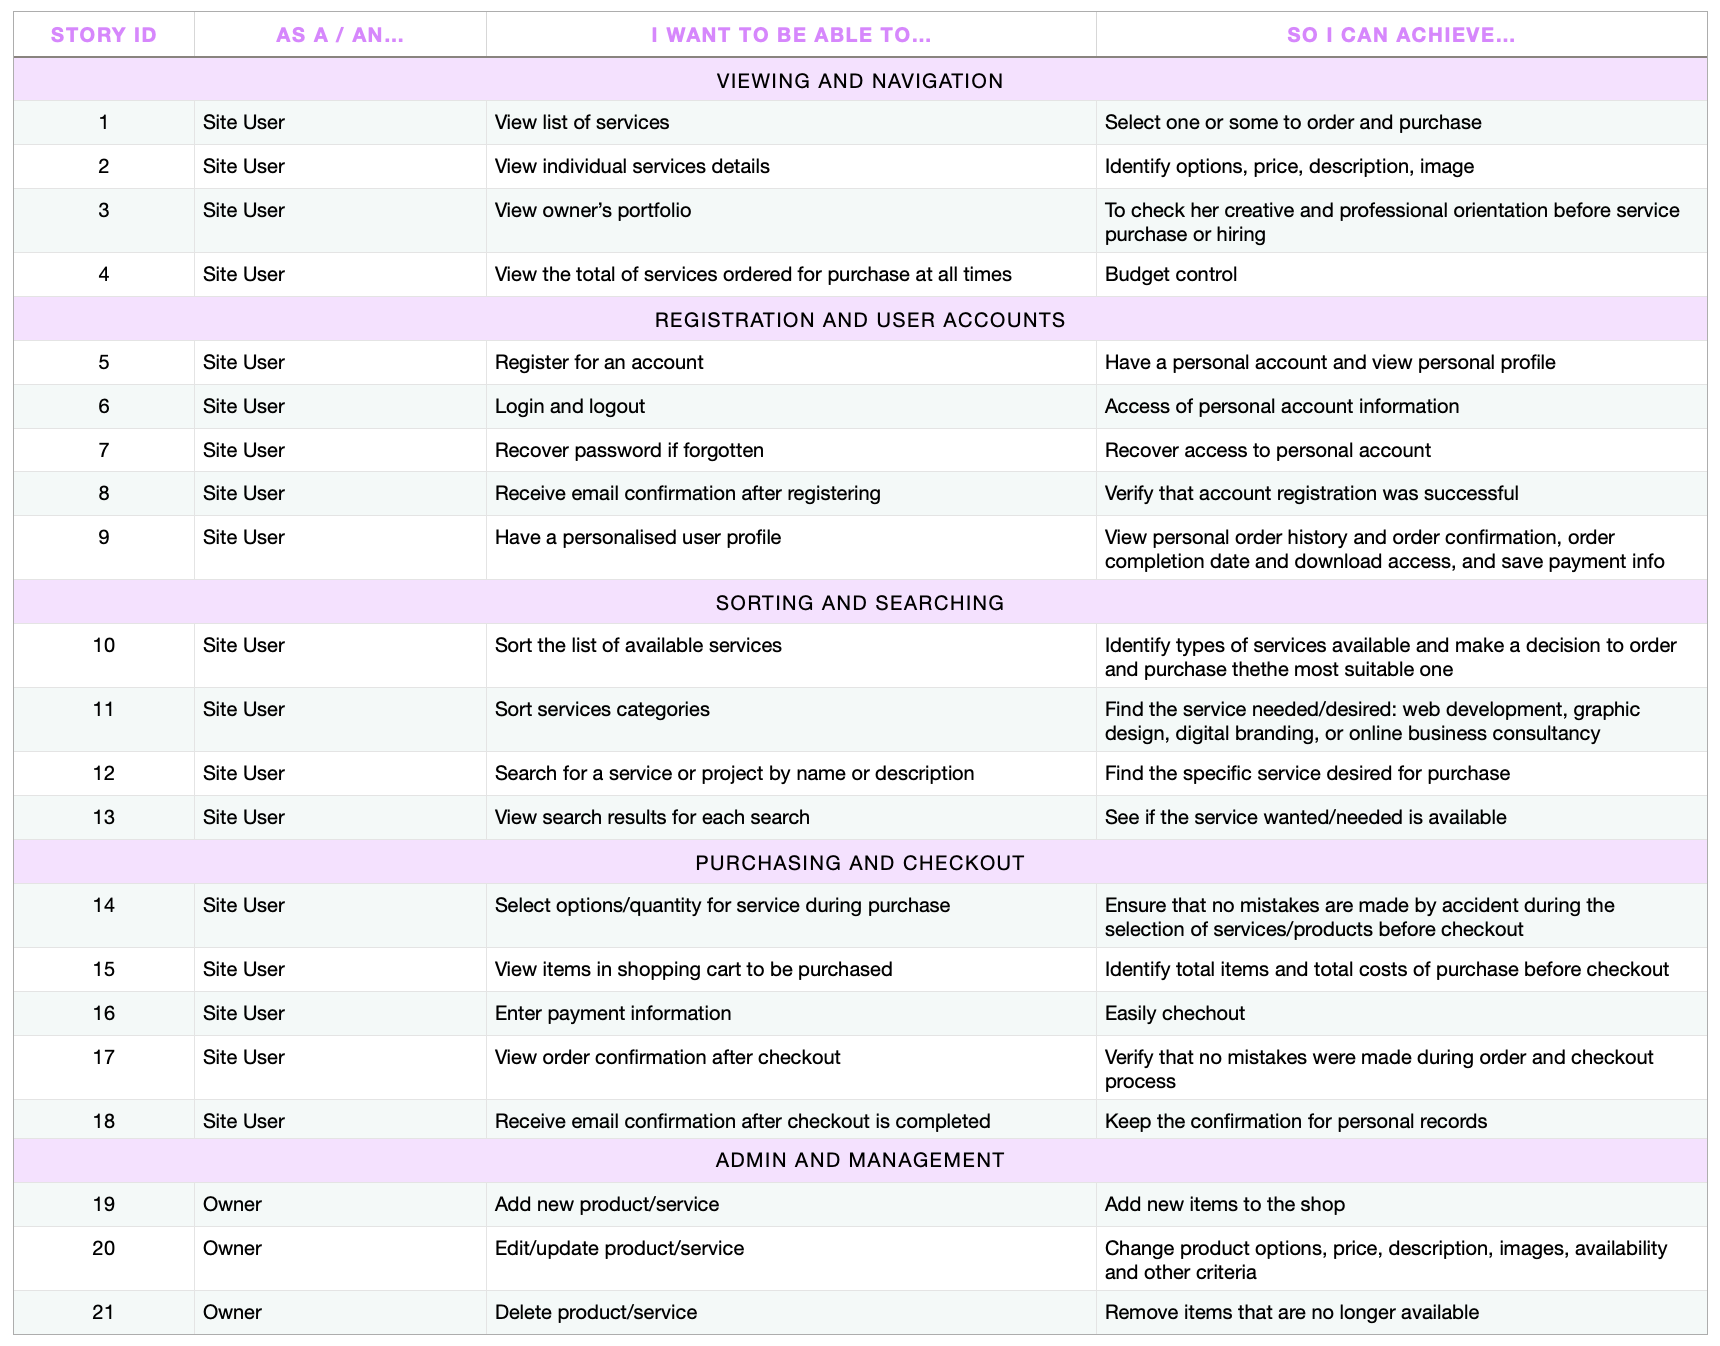
User Stories
Click on the image to see it larger:
User and Their Goals
Since Covid-19 became a global pandemic, many people around the world began to live through lockdowns. Many began to work from home; others lost their jobs. With uncertainty becoming a norm, we can't know when, or if, our societies will return to normal and what consequences the pandemic will leave behind.
Overall, Covid-19 has normalized remote work, and a significant part of our global population is looking for online alternatives for their income: either by creating a new online entrepreneurial project, or by improving the one already in place, or by transferring their main activity from a physical, local organization to an online shop.
For many people, including artists, artisans, small business owners or independent contractors this technological transition can be challenging and expensive, specially during these troubling times.
Stripe Me provides easy and straightforward web-development, graphic design and digital marketing consultancy services for English-speaking users around the world (payments in US dollar). This project gears towards freelancers, entrepreneurs, and small to medium business alike, leveraging their online inception and profits during pandemic crisis.
Here, available services are already formatted and able to be personalized: they are presented with a starter model and options, and the user can customize their order in terms of color scheme, dimensions, and content. Consultancy sessions are also available for users who wish to have higher control and a more professionally involved approach to their digital business development. By setting up basic formats and options that can be personalized, Stripe Me keeps prices affordable and delivery time optimized, and is therefore a great digital services provider for the pandemic times.
User Avatar
- Cross-cultural English-speaking men and women, affected or not by Covid-19;
- Freelancers, entrepreneurs, small business owners looking for online alternatives for their jobs of entrepreneurial projects;
- Travelers, digital nomads, independent culture and art contractors, without a business address and interested in building an online presence for their income activities.
User's Main challenges
Some main challenges regular people and non-technical professionals encounter are:
- They find websites hard to understand and to build.
- They don't have time to learn new technologies.
- Their budget is limited due to current Covid-19 and the economic crisis.
- They rely on free or limited website building services, but they miss the UX and development quality they desire.
- They are not sure what they need in technological terms, and they appreciate guidance.
- They need a personalized e-commerce project that still keeps features basic and affordable.
- They feel intimidated by traditional digital agencies, and they prefer a more friendly, one-to-one approach.
Database Structure
Stripe Me is built on Django, and primarily uses the SQLite3 database during all development stages. Through the deployment to Heroku, the database was changed to a PostgreSQL database as that is provided by Heroku as an add-on for production.
The Django’s default user model for authorization is also in use, which allows the project to meet one of the main requirements of separating features by anonymous users, users in session and superusers.
The structure of the Checkout and Services apps are inspired by one of Code Institute's mini projects: Boutique Ado.
The main database structure models are documented below.
Profiles App
---->> UserProfile Model
| Name | Database Key | Field Type | Validation |
|---|---|---|---|
| User | user | OneToOneField 'User' | on_delete=models.CASCADE |
| Phone number | default_phone_number | CharField | max_length=20, null=True, blank=True |
| Address Line1 | default_street_address1 | CharField | max_length=80, null=True, blank=True |
| Address Line2 | default_street_address2 | CharField | max_length=80, null=True, blank=True |
| Postcode | default_postcode | CharField | max_length=20, null=True, blank=True |
| Town/City | default_town_or_city | CharField | max_length=40, null=True, blank=True |
| County | default_county | CharField | max_length=80, null=True, blank=True |
| Country | default_country | CountryField | blank_label='Country', null=True, blank=True |
Checkout App
---->> Checkout Model
| Name | Database Key | Field Type | Validation |
|---|---|---|---|
| Order Number | order_number | CharField | max_length=32, null=False, editable=False |
| User Profile | user_profile | ForeignKey 'UserProfile' | on_delete=models.SET_NULL, null=True, blank=True, related_name='orders' |
| Full Name | full_name | CharField | max_length=50, null=False, blank=False |
| EmailField | max_length=254, null=False, blank=False | ||
| Country | country | CountryField | blank_label='Country*', null=False, blank=False |
| Postcode | postcode | CharField | max_length=20, null=True, blank=True |
| Town/City | town_or_city | CharField | max_length=40, null=False, blank=False |
| Phone number | phone_number | CharField | max_length=20, null=False, blank=False |
| Street Address 1 | street_address1 | CharField | max_length=80, null=False, blank=False |
| Street Address 2 | street_address2 | CharField | max_length=80, null=False, blank=True |
| County | county | CharField | max_length=80, null=True, blank=True |
| Date | date | DateTimeField | auto_now_add=True |
| Total Price | total_price | DecimalField | max_digits=10, decimal_places=2, null=False, default=0 |
| Original Retreat | original_retreat | TextField | null=False, blank=False, default='' |
| Stripe Pid | stripe_pid | CharField | max_length=254, null=False, blank=False, default='' |
---->> OrderLineItem Model
| Name | Database Key | Field Type | Validation |
|---|---|---|---|
| Order | order | ForeignKey 'Order' | null=False, blank=False, on_delete=models.CASCADE, related_name='lineitems' |
| Service | service | ForeignKey 'Service' | null=False, blank=False, on_delete=models.CASCADE |
| User Message | service_user_message | CharField | max_length=250, null=True, blank=True |
| Quantity | quantity | IntegerField | null=False, blank=False, default=0 |
| Lineitem Total | lineitem_total | DecimalField | max_digits=6, decimal_places=2, null=False, blank=False, editable=False |
Services App
---->> Services Model
| Name | Database Key | Field Type | Validation |
|---|---|---|---|
| Category | category | ForeignKey 'Category' | null=True, blank=True, on_delete=models.SET_NULL |
| Sku | sku | CharField | max_length=254, null=True, blank=True |
| Name | name | CharField | max_length=254 |
| Description | description | TextField | max_length=700 |
| Image URL | image_url | URLField | max_length=300, null=True, blank=True |
| Image | image | ImageField | null=True, blank=True |
| Price | price | DecimalField | max_digits=6, decimal_places=2 |
| Rating | rating | DecimalField | max_digits=6, decimal_places=2, null=True, blank=True |
| Sizes (Dimensions) | has_sizes | BooleanField | default=False, null=True, blank=True |
| Colors (Color Scheme) | has_colors | BooleanField | default=False, null=True, blank=True |
| Message | has_user_message | BooleanField | default=False, null=True, blank=True |
---->> Category Model
| Name | Database Key | Field Type | Validation |
|---|---|---|---|
| Name | name | CharField | max_length=254 |
| Friendly Name | friendly_name | Charfield | max_length=254, null=True, blank=True |
Designs App
---->> Designs Model
| Name | Database Key | Field Type | Validation |
|---|---|---|---|
| Category | category | ForeignKey 'Category' | null=True, blank=True, on_delete=models.SET_NULL |
| Name | name | CharField | max_length=254 |
| Image URL | image_url | URLField | max_length=300, null=True, blank=True |
| Image | image | ImageField | null=True, blank=True |
---->> Category Model
| Name | Database Key | Field Type | Validation |
|---|---|---|---|
| Name | name | CharField | max_length=254 |
| Friendly Name | friendly_name | Charfield | max_length=254, null=True, blank=True |
Webdevs App
---->> Webdevs Model
| Name | Database Key | Field Type | Validation |
|---|---|---|---|
| Category | category | ForeignKey 'Category' | null=True, blank=True, on_delete=models.SET_NULL |
| Name | name | CharField | max_length=254 |
| Description | description | TextField | max_length=254 |
| Image URL | image_url | URLField | max_length=300, null=True, blank=True |
| Image | image | ImageField | null=True, blank=True |
---->> Category Model
| Name | Database Key | Field Type | Validation |
|---|---|---|---|
| Name | name | CharField | max_length=254 |
| Friendly Name | friendly_name | Charfield | max_length=254, null=True, blank=True |
Features
Existing Features
- Hero Image and Call to Action: at site opening, the user begins by seeing the hero image of a workspace with a black button inviting to work together and check available services.
Navbar and Menu: the top main navbar contains the logo, search box, and links to access user profile and shopping bag. Just under the main nav, the menu contains links for easy access to services and portfolio pages, in lists by category, price, rating, and name.
- The Search box is dynamically connected to the database.
- These elements are consistent in design and are responsive throughout the website. However, the contents of the menu changes depending on if a user is logged in or not.
- The menu bar for users logged-in features a 'Sign Out' link where the 'Sign Up' link usually is. When a user in session chooses to sign out, a toast message confirms this action, and they are redirected back to the home page.
- Users with items added to their Bag notice an additional 'Checkout' link in their navbar, allowing them direct access to go straight to check out.
- The authentication pages (Sign In, Sign Up & Sign Out) were built with Django, and therefore include all Django's built-in features (including requesting an email for forgotten passwords.)
Toasts: All toast messages appear under the menu bar with the same fonts as used consistently in the theme.
- Depending on the type of message, the toast color changes to reflect this message.
- Across all 'Service' pages (Webdev, Design & Consultancy), toast messages appear to confirm the contents of a user's Bag when they add new service items. This message also includes the 'Go To Checkout' button: to prompt users to check their bag content or proceed to checkout.
Sign In / Sign Up: These pages feature the consistent white overlay as a background, to maintain simplicity and design cleanliness.
- On the top-left side, the user will find the respective Sign In or Sign Up forms, prompting them to access the parts of the website that require authentication.
- Regular registered users can check and edit their profile details and check their order history (they can't currently enter their full name)
- Admin with superuser privileges can add, edit and delete services from the database.
- Sign Out: The content in this page displays a box that either prompts and verifies that a user wishes to leave the site, with a 'Sign Out' button. Once signed out, users are redirected back to the Home page.
- Discount Notification: it is a notification system on the home page, as well as on the checkout toast and bag page, to inform or remind users that they can get 10% off when total purchase is $500 or more.
- Checkout Overlay: A blue overlay with a spinner gif appears after checkout is initiated and while the transaction is being processed and until the checkout success page has fully loaded.
Service Pages (All Services, Webdev, Design, Consultancy): Although different pages, Webdev, Design and Consultancy pages follow the same structure and are built upon the generic 'All Services' template to avoid repetitive code.
- Each page follows a Bootstrap responsive grid system, using the cards class.
- As the user scrolls down the page, they find cards for each service belonging to that category or to all services if the page is all services.
- Each card contains the service title, image, price, category and rating information; by clicking on the service image the user is redirected to the service details page.
- Services page include a filtering dropdown box, as well as a top category badges selection to facilitate finding the desired service page and details.
- Users can add the service to their bag from the service details page.
Service Details Pages: Users access these pages by clicking on service image of the respective card.
- This page features the service image, title, description about it, customization options and the price.
- From this page users can add the service to their Bag.
- Service Option Fields: on each service detail page, there are boolean fields with color scheme, dimensions and user message options to be entered by the user. These are used to send information to the owner about desired user's customizations for that respective service (the fields color and dimensions are not dynamic and currently in development).
Profile Page: The content of the page changes depending on if the user is logged in or not, if they have items in their Bag and if they have previous orders. Users who have items in their retreat see an overview of what they have selected and see a link to prompt them to go to the My Retreat page to make changes.
- Users can view and update their contact and billing details.
- If users have purchased services in the past, a table with their order history appears with a link (order number, in blue) to direct them to the initial 'booking success' page for that purchase.
Bag: This page is similar to a shopping cart on e-commerce sites.
- The user can see each item in their bag.
- All information about service customization that a user has selected is included on this page, including price, quantity, subtotal and a thumbnail image.
- A 'checkout' button prompts the user to confirm the order through payment.
Checkout: When a user has added items to their retreat, the 'Checkout' link appears in the dropdown navigation menu.
- Users can add their details to an input form and can select whether to save the information to their profile for future reservations.
- An order summary also includes the name, price, quantity and thumbnail link of each item in their bag.
- Below these features, a user can either select the 'Keep Shopping' link or confirm the reservation with the 'Secure Checkout' button.
- Checkout Success: This page is accessed by completing the checkout process. However, it can also be accessed through the 'Profile' page when clicking on more information about a previous order. In this case, an alert message confirms that the user is viewing a previous order and that the confirmation email was sent during payment.
- Back to Top Button: Long pages feature a 'scroll to top' arrow that becomes visible when the user has scrolled down the page.
Features Left to Implement
Colors and Dimensions: Currently the service details page include the dropdown fields for color scheme and project dimensions, but they are not dynamically functional (only the user message text field is fully functional and connected to the checkout model).
- The color scheme option is available for webdev and design services, and when these services are selected the order summary and history returns in development
- The dimension's option is only available for design services. When design services are selected the order summary and history returns in development
- When color scheme is not available for a service (consultancy sessions), and the service is selected the order summary and history returns N/A
- When dimensions are not available for a service (webdev and consultancy sessions), and the service is selected the order summary and history returns N/A.
- The message option is available for all services. When a service is selected and the user specifies a message in the text field, the exact text will appear in the order summary and history; if the user does not enter a message in the text field, the order summary and history will return None;After spending many days trying to find a plausible way to connect all boolean fields simultaneously, I have decided to only include them on the HTML template with if statements accordingly, as this feature at this point, requires me to restructure the bag and checkout dictionary logic and connect it to the Stripe API in a new way, which at the moment is beyond the capacity required for the scope of this project. However, this would be the first feature that I would consider working on to develop this project further.
- Portfolio Admin: Currently the webdevs and designs portfolio are managed from the back end (from within the app in the fixture and models files). My goal was to install admin fields so both portfolios would be manageable from the Django admin with superuser privileges (following the example used in the service app). However, to respect the timeline and deadline of this project, this feature has been left for later implementation.
- Full Name: Currently, users cannot enter their full name in their details session; their name has to be entered at each new order. The implementation of this feature is beyond the scope of this project and planned to be developed in the future.
Technologies Used
- HTML5
- CSS3
- JavaScript
- jQuery
- Python
- Django
- Django Crispy Forms
- SQLite
- PostgresSQL
- Gunicorn
- Psycopg2
- Bootstrap framework
- Gitpod
- Git Version Control
- GitHub
- Heroku
- Stripe
- AWS S3 Bucket
- Gmail
- Figma
- FontAwesome
- Google Fonts
Testing
Defensive Design
- I used a 'mobile first' approach to developing this project, and consistenly used Google Chrome's Dev Tools to view the view the output of my code on different screen sizes.
- During debugging, my approach often included using print statements to check where an issue was coming from.
Validators and Formatters
- I used the built-in formatter feature in Gitpod to clean my HTML Code, as well as passed my code through the W3C Markup Validation Service
- I checked the CSS code with the W3C Markup Validation Service.
- I used the Gitpod built in Flake8 input to check and format the Python code stored within each app.
Compatibility tests
Using different browsers
I manually tested this project on the following web browsers, checking that all aspects worked as planned:
- Google Chrome
- Mozilla Firefox
- Apple Safari
Using different devices
I tested this project on the following devices:
- Apple MacBook Pro 15"
- Apple iPhone 6
- Apple iPad Air
Deployment
Local Deployment
This project was developed using Gitpod as the chosen IDE and GitHub as a remote repository. The Project's source files were regularly pushed to the GitHub StripeMe Repository via the master branch. To reproduce this project within a local deployement, use the following steps and requirements:
Have the following installed in your IDE of choice:
- Git (for version control)
- pip (package installer for Python; pip3 was used at the time of production: October 2020)
- Python3 (the programming language used to produce the backend logic of this project)
- Create an account with Stripe, necessary for payment features in the project.
- Use an email provider (I used Gmail for this project) and sign in and navigate to the Google Account Security page.
- Create two-step authentication by creating an App password for your Django app.
Use the same email values to set up your email username and password in the steps below:
- Scroll to the top of this repository and click on the "clone or download button".
- Decide whether you want to clone the project using HTTPS or an SSH key and do the following:
- HTTPS: click on the checklist icon to the right of the URL to copy it
- SSH key: first click on 'Use SSH' then click on the same icon as above
- Return to your IDE and open a new Terminal window.
- Change the current working directory to the location where you want the cloned directory.
- Enter the following command and press 'Enter' to create your local clone:
git clone https://github.com/kescardoso/stripeme.git
- Install the required dependencies with the following command:
pip3 install -r requirements.txt
- Create an env.py file and add the following, complete with your own values:
import os
os.environ['AWS_ACCESS_KEY_ID'] = '<your value>'
os.environ['AWS_SECRET_ACCESS_KEY'] = '<your value>'
os.environ['DATABASE_URL'] = '<your value>'
os.environ['EMAIL_HOST_PASS'] = '<your value>'
os.environ['EMAIL_HOST_USER'] = '<your value>'
os.environ['SECRET_KEY'] = '<your value>'
os.environ['STRIPE_PUBLIC_KEY'] = '<your value>'
os.environ['STRIPE_SECRET_KEY'] = '<your value>'
os.environ['STRIPE_WH_SECRET'] = '<your value>'
os.environ['DEVELOPMENT'] = 'True'
os.environ['USE_AWS'] = 'True'
- Add your env.py file to .gitignore to make sure your database information is not viewable to others and to keep your values safe.
- To set up the Django SQLite3 tables required for this project, use the following commands:
python3 manage.py makemigrations
python3 manage.py migrate
- With this complete, create a superuser for your project with the following command and follow the instructions in the Terminal (note: this will be necessary to add data to your locally deployed version):
python3 manage.py createsuperuser
- Your cloned version is now ready to run locally with the following command:
python3 manage.py runserver
- Once you run your project locally, add '/admin' to the locally deployed project's URL.
- Add the service categories and service items to the database. This information can be copied from each individual service's page of the deployed version of the project found here: StripeMe
Heroku Deployment
To deploy this project to Heroku, use the following steps as a continuitation from local deployment outlined above:
- Create a AWS S3 Bucket, as this will be necessary to store static files and media for deployment.
- Create an account and sign in to Heroku.
- Inside the Heroku Dashboard, create a new app with a unique name and set the region to the closest to you, eg. 'Europe'.
- To use the Postgres database for deployment, select 'Heroku Postgres' as a free add-on.
- With the app created, go to the 'Settings' tab, click on the 'Reveal Config Variables' button, and input the following values:
| Key | Value |
|---|---|
| AWS_ACCESS_KEY_ID | your AWS bucket ID |
| AWS_SECRET_ACCESS_KEY | your AWS secret key |
| DATABASE_URL | your Heroku Postgres database url |
| EMAIL_HOST_PASS | your password to use your gmail account for emails |
| EMAIL_HOST_USER | your email address |
| SECRET_KEY | secret key used for your Django project |
| STRIPE_PUBLIC_KEY | obtained through your Stripe account |
| STRIPE_SECRET_KEY | obtained through your Stripe account |
| STRIPE_WH_SECRET | obtained through your Stripe account |
| USE_AWS | True |
- In Gitpod, create a requirements.txt file with the following command:
pip3 freeze --local > requirements.txt
- Create a Procfile with the following content within (making sure that 'Procfile' was written with a capitalized 'P'):
echo web: gunicorn stripe_me.wsgi:application > Procfile
- As with local deployment, set up the Postgres database with the following commands:
python3 manage.py makemigrations
python3 manage.py migrate
- Follow steps 11 to 13 from local deployment outlined above.
- Commit these changes with the following:
git add .
git commit -m "<your commit message here>"
- With these files committed, log in to Heroku from the terminal using this command and enter your details when prompt:
heroku login -i
- Once logged in, link your Heroku app created above as the remote repository with this command:
heroku git:remote -a <your app name here>
- Complete the deployment by pushing the projekt to Heroku:
git push heroku master
- This completes the process of deploying the project to Heroku. Once deployed, continue to push all changes made to the project to Heroku with the final command listed above
Credits
Media
All stock-free images were retrieved from Unsplash and used with permission:
- Hero, by Jess Bailey
- Google Blogger Website, by STIL
- Wordpress Hosted Website, by Christin Hume
- Custom Web App, by Kewal
- Custom Logo, by Diego PH
- Cards & Flyers, by Andrea Rapuzzi
- Social Media Graphics, by Linda Xu
- Branding Session, by Danielle MacInnes
- UX Strategy Session, by Brooke Lark
- Master Session, by Kevin Baghat
Acknowledgements
Gratitude to the following people for their help, support and inspiration:
- My mentor Seun Owonikoko for her patience and gentleness, for staying available and supportive through my unique process and special circumstances. I've learned a great deal working with her and am glad we are now connected.
- To Code Institute, their team and staff, to the student services and advisors for their unconditional support and tough love, to the amazing tutors for their great didactics and good humor and ongoing 24hour support. My training experience couldn't have been more rewarding and uplifting. Thank you, from the bottom of my heart.
- To my family and friends for continually motivating me through struggles and challenges. I am grateful I am never alone and always supported.
- And to my cat Jasper, for always accompanying me and staying right by my side in the early dawn and late night, during my coding sprints and nuit blanches, and for teaching me about balance, gentleness and unconditional friendship.
Thank you!
NOTE: This project was created for educational purposes only.
 kescardoso


