roadtagger
This repository consists of the source code of the paper and a generic version of the RoadTagger model. The original source code of RoadTagger is in the pre_alpha_clean_version folder.
IMPORTANT As this is not yet a stable version, the code in the pre_alpha_clean_version folder may only be used as reference - setting up your own data processing/training/evaluation code followed by the description in the paper and borrowing some code snippets from this repo would potentially save your time. :-)
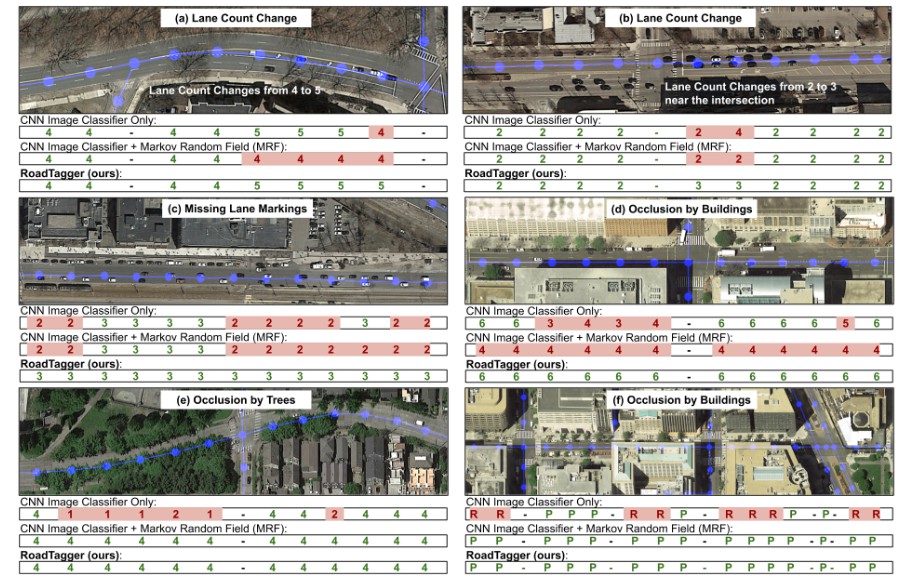
Results on Real-world Imagery
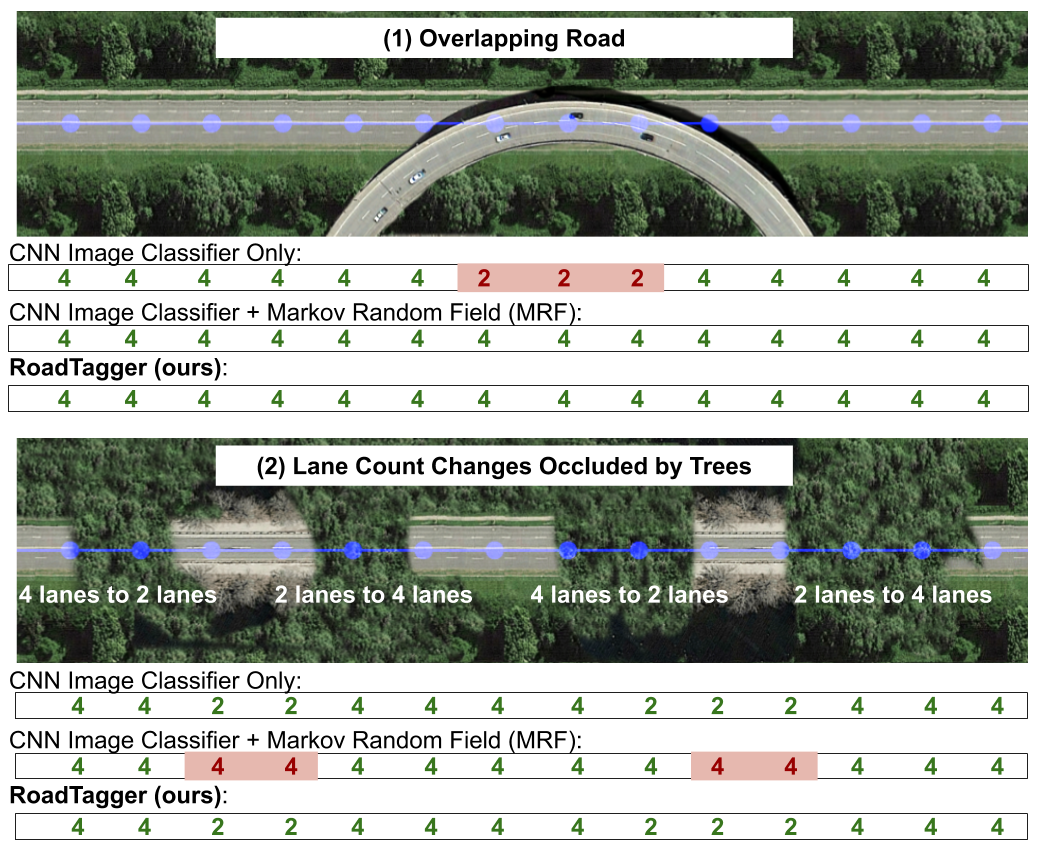
Results on Synthesized Imagery
Instruction for the generic version (Recommended for Quick Start)
You can check out the example code for graph loading, training and evaluation in folder generic_version/.
But for now, you may have to preprocess your training data according to the example graph loader. More detailed instructions are coming soon.
Instruction for the pre-alpha clean version
Download the Dataset
Step-1:
In 'pre_alpha_clean_version' folder,
Edit line 47 in helper_mapdriver.py. Enter your Google API Key there.
python roadtagger_generate_dataset.py config/dataset_180tiles.json
This script will download the dataset with 20 cities into the 'dataset' folder.
BEFORE running this script, it would be highly recommended to try the sample dataset first to make sure there is no runtime issues.
python roadtagger_generate_dataset.py config/dataset_sample.json
The code automatically download OpenStreetMap data into the 'tmp' folder. Because the OpenStreetMap is changing all the time, we put the snapshots of four regions in the 'tmp' folder. The manual annotation in Step-2 ONLY matches these snapshots.
Step-2:
Add the manual annotation.
cp annotation boston_region_0_1_annotation.p dataset/boston_auto/region_0_1/annotation.p
cp annotation chicago_region_0_1_annotation.p dataset/chicago_auto/region_0_1/annotation.p
cp annotation dc_region_0_1_annotation.p dataset/dc_auto/region_0_1/annotation.p
cp annotation seattle_region_0_1_annotation.p dataset/seattle_auto/region_0_1/annotation.p
Train RoadTagger Model
Use the following code to train the model.
time python roadtagger_train.py \
-model_config simpleCNN+GNNGRU_8_0_1_1 \
-save_folder model/prefix \
-d `pwd` \
-run run1 \
-lr 0.0001  \
--step_max 300000  \
--cnn_model simple2 \
--gnn_model RBDplusRawplusAux \
--use_batchnorm True \
--lr_drop_interval 30000 \
--homogeneous_loss_factor 3.0 \
--dataset config/dataset_180tiles.json
Here, the model is a CNN + GNN model. The GNN uses Gated Recurrent Unit (GRU). The propagation step of the graph neural network is 8. The graph neural network uses the graph structures that consists of the Road Bidirectional Decomposition graph, the original road graph and the auxiliary graph for parallel roads.
Evaluate the Model
E.g., Boston.
time python roadtagger_evaluate.py \
-model_config simpleCNN+GNNGRU_8_0_1_1 \
-d `pwd` \
--cnn_model simple2 \
--gnn_model RBDplusRawplusAux \
--use_batchnorm true \
-o output_folder/prefix \
-config dataset/boston_auto/region_0_1/config.json  \
-r path_to_model


