dop
Design Concept
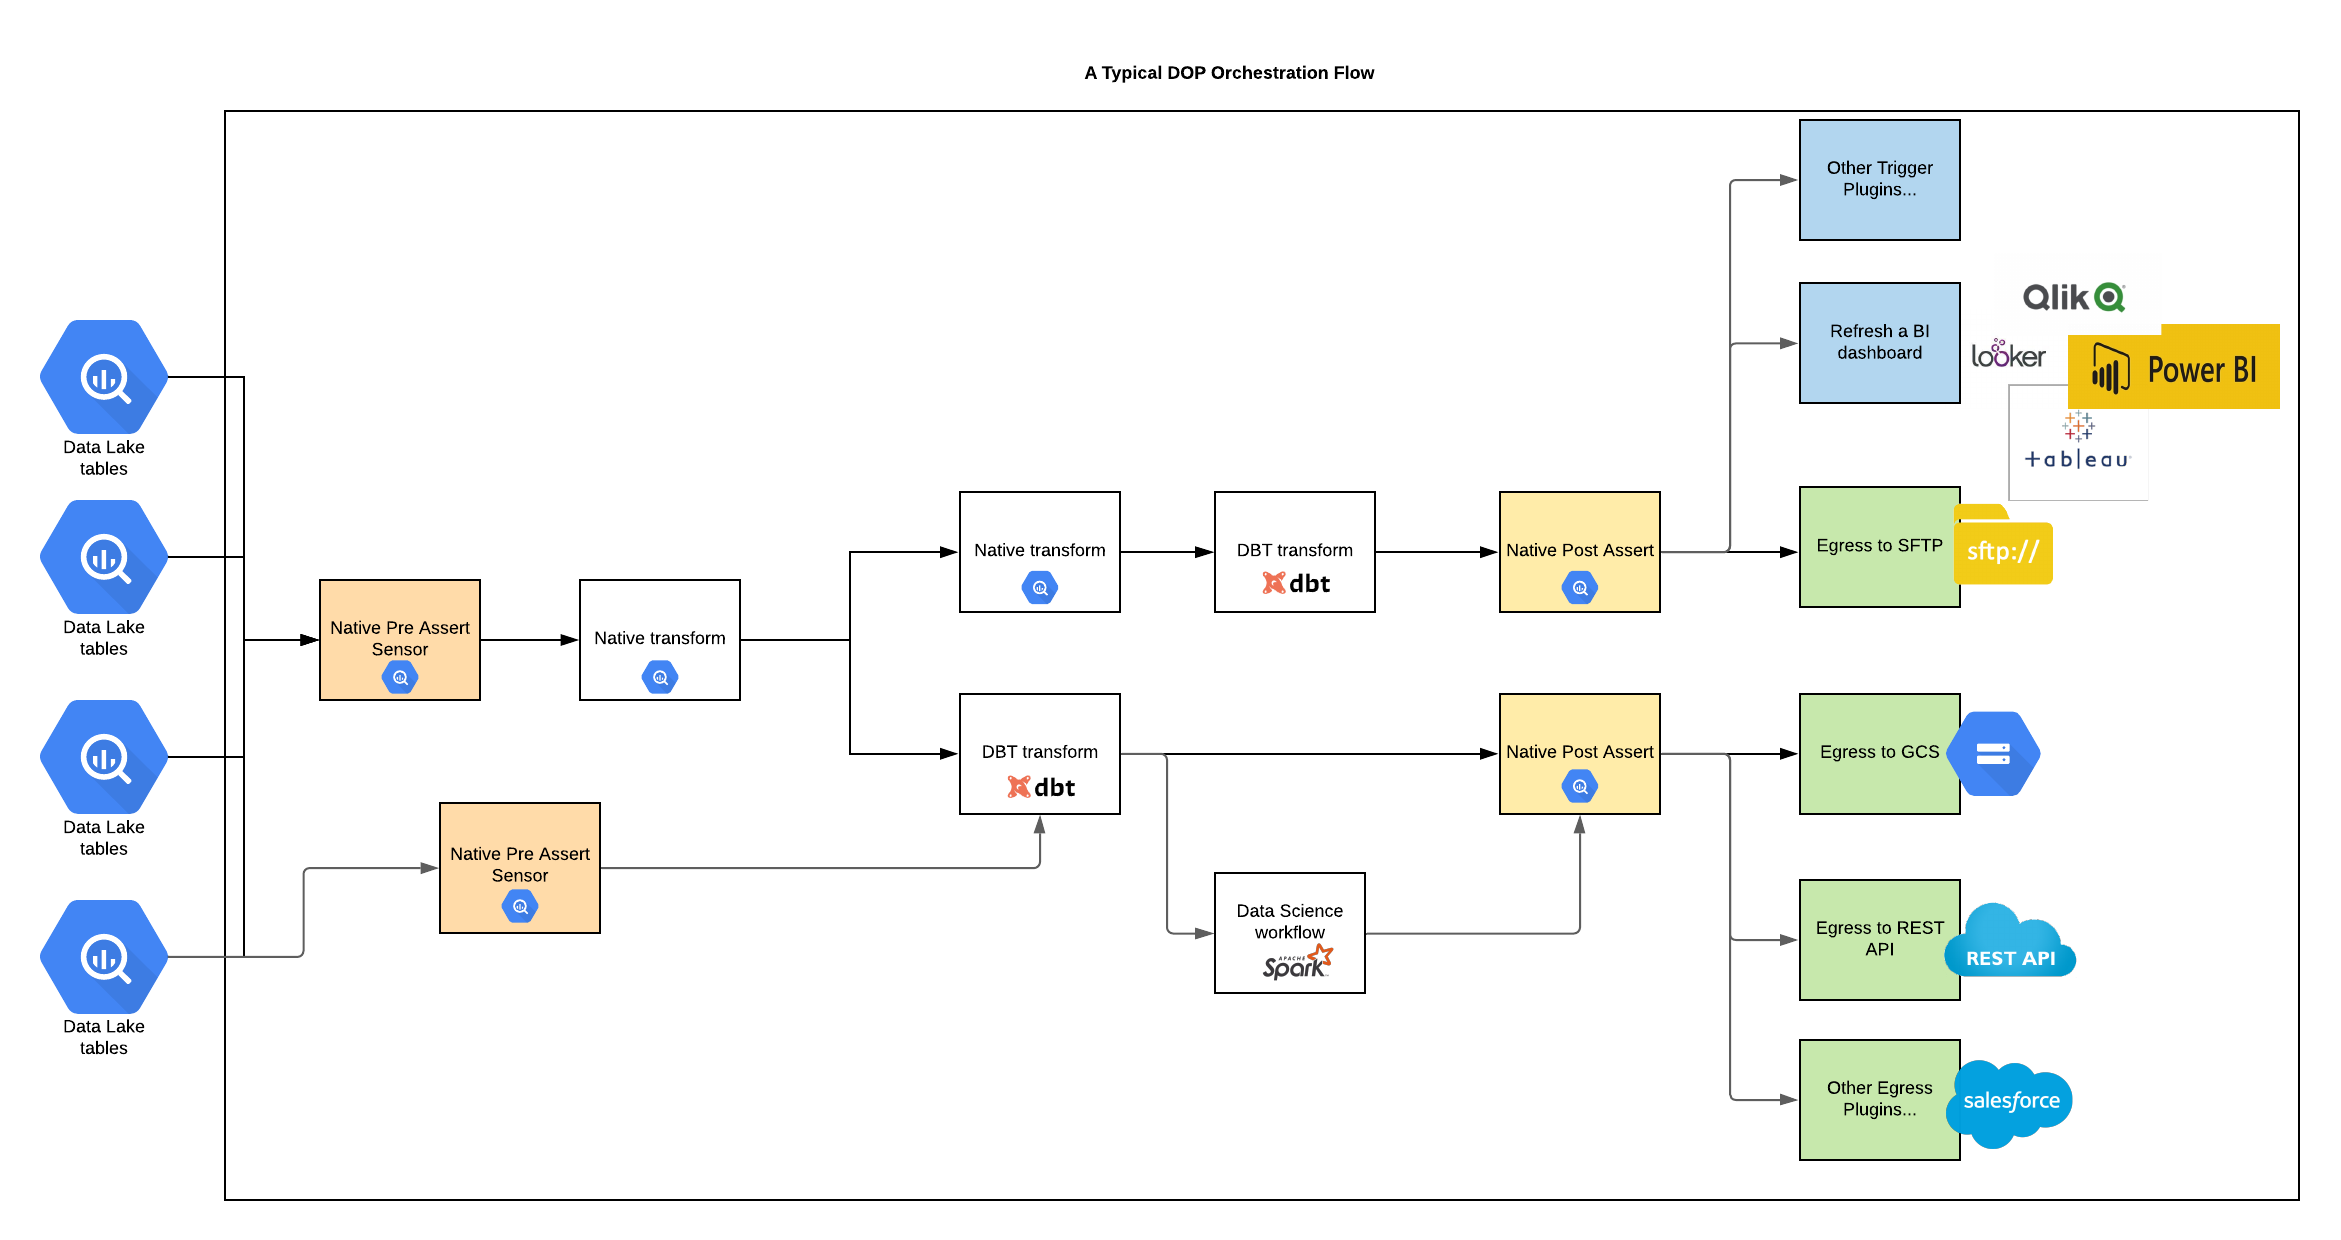
DOP is designed to simplify the orchestration effort across many connected components using a configuration file without the need to write any code.
We have a vision to make orchestration easier to manage and more accessible to a wider group of people.
Here are some of the key design concept behind DOP,
- Built on top of Apache Airflow - Utilises it’s DAG capabilities with interactive GUI
- DAGs without code - YAML + SQL
- Native capabilities (SQL) - Materialisation, Assertion and Invocation
- Extensible via plugins - DBT job, Spark job, Egress job, Triggers, etc
- Easy to setup and deploy - fully automated dev environment and easy to deploy
- Open Source - open sourced under the MIT license
Please note that this project is heavily optimised to run with GCP (Google Cloud Platform) services which is our current focus. By focusing on one cloud provider, it allows us to really improve on end user experience through automation
A Typical DOP Orchestration Flow

Prerequisites - Run in Docker
Note that all the IAM related prerequisites will be available as a Terraform template soon!
For DOP Native Features
- Download and install Docker https://docs.docker.com/get-docker/ (if you are on Windows, please follow instruction here as there are some additional steps required for it to work https://docs.docker.com/docker-for-windows/install/)
- Download and install Google Cloud Platform (GCP) SDK following instructions here https://cloud.google.com/sdk/docs/install.
- Create a dedicated service account for docker with limited permissions for the
developmentGCP project, the Docker instance is not designed to be connected to the production environment- Call it
dop-docker-user@<your GCP project id>and create it inhttps://console.cloud.google.com/iam-admin/serviceaccounts?project=<your GCP project id> - Assign the
roles/bigquery.dataEditorandroles/bigquery.jobUserrole to the service account underhttps://console.cloud.google.com/iam-admin/iam?project=<your GCP project id>
- Call it
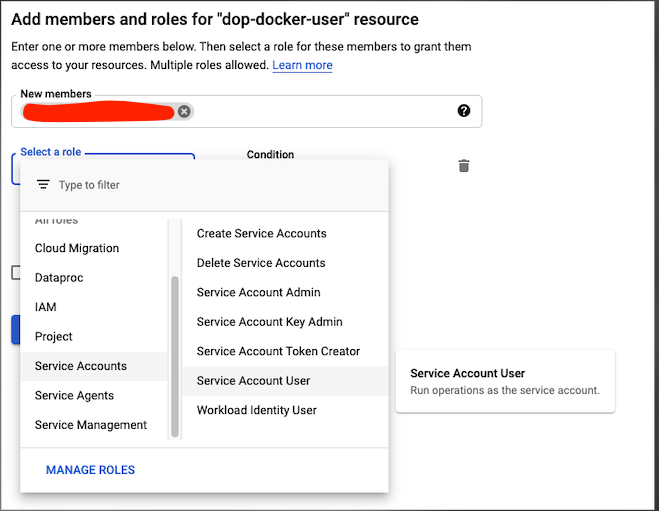
- Your GCP user / group will need to be given the
roles/iam.serviceAccountUserand theroles/iam.serviceAccountTokenCreatorrole on thedevelopmentproject just for thedop-docker-userservice account in order to enable Service Account Impersonation.

- Authenticating with your GCP environment by typing in
gcloud auth application-default loginin your terminal and following instructions. Make sure you proceed to the stage whereapplication_default_credentials.jsonis created on your machine (For windows users, make a note of the path, this will be required on a later stage) - Clone this repository to your machine.
For DBT
- Setup a service account for your GCP project called
dop-dbt-userinhttps://console.cloud.google.com/iam-admin/serviceaccounts?project=<your GCP project id> - Assign the
roles/bigquery.dataEditorandroles/bigquery.jobUserrole to the service account at project level underhttps://console.cloud.google.com/iam-admin/iam?project=<your GCP project id> - Your GCP user / group will need to be given the
roles/iam.serviceAccountUserand theroles/iam.serviceAccountTokenCreatorrole on thedevelopmentproject just for thedop-dbt-userservice account in order to enable Service Account Impersonation.
Instructions for Setting things up
Run Airflow with DOP in Docker - Mac
See README in the service project setup and follow instructions.
Once it's setup, you should see example DOP DAGs such as dop__example_covid19

Local development
To simplify the development, in the root folder, there is a Makefile and a docker-compose.yml that start Postgres and Airflow locally
From the root of the repo run:
make build \
    DOP_PROJECT_ID=<my project id> \
    DOP_LOCATION=<my project location>
For subsequent runs run
make up \
    DOP_PROJECT_ID=<my project id> \
    DOP_LOCATION=<my project location>
To shut the local environment down run:
make down \
    DOP_PROJECT_ID=<my project id> \
    DOP_LOCATION=<my project location>
On Linux, the mounted volumes in container use the native Linux filesystem user/group permissions.
Airflow image is started with the user/group 50000 and doesn't have read or write access in some mounted volumes
(check volumes section in docker-compose.yml)
$ docker exec -u airflow -it dop_webserver id
uid=50000(airflow) gid=50000(airflow) groups=50000(airflow)
$ docker exec -u airflow -it dop_webserver ls -ld dags
drwxrwxr-x 5 1001 1001 4096 Jun  4 07:25 dags
$ docker exec -u airflow -it dop_webserver ls -l /secret/gcp-credentials/application_default_credentials.json
-rw------- 1 1001 1001 341 Jun  4 09:54 /secret/gcp-credentials/application_default_credentials.json
So, permissions must be updated manually to have read permissions on the secrets file and write permissions in the dags folder
Run Airflow with DOP in Docker - Windows
This is currently working in progress, however the instructions on what needs to be done is in the Makefile
Run on Composer
Prerequisites
- Create a dedicate service account for Composer and call it
dop-composer-userwith following roles at project level- roles/bigquery.dataEditor
- roles/bigquery.jobUser
- roles/composer.worker
- roles/compute.viewer
- Create a dedicated service account for DBT with limited permissions.
- [Already done in here if it’s DEV] Call it
dop-dbt-user@<GCP project id>and create inhttps://console.cloud.google.com/iam-admin/serviceaccounts?project=<your GCP project id> - [Already done in here if it’s DEV] Assign the
roles/bigquery.dataEditorandroles/bigquery.jobUserrole to the service account at project level underhttps://console.cloud.google.com/iam-admin/iam?project=<your GCP project id> - The
dop-composer-userwill need to be given theroles/iam.serviceAccountUserand theroles/iam.serviceAccountTokenCreatorrole just for thedop-dbt-userservice account in order to enable Service Account Impersonation.
- [Already done in here if it’s DEV] Call it
Create Composer Cluster
- Use the service account already created
dop-composer-userinstead of the default service account - Use the following environment variables
and optionallyDOP_PROJECT_ID : {REPLACE WITH THE GCP PROJECT ID WHERE DOP WILL PERSIST ALL DATA TO} DOP_LOCATION : {REPLACE WITH GCP REGION LOCATION WHRE DOP WILL PERSIST ALL DATA TO} DOP_SERVICE_PROJECT_PATH := {REPLACE WITH THE ABSOLUTE PATH OF THE Service Project, i.e. /home/airflow/gcs/dags/dop_{service project name} DOP_INFRA_PROJECT_ID := {REPLACE WITH THE GCP INFRASTRUCTURE PROJECT ID WHERE BUILD ARTIFACTS ARE STORED, i.e. a DBT docker image stored in GCR}DOP_GCR_PULL_SECRET_NAME:= {This maybe needed if the project storing the gcr images are not he same as where Cloud Composer runs, however this might be a better alternative https://medium.com/google-cloud/using-single-docker-repository-with-multiple-gke-projects-1672689f780c} - Add the following Python Packages
dataclasses==0.7 - Finally create a new node pool with the following k8 label
key: cloud.google.com/gke-nodepool
value: kubernetes-task-pool
Misc
Service Account Impersonation
Impersonation is a GCP feature allows a user / service account to impersonate as another service account.
This is a very useful feature and offers the following benefits
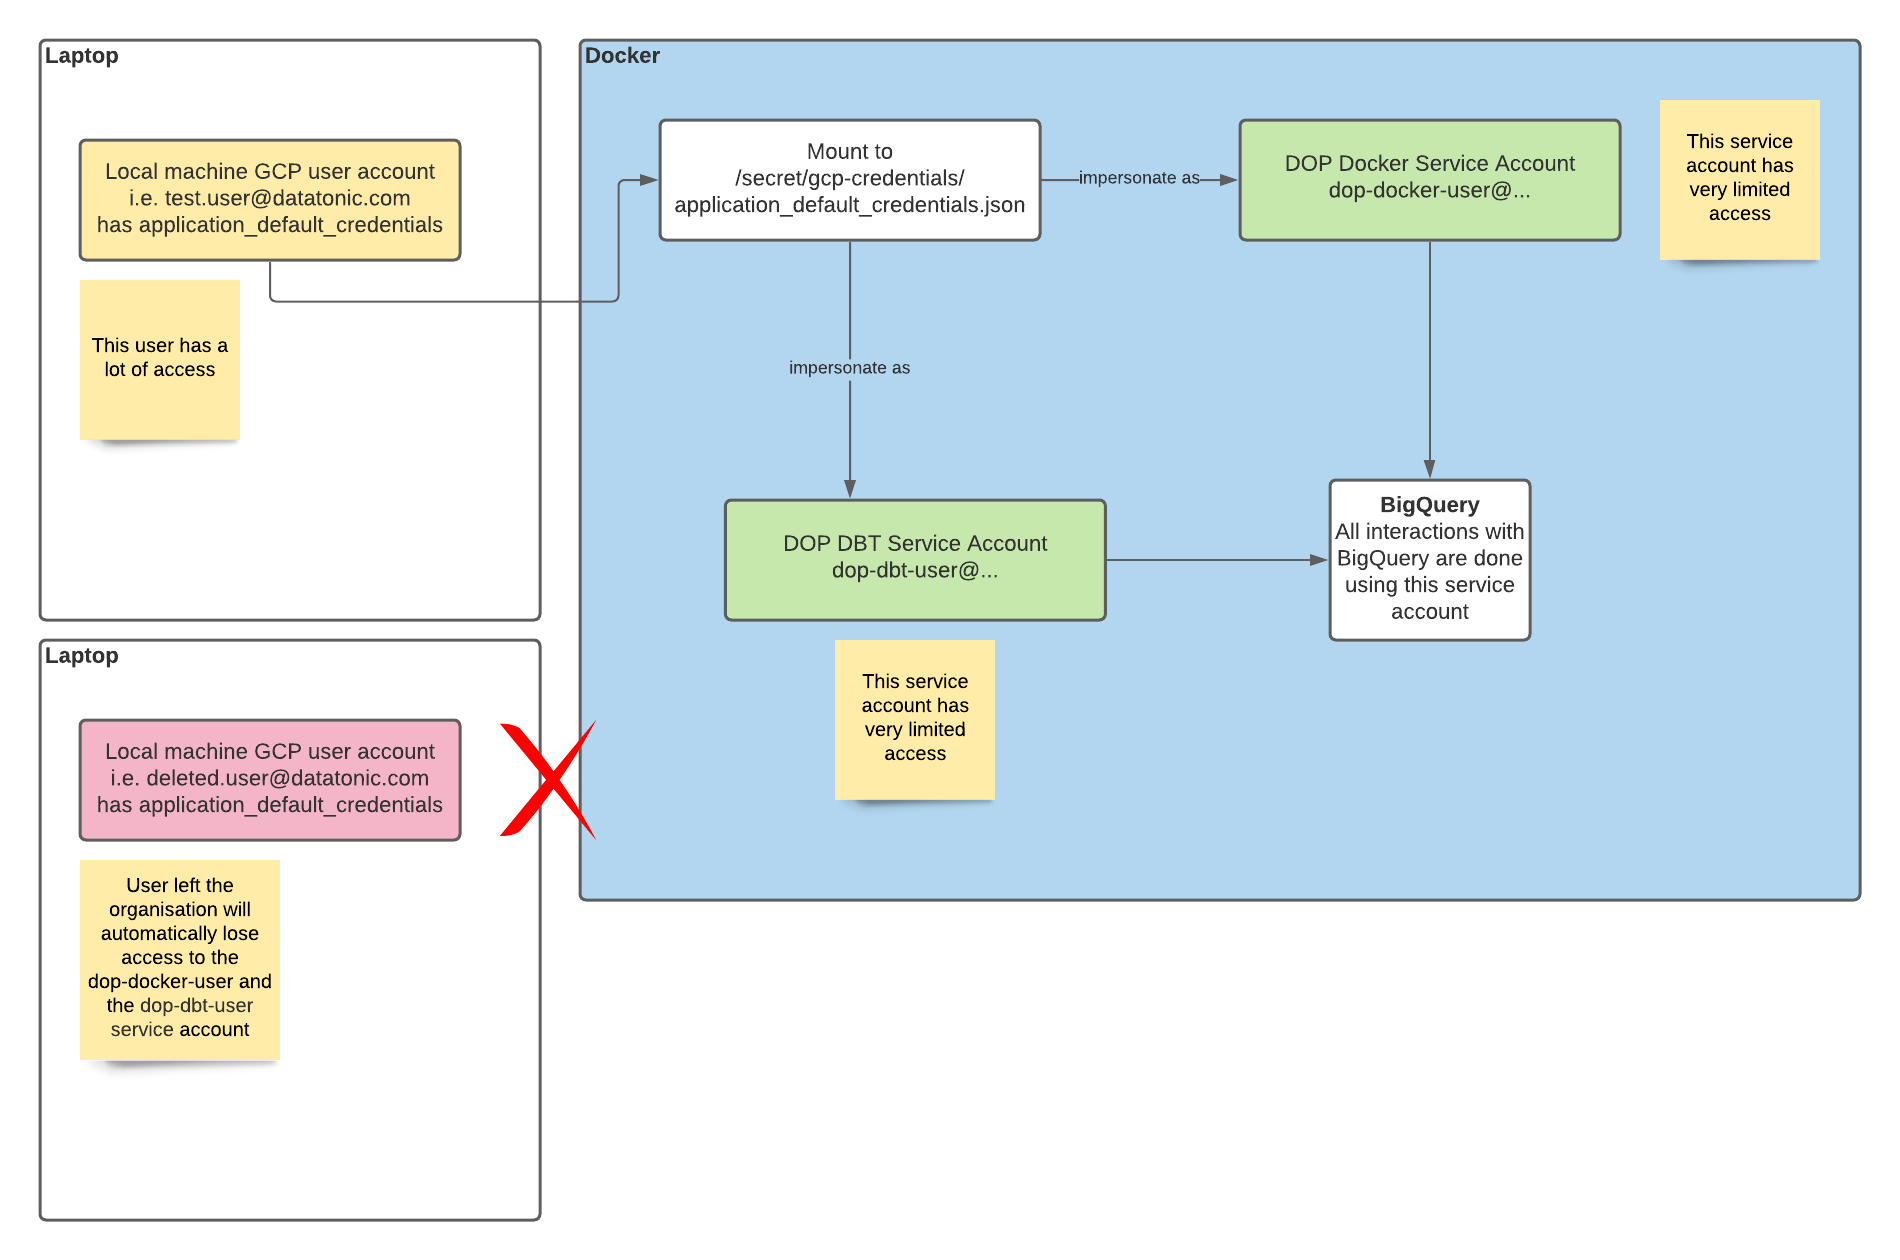
- When doing development locally, especially with automation involved (i.e using Docker), it is very risky to interact with GCP services by using your user account directly because it may have a lot of permissions. By impersonate as another service account with less permissions, it is a lot safer (least privilege)
- There is no credential needs to be downloaded, all permissions are linked to the user account. If an employee leaves the company, access to GCP will be revoked immediately because the impersonation process is no longer possible
The following diagram explains how we use Impersonation in DOP when it runs in Docker

And when running DBT jobs on production, we are also using this technique to use the composer service account to impersonate as the dop-dbt-user service account so that service account keys are not required.
There are two very google articles explaining how impersonation works and why using it
- Using ImpersonatedCredentials for Google Cloud APIs
- Stop Downloading Google Cloud Service Account Keys!
Pre-commit Linter
pre-commit tool runs a number of checks against the code, enforcing that all the code pushed to the repository follows the same guidelines and best practices. In this project the checks are:
- Trim trailing whitespaces
- Fix end-of-file
- YAML file format
- Python code formatter using Black
- Python style guide using Flake8
To install locally, follow the installation guide in the pre-commit page
The normal usage is to run pre-commit run after staging files. If the git hook has been installed, pre-commit will run automatically on git commit.


