pihole-router
Pi-Hole is great. It blocks ads and tracking at a DNS level, and is still surprisingly effective many years after it was first introduced. However, home networks often lack some tools that would truly make Pi-Hole great.
-
It would be great if home routers could shunt all port 53 (DNS) traffic to the Pi-Hole, no matter the DNS server specified. It would be great for preventing those sneaky IoT devices from bypassing your filtering
-
It would be great if I could prevent outbound connections to port 853 (DNS over TLS) from my devices
-
What if I want to monitor all connections on my network, and not just DNS?
-
Sometimes, port forwarding on my router just... stops. It's dumb.
Higher-end hardware can absolutely do a lot of this, but most home hardware cannot. Fortunately, with Pi-Hole and a couple of extra bits of software, your lowly Raspberry Pi can do all of this! Here is a video showing the DNS force-to-PiHole in action: https://www.youtube.com/watch?v=oG5o5yc3M2Q
If you're feeling adventurous, I detail herein how I rebuilt my entire home network with a Pi-Hole truly in the middle. You can do the same, with some time and patience!
Before you get started, there are a couple of things to keep in mind
-
This guide is mostly for educational purposes. I am not a networking expert, so some of my firewall rules may have gaps. If you spot a problem, let me know! Half the reason I'm sharing this is for the internet to tell me how wrong I am
-
Every ISP provides their connectivity differently. This guide may not work for you word-for-word, but it should get you on the right track
-
Make sure you get permission from your network owner before doing this
-
Even if you're the network owner, get permission from yourself. You really gotta think long and hard about doing this. Your Pi will be the only security device sitting between your lousy, rusted-out computer and the big mean internet. Does that sound like a good idea? No! Does it sound fun? Yes!
-
I'm not responsible for anything bad that happens. I'm not responsible for breaking your internet. I'm not responsible for ticking off your ISP. Finally, I'm not responsible for your significant other getting angry that their internet isn't working for the 47th time that day because you were tinkering with "one more thing" on "your stupid berry computer"
What you need
-
Internet Modem that can be put into bridged mode. I'm using a TP-Link TC-W7960 with an XFinity (Cable) residential internet connection.
-
Raspberry Pi, or some other computer/server capable of running Pi-Hole. It should probably be a physical server, but if you're crafty enough you can probably virtualize it somehow. I'm using a Raspberry Pi 4 to get an edge on Ethernet speeds.
-
The server needs to have 2 ethernet ports. I use an RTL8153 Gigabit Ethernet Adapter for my 2nd port. Specifically, I use this one: https://www.bestbuy.com/site/insignia-usb-3-0-to-gigabit-ethernet-adapter-white/3510527.p?skuId=3510527
-
Wi-Fi router that can be put into AP mode. I'm using a TP-Link Archer C1200v3
-
A laptop to do configuration changes
-
Determine if your ISP supports IPv6. Mine does, so I'll cover it as an optional part
Steps
1. Have your modem running in it's normal "router" mode with a working internet connection.
2. Image an SD card with Raspberry Pi OS Lite (https://www.raspberrypi.org/software/operating-systems/) and put it in the Pi.
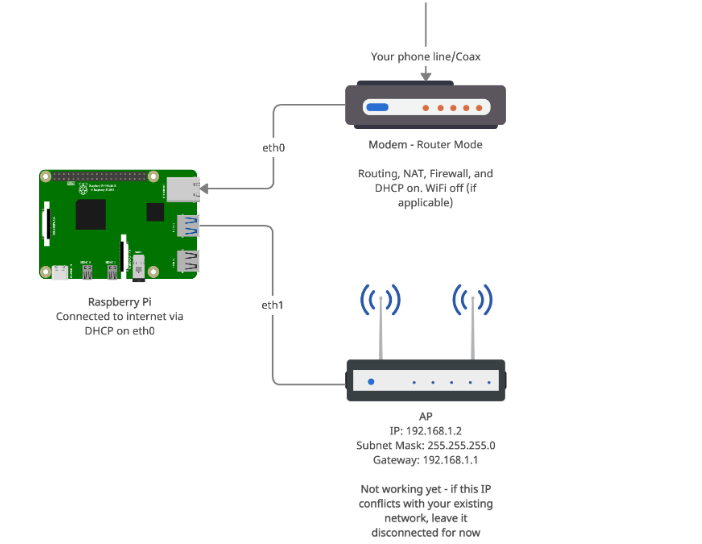
3. Put your wireless router into AP mode. From here on, I'm going to call this your "AP" to avoid confusion. Configure the Wi-Fi network as desired on the AP (SSID, Security, Channel, etc). Also configure a static IP on it:
    IP: 192.168.1.2
    Subnet Mask: 255.255.255.0
    Gateway: 192.168.1.1
4. Turn off the WiFi broadcast on your modem (if any)
5. Connect the USB Ethernet port to the Pi and plug an ethernet cord from it into the WAN port of the AP
6. Plug an ethernet cord from your modem into the onboard ethernet port.
At this point, your Modem, Pi, and AP should be connected like this:
7. Boot the Pi. Let it do its initial configuration, and do things like change the pi account password, set timezone, etc.
8. Run the following commands:
    sudo apt update
    sudo apt upgrade
    sudo apt install iptables-persistent #Say yes at the prompt to save current rules
    sudo reboot
9. Do a typical Pi-Hole installation as instructed at https://github.com/pi-hole/pi-hole/#one-step-automated-install. Choose eth0 as the interface you're using (Onboard Ethernet). Set a static IP when prompted; just use the current one for now. This will be changing later. Use IPv4 only for now; we'll get to IPv6 later. Set everything else in the Pi-Hole setup however you want.
10. Test Pi-Hole and make sure it's working as-is (eg. use dig or nslookup to query a record from it)
From here on, we're turning your network upside down! Make sure you won't need the internet for a while in case everything goes south.
11. Put your modem into bridged mode. This makes it so that the modem doesn't do any routing/DHCP/etc, and passes it off to another device instead. Each modem is different, so look this up how to do this in your modem's manual.
12. Edit /etc/dhcpcd.conf on the Pi. Scroll down until you see the configs for "interface eth0" and "interface eth1" (eth1 may not be there). Comment them out and replace it with the following:
interface eth0
  static domain_name_servers=8.8.8.8

interface eth1
  static ip_address=192.168.1.1/24
I'm not setting a static IP for eth0 (the modem), so it's going to aquire an IP via DHCP. That's because my ISP, XFinity, uses DHCP to issue IPs. That's good enough for my needs! Note that not all ISPs hand out IPs with DHCP. Some require something more complex, like PPPoE. This isn't necessarily a roadblock and can be configured to work - I did it before at an old residence with pppoeconf. However, it's more complicated and won't be discussed here.
On eth1, we're establishing that the Pi's IP address will be 192.168.1.1, with a subnet mask of 255.255.255.0
13. Edit /etc/iptables/rules.4 on the Pi to match this file here. There's a lot going on here, so let's break it down a bit
The *nat section has 3 rules of interest.
-
The two PREROUTING rules route all DNS packets to the Pi-Hole, no matter where they were originally addressed. So, if you have a device that has a hard-coded DNS server, the Pi still processes the request. Nifty!
-
The MASQUERADE command is what NATs the packets between the private IP addresses and the public internet
The *filter section protects you
-
The
-A INPUT -i eth0 -m state --state RELATED,ESTABLISHED -j ACCEPTline makes the Pi accept any inbound packets that are a part of an established connection -
The
-A INPUT -i eth0 -j DROPline drops any other packets coming in from the internet. This means people won't be able to connect to the Pi across the internet -
The
-A FORWARD -i eth1 -m tcp -p tcp --dport 853 -j DROPlines prevents DNS over TLS
14. Edit /etc/sysctl.conf. Look for the line that has net.ipv4.ip_forward=1 and uncomment it. This enables forwarding packets between the network interfaces
15. Reboot the Pi.
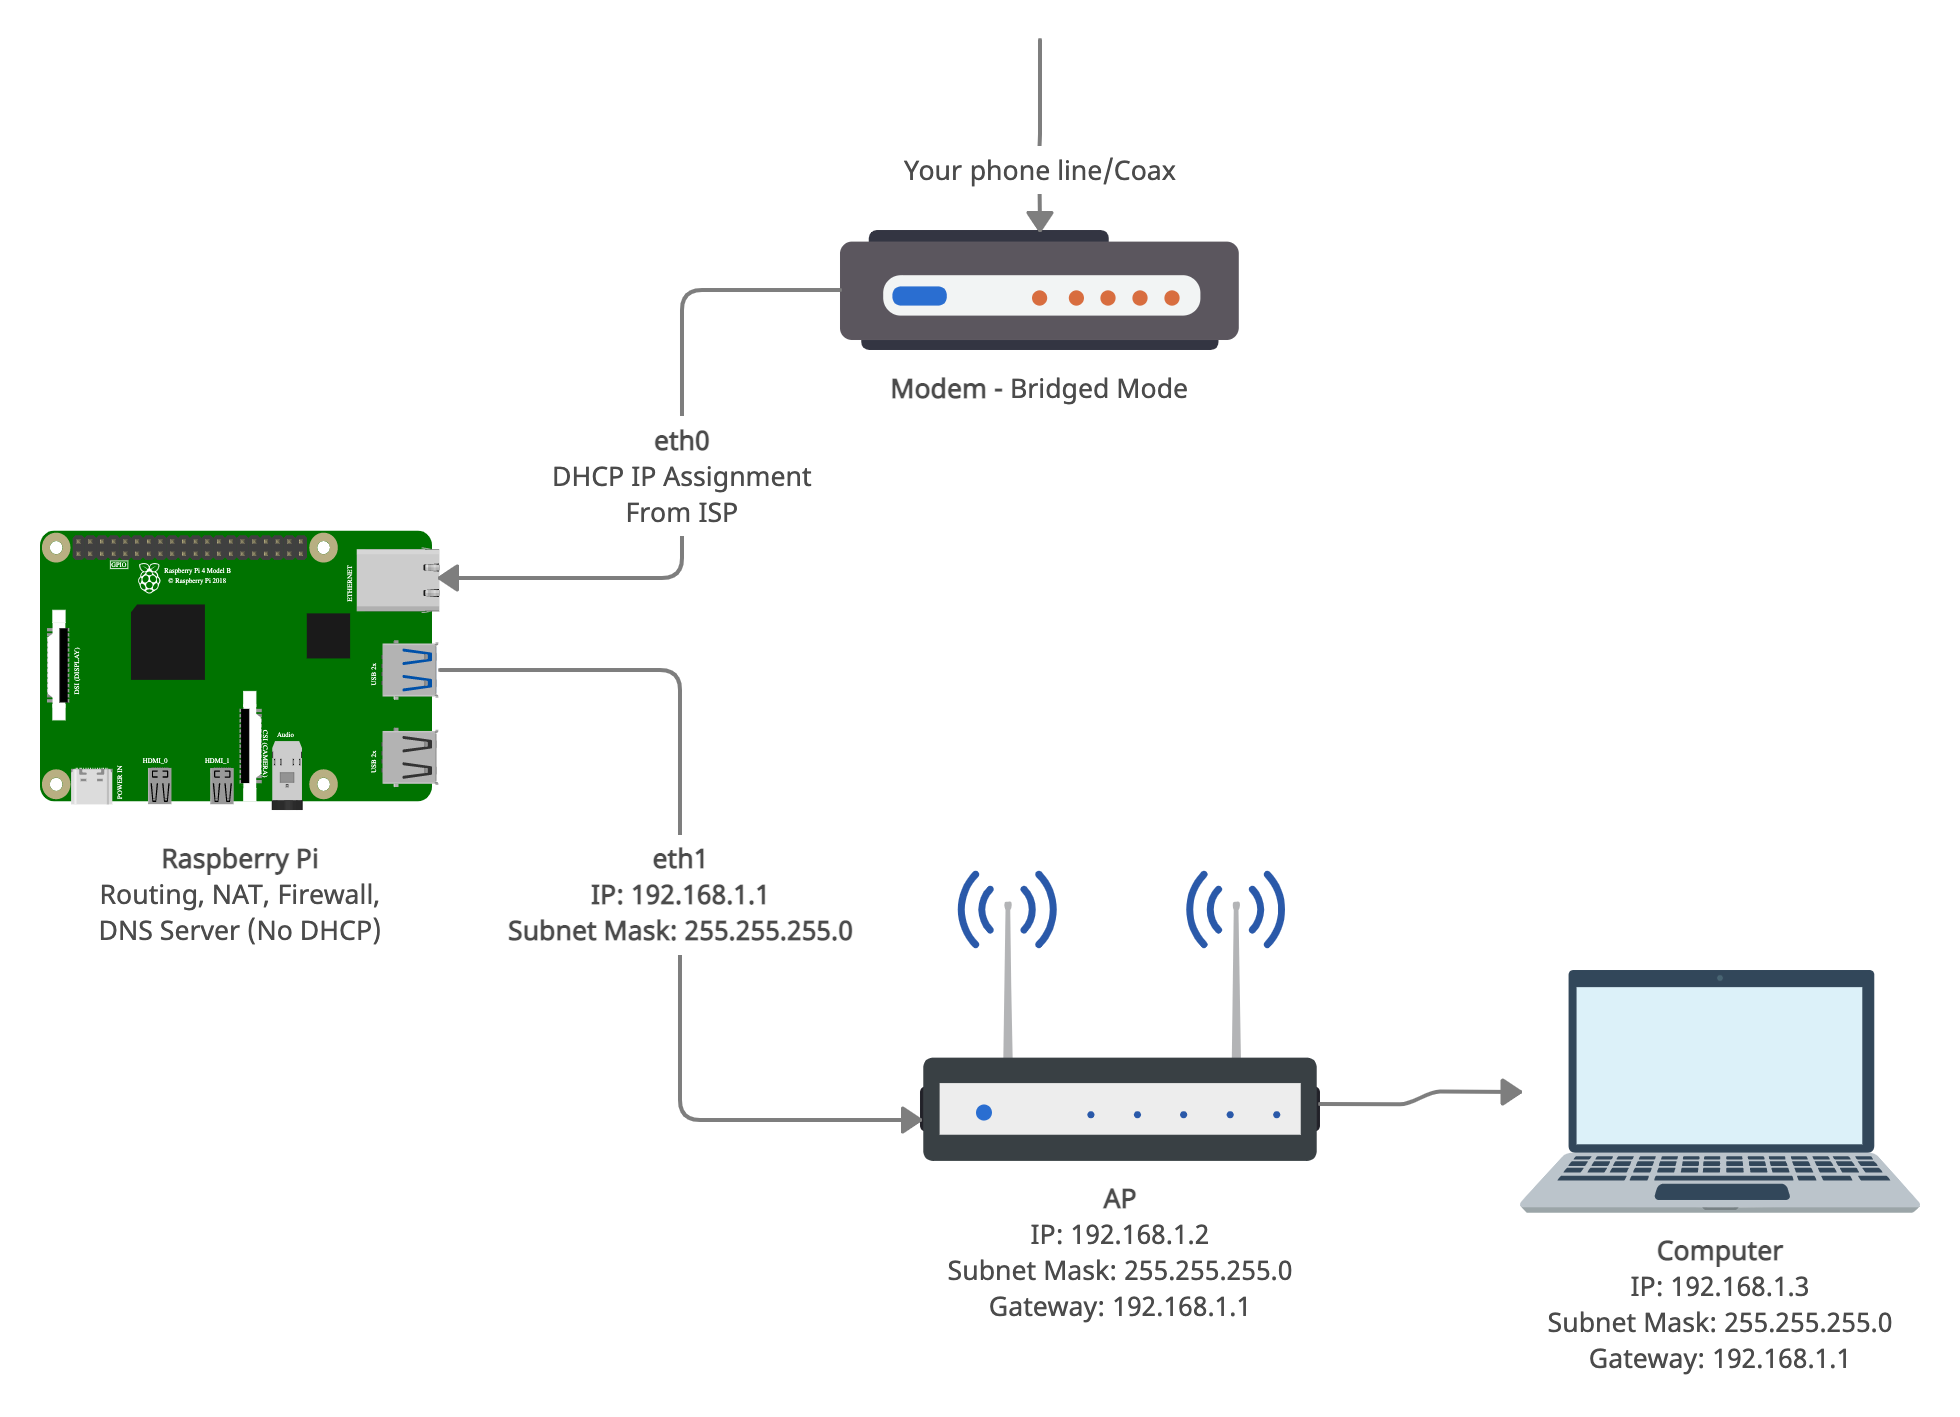
16. Once the Pi comes back up, you can connect a laptop to the AP's WiFi. Give the laptop a static IP:
IP: 192.168.1.3
Subnet Mask: 255.255.255.0
Gateway: 192.168.1.1
17. At this point, your new network should look something like this:
18. SSH into the pi from your laptop (use the 192.168.1.1 as the IP). Then, run pihole -r. When prompted, choose reconfigure. Choose "eth1" as the interface you're using (USB Ethernet). It should confirm that you're using 192.168.1.1 as the IP; go ahead and confirm those settings. Accept everything else
19. Edit /etc/dhcpcd.conf again and make sure it looks the same as you left it in step 12. Correct any edited lines.
20. Sign into the Pi-Hole web interface and do some basic configuration
DNS
-
Set "Interface Listening Behavior" to "Listen only on interface eth1"
-
Check "Never forward non-FQDNs"
-
Check "Never forward reverse lookups for private IP ranges"
DHCP
-
Check off "DHCP Server Enabled"
-
From: 192.168.1.100
-
To: 192.168.1.200
-
Router (gateway) IP address: 192.168.1.1
21. For good measure, reboot the pi again.
22. On the Pi, run ip -4 addr. It should looks something like this:
1: lo: <LOOPBACK,UP,LOWER_UP> mtu 65536 qdisc noqueue state UNKNOWN group default qlen 1000

    inet 127.0.0.1/8 scope host lo

       valid_lft forever preferred_lft forever

2: eth0: <BROADCAST,MULTICAST,UP,LOWER_UP> mtu 1500 qdisc mq state UP group default qlen 1000

    inet 1.2.3.4/21 brd 255.255.255.255 scope global dynamic noprefixroute eth0

       valid_lft 231933sec preferred_lft 191408sec

3: eth1: <BROADCAST,MULTICAST,UP,LOWER_UP> mtu 1500 qdisc pfifo_fast state UP group default qlen 1000

    inet 192.168.1.1/24 brd 192.168.1.255 scope global noprefixroute eth1

       valid_lft forever preferred_lft forever
Of interest, you want to make sure that you have a public IP address on eth0. eth1 should have an IP of 192.168.1.1.
23. Put your laptop's network configuration back to dynamic/DHCP.
OK, big moment: take a breath and try to load something on the internet. If you did everything right, you should be greeted with a successfully loaded web page!
If you want to test the rule that redirects all DNS to the Pi-Hole, configure 8.8.8.8 as a static DNS server on your laptop. It should still work, but you'll still see all queries on the Pi-Hole log and ads will be blocked. Neat!
IPv6
So far, we haven't handled IPv6 - just IPv4. If you don't need it, great! But, IPv6 is the future. There are places in the world that only offer IPv6-only internet already, so it would behoove you to learn it now. Besides, if you're reading this, you're the inquizitive type! So, here's how to get IPv6 working.
Note that your ISP must support IPv6 for this to work. You can use a 4to6 gateway, but that's outside the scope of this project.
1. Edit /etc/sysctl.conf and add the following lines:
    net.ipv6.conf.all.forwarding=1
    net.ipv6.conf.eth0.accept_ra=2
The first line enables forwarding of IPv6 Packets between network interfaces. The second one allows the Pi to accept Router Advertisements on eth0. This is necessary for automatic IPv6 configuration from your ISP
2. Edit /etc/dhcpcd.conf and configure it to look like this example here.
noipv6rs globally turns off router solicitations and acceptance of router advertisements.
waitip 6 means wait for an IPv6 address
Under eth0:
ipv6rs: accept router solicitation on this interface only. This is necessary for automatic IPv6 configuration from your ISP, and overrides the global noipv6rs
iaid 1
ia_pd 1/::/60 eth1/0/64
These two lines set the Interface Association Identifier (iaid) to 1, then requests a Delegated Prefix from it and assigns it to eth1. The 60 is the prefix length you get from your ISP, and the 64 is the length of the one you're assigning to eth1. You can get these numbers by inspecting network traffic from your router. I cheated and got it from here: https://www.reddit.com/r/ipv6/comments/deb531/linux_xfinity_dhcpcd_and_getting_a_local_prefix/
3. Create a new file named /etc/dnsmasq.d/05-pirouter.conf with the contents from here. This code does three things:
-
Broadcasts itself as the IPv6 DNS server
-
Sets the "search domain" to "lan." Make sure this matches the domain set in the Pi-Hole web interface under Advanced DHCP Settings
-
Enables both Router Advertisements for SLAAC, and DHCPv6 configuration. Announces self as IPv6 router
This setting really closely mirrors the one that gets set when you check off "Enable IPv6 support (SLAAC + RA)" in the Pi-Hole web interface. The difference is, this custom one also states in the Router Advertisement that it is the Router. By the way, definitely don't check off that box in the Pi-Hole Web Interface. It conflicts with this config.
4. Edit /etc/iptables/rules.v6 to match the file here. Again, there's a lot going on in this file, and it looks different from the IPv4 rules.
The *nat section is a bit of a no-no with IPv6... but I'm doing it anyway, just minimally
-
Forces IPv6 DNS requests to the Pi. You'll need to put your Pi's IPv6 address in here for this to work - make sure to edit the file! Prevents devices from using whatever random DNS server they're programmed for.
-
There's no MASQUERADE because all IPv6 devices are supposed to be directly addressable without a NAT
The *filter section protects you
-
The
-A INPUT -i eth0 -m state --state RELATED,ESTABLISHED -j ACCEPTline makes the Pi accept any inbound packets that are a part of an established connection -
The
-A INPUT -i eth0 -p ipv6-icmp -j ACCEPTline is needed for Neighbor Discovery and overall IPv6 functionality. It's possible to lock this down more, but that often breaks RFC compliance. This line does allow pinging your devices from the internet -
The
-A INPUT -i eth0 -j DROPline drops any other packets coming in from the internet. This means people won't be able to connect to your devices across the internet -
Those lines are repeated on the FORWARD chain as well to protect devices on the network. DHCP from eth0 is blocked as it is not needed or wanted.
-
The
-A FORWARD -i eth1 -m tcp -p tcp --dport 853 -j DROPline prevents DNS over TLS
5. Run pihole -r and reconfigure Pi-Hole with IPv6 Enabled. You can select all the default settings as it should read them correctly from last time, plus the new IPv6 address
6. Make sure /etc/dhcpcd.conf still looks like it does here.
7. Reboot the Pi, and disconnect/reconnect your devices to force them to refresh the connection
8. On the Pi, run ip -6 addr. It should look something like this (IP addresses anonymized to protect the innocent). The important part is that there is a public IP (non-fe80) on eth1
    1: lo: <LOOPBACK,UP,LOWER_UP> mtu 65536 state UNKNOWN qlen 1000

        inet6 ::1/128 scope host

           valid_lft forever preferred_lft forever

    2: eth0: <BROADCAST,MULTICAST,UP,LOWER_UP> mtu 1500 state UP qlen 1000

        inet6 fe80::eeee:eeee:eeee:eeee/64 scope link

           valid_lft forever preferred_lft forever

    3: eth1: <BROADCAST,MULTICAST,UP,LOWER_UP> mtu 1500 state UP qlen 1000

        inet6 2601:111:111:111::1/64 scope global dynamic noprefixroute

           valid_lft 233265sec preferred_lft 233265sec

        inet6 fe80::dddd:ddd:dddd:dddd/64 scope link

           valid_lft forever preferred_lft forever
8. On your device in your network, check if you have an IPv6 address. You can test it with https://ipv6-test.com/.
Doing other network analysis
Since the pi is sitting in the middle of all your internet traffic now, you can do all kinds of monitoring. I'm using ntopng to do that (https://www.ntop.org/products/traffic-analysis/ntop/). Ntopng is very powerful with a ton of features. It can show you the Layer-7 apps being used on your network, top talkers, top destinations, the countries the servers you're talking to are in, and much more. It has a free version, but I'm paying for the Pro embedded license (50 Euro) and I think it's worth every penny.
There's also simpler software around like darkstat. It can be installed with sudo apt install darkstat. https://unix4lyfe.org/darkstat/
Some other thoughts on the project
-
If your ISP supports IPv6 but you don't want to use it on your network, you should disable IPv6 completely. If you leave it enabled without configuring everything else, your Pi may be able to communicate across IPv6 without a firewall. That's no good! To fix the problem, disable IPv6 by adding the following lines to /etc/sysctl.conf:
net.ipv6.conf.all.disable_ipv6=1 net.ipv6.conf.default.disable_ipv6=1 net.ipv6.conf.lo.disable_ipv6=1 -
Blocking DNS over HTTPS is... somewhat possible. You can block port 443 on known DoH IPs, but you can't protect yourself from the little DoH servers nobody knows about. These are the ones you need to worry about anyway, so I find it's best to ignore DoH.
-
OSs other than Raspberry Pi OS will probably work, as long as Pi-Hole supports it. You'll certainly run into differences, however!
-
On the modem, bridged mode is needed to avoid a double-NAT. You can alternatively use the "DMZ" mode of most routers to forward packets to a static IP configured on eth0.
-
This is fully compatible with common methods of using unbound or cloudflared as your upstream DNS for Pi-Hole
-
I am also using PiVPN to set up OpenVPN. This seems to work well, but OpenVPN only seems to play nicely with IPv4. Oh well. Don't forget to forward port 1194 in your /etc/iptables/rules.4 file!
-
Pi-Hole is not necessary and you can use dnsmasq instead, but you're on your own for configuring it


