MCsniperPY
A Fast, async, and open source Minecraft name sniper.
- Asynchronous • MCsniperPY is asynchronous meaning it tends to be faster and more efficient than multithreaded name snipers
- Open source • MCsniperPY is open source, meaning you can look at everything that goes on behind the scenes to get you a name. This means you can be sure it doesn't steal your account.
- Fast • MCsniperPY is fast, but not so fast that your requests run out instantly.
Installing
Before you begin, make sure you have Python and Pip installed. To check if you have these installed run python3 -V and python3 -m pip -V. If you don't have these installed google "How to install python and pip for <insert your operating system here>". After that you can run this command to install MCsniperPY.
Installing Python for Windows
Go to the following link and download Python:
https://www.python.org/ftp/python/3.8.5/python-3.8.5-amd64.exe
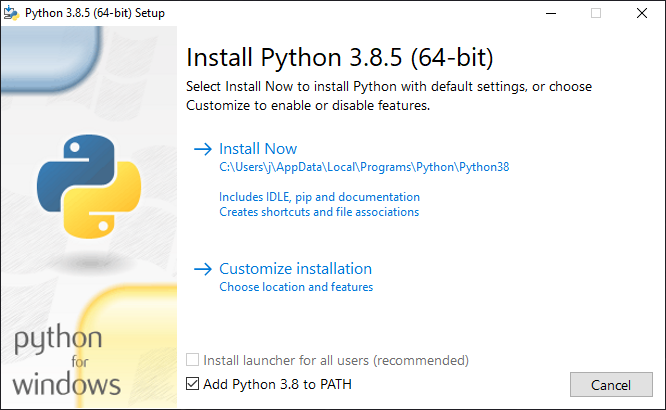
Once you have opened the installer, make sure that you add Python to path. Your installer should look like this:
Installing Python for MacOS.
Go to the following link and download Python:
https://www.python.org/ftp/python/3.8.5/python-3.8.5-macosx10.9.pkg
Installing Python for Linux
Since there are so many package installers for Linux, we are going to use apt used in Debian-derived distros such as Ubuntu as an example.
Go to the terminal and type in the following:
sudo apt update && sudo apt upgrade
sudo apt install -y python3 python3-pip
Installing MCsniperPY
Windows
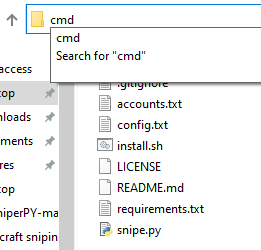
You now need to open a command prompt. Navigate to the folder you want to install MCsniperPY on and open the folder and typing cmd in the path:
Once you have a commant prompt open to the correct path, type the following commands:
py -m pip install mcsniperpy
Many windows users will have to run py -m mcsniperpy instead of the mcsniperpy command in the future sections of this readme. you'll want to always do this or it won't work.
If you get a message similar to this:
'py' is not recognized as an internal or external command, operable program or batch file.
then you will need to reinstall Python following the guide above, make sure that you added Python to PATH.
If you get a red error, with this message inside:
error: Microsoft Visual C++ 14.0 is required.
then you will need to download Microsoft Build Tools, you can do that by downloading the following program and installing Build Tools:
https://visualstudio.microsoft.com/thank-you-downloading-visual-studio/?sku=BuildTools
Otherwise, you have installed the correct dependencies and can follow on with the tutorial. If you have a problem and can't figure it out, feel free to ask in #support in the McSniperPY Discord server.
MacOS and Linux
python3 -m pip install mcsniperpy
If you get a message saying something like WARNING: The script mcsniperpy is installed in '/home/$USER/.local/bin' which is not on PATH. then run the command below. If that fails, try replacing bashrc with zshrc.
For Linux
echo "PATH=$PATH:/home/$USER/.local/bin" >> ~/.bashrc && source ~/.bashrc
For MACOS
echo 'export PATH="$PATH:$HOME/.local/bin"' >> ~/.zshrc && source ~/.zshrc
Installing Dimension 4
Sometimes your computer's time can come out of sync. If this happens to you then all of your name snipes will be inconsistent, meaning you can't figure out your delays properly and all of your snipes are just lucky. Dimension 4 fixes this. The UNIX equivalent to this is called chrony.
Download Dimension 4 from the following link (download is at the bottom of the page):
http://www.thinkman.com/dimension4/download.htm
Install Dimension 4, then open it.
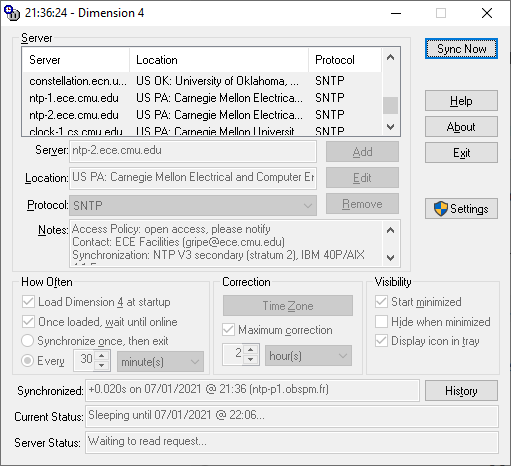
Click the "Sync Now" button at the top right, your time should now be synced.
You can check if your time is synced by visiting the following website:
Setup
Note: You do not need to read this paragraph to use the sniper. It may be helpful to you in the future though.
Something that MCsniperPY does differently than other snipers is it's method for loading accounts and your configuration. Rather than requiring you to be in a certain directory with your config and accounts file, MCsniperPY requires you to initialize it in a directory which will act as your "home" directory (not to be confused with your system's home directory). When you run mcsniperpy init, MCsniperPY does a lot of stuff under the hood. It starts by making (or not, if it already exists) a directory in $HOME or %userprofile% called .mcsniperpy and putting a "backend" configuration file, which contains a path to your current working directory (which is now your "home" directory for MCsniperPY) in that directory. This is where MCsniperPY looks to figure out where your accounts and config are. If you move or delete this directory or config file your sniper will not function until you run mcsniperpy init again. After that, it makes your config and accounts file in your current directory. Whenever you run the mcsniperpy snipe command from now on it will check that config file to find your accounts and main config file.
Initializing Your Sniper
Initializing your sniper is very simple. It's the same no matter what platform you're on. All you do is run the command shown below in a terminal / command prompt. It should do everything mentioned in "How Initialization Works" in the MCsniperPY documentation. to sum up that section, it makes a config and accounts file for you and then stores the path to both of those files so you don't have to worry about what directory you're in again!
mcsniperpy init
Pre-snipe
Before you start sniping, add your accounts to the accounts.txt file. Just open the accounts.txt file through your favorite program such as notepad or nano. The format for accounts.txt should be in the file, but in case it's not it is show below in the code block.
Note: accounts.txt is located in the directory you initialized MCsniperPY in.
# You can comment out lines (the sniper ignores them) by prefixing them with a hashtag #
# If you have security questions, then the format should look like as shown below:
email:password:answer:answer:answer
# Note: replace all of those answer's with the actual answers to your security questions.

# If you don't have security questions the format will look like this:
email:password

# IMPORTANT!!! If there is a colon in your email or password THIS WILL NOT WORK.
Awesome! Now that you've put your account(s) in the accounts.txt file it's time to configure the sniper to your liking. Just look for a file named config.ini in the same folder / directory as your accounts.txt, and open it with a text editor (notepad, or something else). You can edit the values to your liking.
Note that currently only Mojang accounts are supported.
Config.ini
[sniper]
timing_system = teun
auto_claim_namemc = no
snipe_requests = 3
timing_system: kqzz_api / namemc / teun (namemc does not work at times because cloudflare blocks the scraper, teun is the default value and works most of the time)
auto_claim_namemc: whether the namemc account is claimed automatically
snipe_requests: the amount of requests for every account in your accounts.txt File. (For Example: 10 Accounts = 30 Requests)
[accounts]
max_accounts = 1
authentication_delay = 500
start_authentication = 720
max_accounts: The maximum number of accounts allowed in your accounts.txt file before MCsniperPY warns you (1 is recommended)
authentication_delay: milliseconds between authorizing each account
start_authentication: minutes before droptime to authenticate
[skin]
change_skin_on_snipe = yes
skin_change_type = username
skin = notch
skin_variant = slim
change_skin_on_snipe: yes or no to automatically change the skin on snipe
skin_change_type: username / url / path
skin: depends on what you put at skin_change_type
- username: just the ign of another player
- url: complete url to a skin file or namemc url (For Example
 or https://namemc.com/skin/6eb76940096ed6ac)
 - path: path to a skin file (For Example
C:/Users/kqzz/Desktop/skin.png)
skin_variant: slim / classic
[announce]
announce_snipe = no
announcement_code =
webhook_urls =
webhook_format = sniped `{name}` with `{searches}` searches!
announce_snipe: yes / no announce snipe throught custom announce
announcement_code: announcement code (cannot be generated atm)
webhook_urls: webhook urls, separated by commas (if you have one url, then no need for any comma)
webhook_format: webhook format. see example above.
Offset
An offset is the time in milliseconds that the sniper starts to send requests before the name drop time. If a name drops at 10:00:59 and you tell the sniper to use a delay of 1000, the sniper will start sending the requests at 10:00:58 because 1000 milliseconds = 1 second.
Offsets are useful for 2 reasons — ping and server lag.
If you have high ping to Mojang's APIs (api.minecraftservices.com, not api.mojang.com - they're seperate servers) then using a higher ping is recommended, vice versa goes for lower pings. Note that MinecraftServices is hosted in Ashburn, Virginia.
If a lot of people are going for a username (you can usually determine this by the amount of views it has on NameMC) then Mojang's servers can lag. It's generally advised to use a higher delay when going for a name with high views.
Other people's delays in most cases won't work on your machine. Delays can depend on many things, including ping, network routes and even CPU speed.
How do I find an offset that works for me?
While finding an offset is now fairly easy, it still requires some manual tweaking. Start by running mcsniperpy offset-test --aim-for .1 in your terminal. After a little bit it should say [success] <offset> is a good offset! Start with that offset and tweak based on if you're early or late. Compare the droptime of the name to the time of the requests. if you are late, then that means your offset is too low. if you are early, that means your offset is too high. Keep tweaking until you find something that works for you!
Understanding the logs
When you attempt to snipe a name, you are given information about the requests that McSniperPY sends to Mojang's API. This information is in the following format:
[fail/success] [http status code] @ [timestamp]
The timestamp is the time that you got a response from mojang about your request
HTTP Status Codes
When the sniper sends requests to a server, it returns a HTTP Status Code. Mojang's API returns a status code based on what we requested, in terms of name sniping, the status codes and their meanings can be seen below:
| Status Code | Meaning |
|---|---|
| 200 | Sniped name successfully |
| 403 | Failed to snipe name |
| 429 | Account or IP is rate limited |
| 500 | Minecraft API issue |
Running the sniper
Now that you've got everything setup, it's time to try a snipe! You can start the sniper with one simple command! Just run the command shown below, enter in the necessary values (i'll cover offset later; it's the same as delay btw), press enter, and wait for the name to drop! Hopefully you get the name 
mcsniperpy snipe
You can now follow the onscreen instructions.
For advanced users
For this section, replace YOYRPYTHONPREFIX with py for Windows and python3 for MacOS or Linux.
Command line arguments
YOURPYTHONPREFIX -m mcsniperpy --help
Development install
# You need git, python, and pip installed for this to work
git clone https://github.com/MCsniperPY/MCsniperPY.git
cd ./MCsniperPY
git checkout recode
YOURPYTHONCOMMAND -m pip install --editable .
YOURPYTHONCOMMAND -m mcsniperpy --help
# You can now edit code / add features / whatever


